
Heater assembly - models without air conditioning (page 2 of 2)
- Make
- Land Rover
- Model
- Discovery II
- Section
- REPAIRS
HEATING AND VENTILATION
REPAIRS
80-23
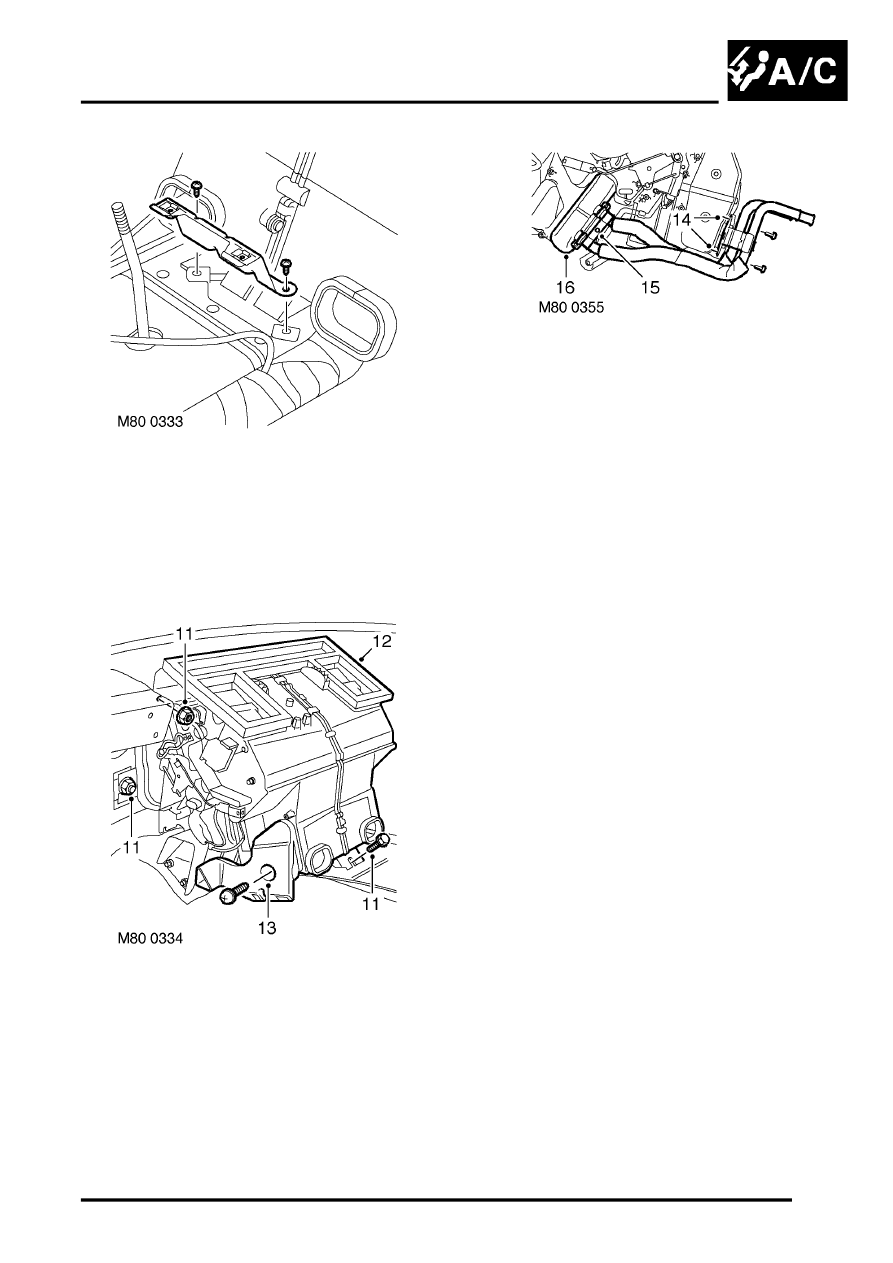
8. Remove 2 screws securing console bracket to
tunnel and remove bracket.
9. Release radio coaxial cable from behind heater
pipes.
10. Protect the carpet from coolant spillage.
11. Remove 4 nuts and 1 bolt securing heater to
body.
12. Remove heater from vehicle.
13. Remove 2 screws securing heater RH and LH
footwell outlet duct to heater casing and
remove ducts.
14. Remove 2 screws securing matrix pipe bracket
to heater casing.
15. Remove screw securing pipe clamp to heater
casing and remove clamp.
16. Carefully remove matrix from heater.
Refit
1. Fit matrix into heater casing.
2. Fit screws securing pipe bracket to heater
casing.
3. Fit pipe clamp and secure with screw.
4. Fit heater ducts and secure with screws.
5. Position heater assembly to vehicle, ensure
heater coolant pipe grommet is correctly
located in bulkhead and secure with nuts and
bolt.
6. Fit radio coaxial cable behind heater pipes.
7. Fit console bracket and secure with screws.
8. Connect drain tubes to base of heater.
9. Fit blower unit to heater and secure to body
with nuts and bolt.
10. Connect harness multiplug to blower motor.
11. Fit facia assembly
12. Connect heater hoses and secure with clips.
13. Diesel models: Fit engine cover and secure
with bolts.
14. Refill cooling system
l
ADJUSTMENTS, Drain and refill.
l
Parts & tools for this job Staging For Land Rover Discovery
- TOOLA/C manifold gauge setSearch: AC manifold gauge set
- TOOLUV leak detection kitSearch: AC UV leak detection kit
- PARTCabin filterSearch: Land Rover Discovery cabin filter
Links open Amazon search results in a new tab. As an Amazon Associate I earn from qualifying purchases.