
Differential assembly (page 10 of 18)
- Make
- Land Rover
- Model
- Discovery II
- Section
- OVERHAUL
TRANSFER BOX - LT230SE
OVERHAUL
41-55
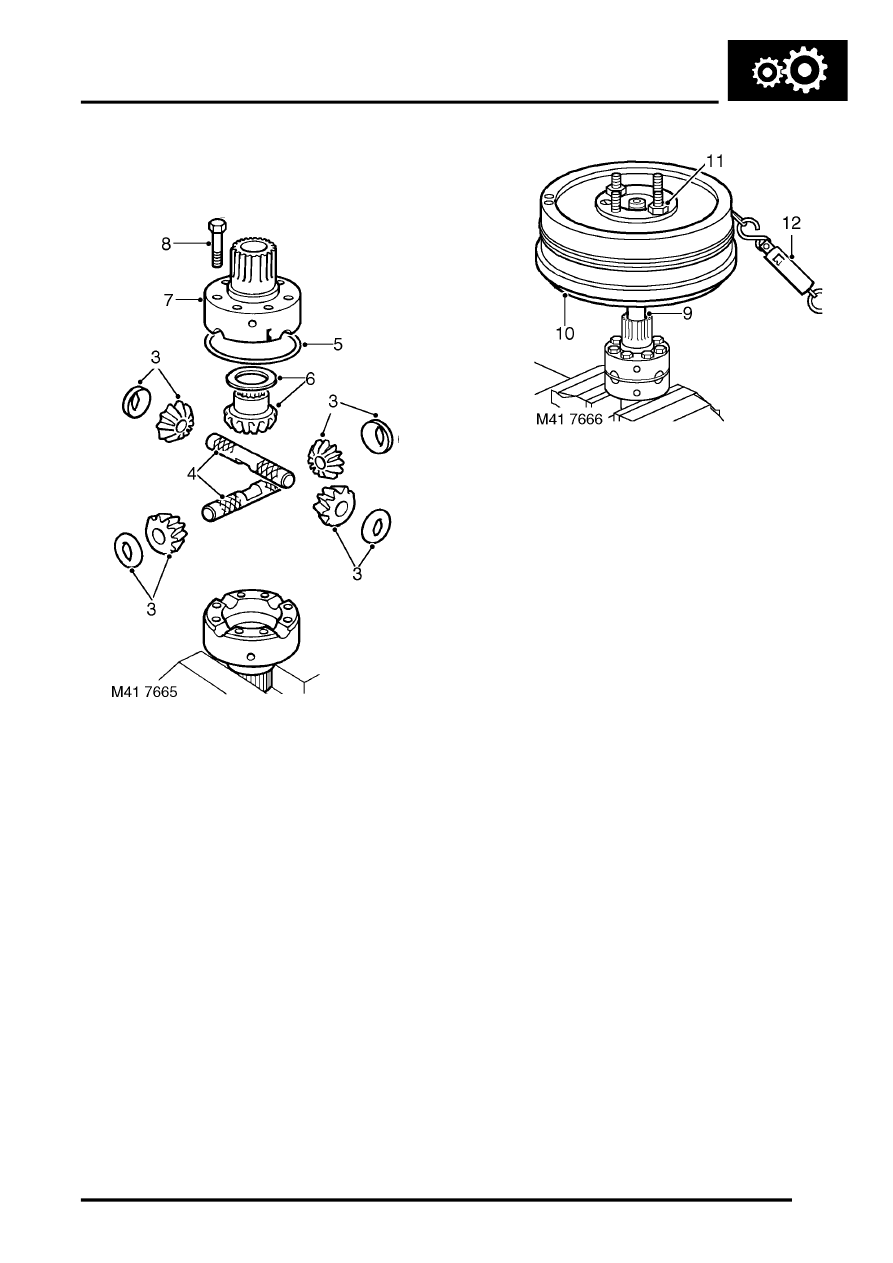
Reassembly
1. Lubricate all components with recommended
oil and lightly oil the differential bolt threads.
2. Secure rear half of differential carrier in a soft
jawed vice.
3. Fit each planet gear to its respective cross
shaft, fit new dished thrust washer to each
gear.
4. Fit cross shafts, planet gears and dished thrust
washers in rear half of carrier.Ensure that
cross shafts are fitted correctly. Do not fit
the sun gear into the rear half carrier at this
stage.
5. Fit retaining ring.
6. Fit a 1.05 mm (0.04 in) thrust washer to sun
gear from front half of carrier. Position gear in
front half of carrier.
7. Ensuring that assembly marks are aligned, fit
both halves of carrier together.
8. Fit the differential carrier bolts and, working in a
diagonal sequence, tighten the bolts to 60 Nm,
(44 lbf.ft).
9. Insert the front output shaft into the front half of
the carrier and check that the gears rotate
freely.
10. Fit output flange on to the splines of the output
shaft, but do not fit flange nut at this stage.
11. Fit transmission brake drum to output flange
and secure the drum using 2 nuts.
12. Secure a length of cord around the drum and
attach one end of the cord to a spring balance.
13. Pull on the spring balance and note the load at
which the brake drum starts to turn. Used
gears should rotate smoothly, while new
gears will have a 'notchy' feel as they rotate.
14. Compare the figure obtained with the following.
l
Used gears = 0.45 kg (1.0 lb)
l
New gears = 1.72 kg (3.8 lb)
15. If the load to turn figure is below the specified
limits, proceed as follows.
16. Remove the front output shaft and brake drum.
17. Remove the 8 bolts securing the two halves of
the differential carrier
18. Separate the differential carrier and remove the
sun gear and thrust washer from the front half.
19. Select a thicker thrust washer from the range
available. 5 different thrust washers are
available, rising in increments of 0.10 mm
(0.004 in) from 1.05 mm to 1.45 mm (0.04 to
0.06 in).
20. Repeat steps 7 to 19 as necessary until the
load to turn figure is as specified
21. When specified load to turn is obtained,
proceed as follows.
22. Remove the front output shaft and brake drum.
23. Remove the 8 bolts securing the two halves of
the differential carrier
24. Separate the differential carrier and remove the
sun gear and thrust washer from the front
half.Retain the selected thrust washer with
its sun gear.
Parts & tools for this job Staging For Land Rover Discovery
- TOOLTorque wrenchSearch: 3/8 inch torque wrench
- TOOLSocket setSearch: socket set metric
- BOOKHaynes manualSearch: Haynes manual Land Rover Discovery
Links open Amazon search results in a new tab. As an Amazon Associate I earn from qualifying purchases.