
Harness - engine - diesel
- Make
- Land Rover
- Model
- Discovery II
- Section
- REPAIRS › Harness - engine - diesel
HARNESSES
86-7-12 REPAIRS
Refit
1. Position engine harness around engine.
2. Connect oil pressure switch and camshaft
sensor multiplugs.
3. Fit and tighten bolt securing harness to LH side
of engine.
4. Connect both knock sensor multiplugs.
5. Connect battery cable and solenoid cable to
starter motor.
6. Position starter heat shield and secure with
bolt.
7. Clean exhaust flange mating faces, using a
new gasket align exhaust fit nuts and tighten to
60 Nm (44 lbf.ft).
8. Remove stand(s) and lower vehicle.
9. Position harness into footwell and secure
grommet.
10. Connect ECM multiplugs.
11. Position toe board and secure with trim fixings.
12. Connect engine harness to main harness
multiplug and secure earth lead.
13. Connect EVAP solenoid multiplug.
14. Connect both fuse box multiplugs.
15. Position starter lead to fuse box and secure
screw.
16. Fit fuse box cover.
17. Position battery positive lead to battery and
secure nut.
18. Secure harness to coolant rail.
19. Position alternator cables and tighten terminal
B+ to 18 Nm (13 lbf.ft) and terminal D+ to 5 Nm
(3.7 lbf.ft)
20. Connect coolant temperature sensor multiplug.
21. Connect A/C compressor multiplug.
22. Secure harness clip to rear of LH cylinder head.
23. Connect CKP sensor multiplug.
24. Secure injector harness and connect injector
multiplugs.
25. Connect coil multiplugs.
26. Connect and secure HS
2
O sensor multiplug
27. Fit upper inlet manifold.
SYSTEMS - V8, REPAIRS, Gasket - inlet
manifold - upper - Without Secondary Air
Injection.
28. Connect battery earth lead.
Harness - engine - diesel
$% 86.70.17
Remove
1. Remove engine acoustic cover.
2. Remove battery carrier.
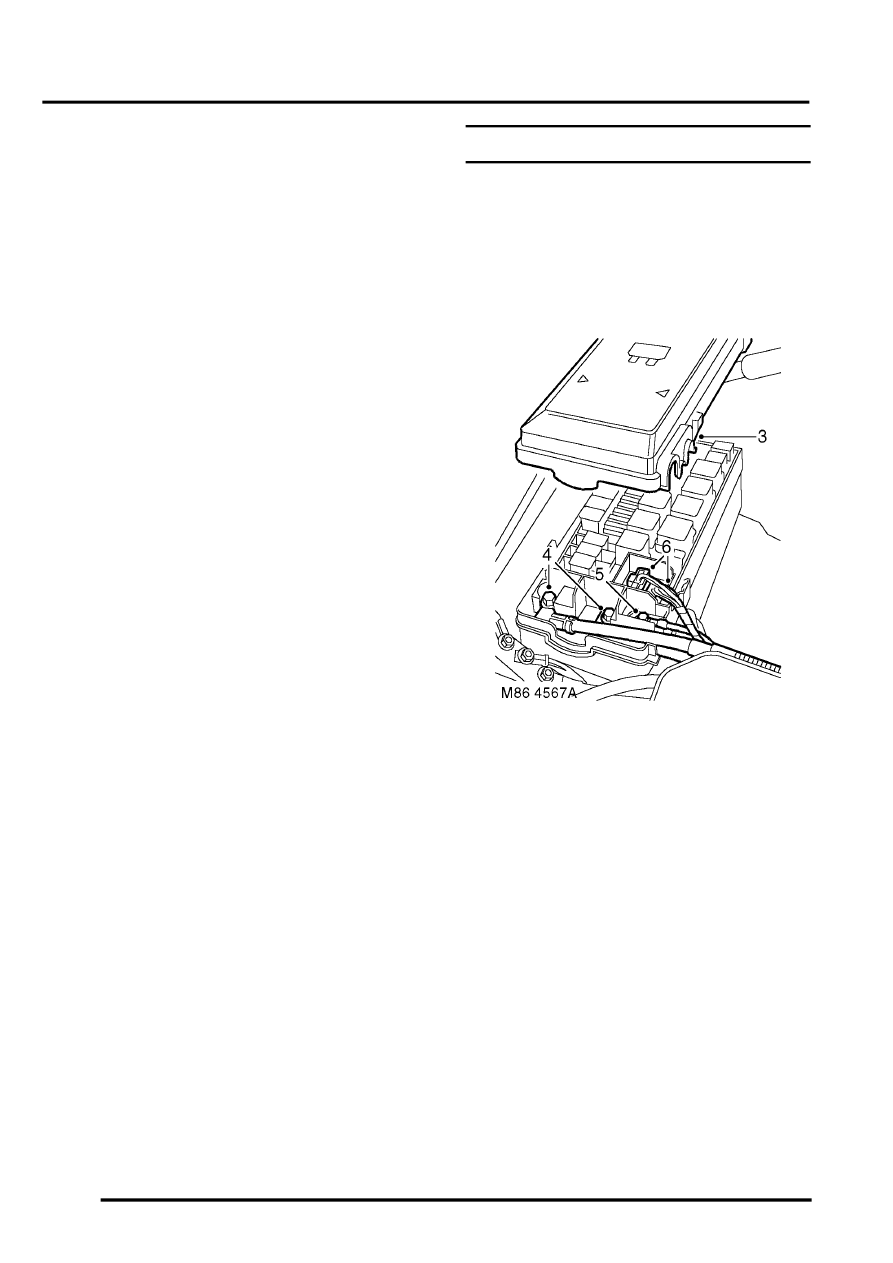
3. Remove engine compartment fuse box cover.
4. Remove bolts securing battery and alternator
leads to fuse box.
5. Remove bolt securing heater plug lead to fuse
box.
6. Disconnect 2 engine harness multiplugs from
fuse box.
Parts & tools for this job Staging For Land Rover Discovery
- PARTGlow plugsSearch: Land Rover Discovery glow plugs
- TOOLGlow plug socketSearch: glow plug socket
- TOOLDiesel compression testerSearch: diesel compression tester
Links open Amazon search results in a new tab. As an Amazon Associate I earn from qualifying purchases.