
Ball joint - lower - steering knuckle
- Make
- Land Rover
- Model
- Discovery II
- Section
- REPAIRS › Ball joint - lower - steering knuckle
FRONT SUSPENSION
REPAIRS
60-29
Refit
1. Clean upper ball joint location and surrounding
area of axle yoke.
2. Apply a 12 mm (0.5 in) wide yellow paint stripe
on axle yoke, adjacent to upper ball joint
location.
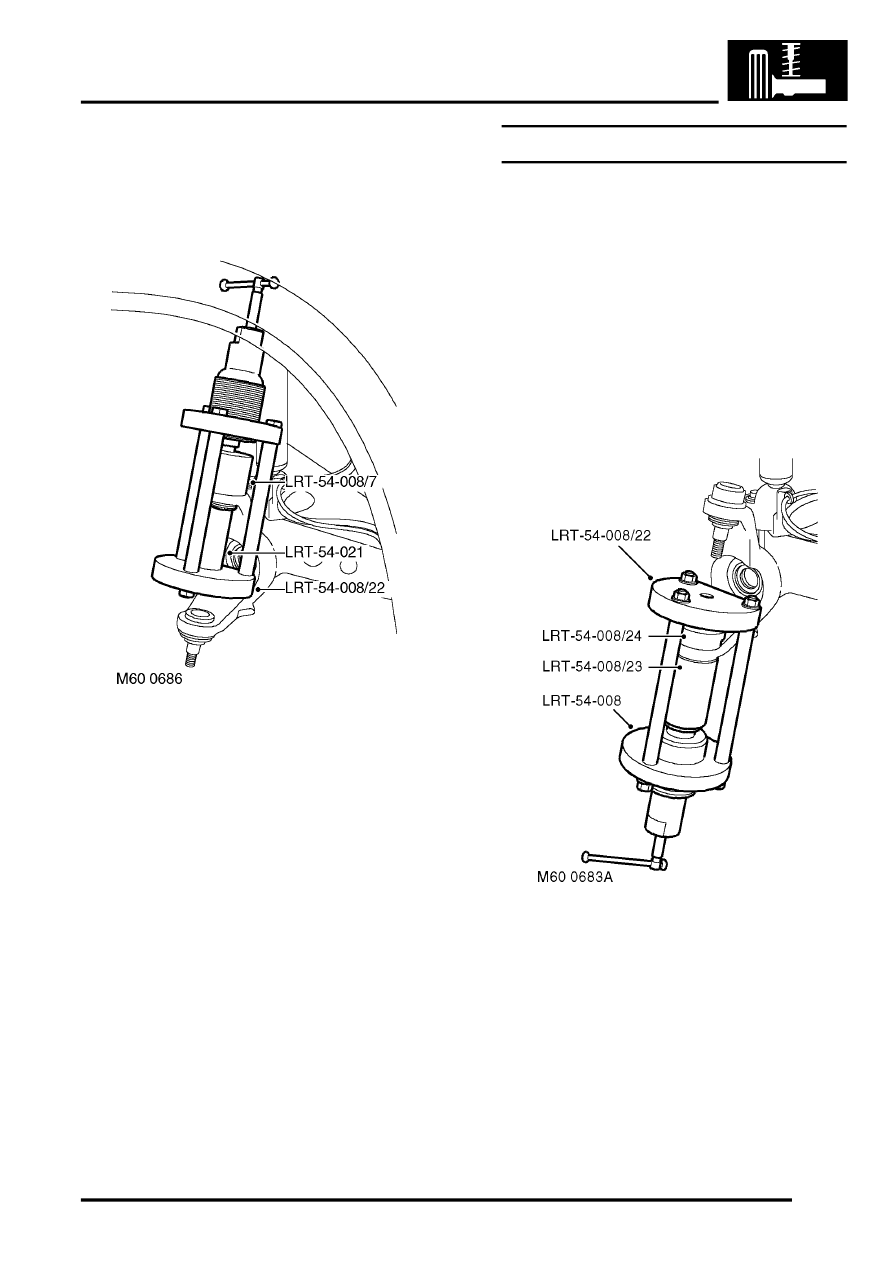
3. Fit tool LRT-54-021 to tool LRT-54-008, and
secure with the screw.
4. Fit tool LRT-54-008/7 to tool LRT-54-008 and
position tool assembly over ball joint and axle.
5. Align tool assembly and press upper ball joint
into axle yoke.
CAUTION: Damage to the joint boot will
result if the tool is not correctly aligned
during the fitting procedure.
6. Remove tools from axle yoke.
7. Clean the spring seats.
8. Position spring over damper and locate in cut-
out in spring seat.
9. Raise the front axle, fit bolts securing dampers
to front axle and tighten to 45 Nm (33 lbf.ft).
10. Fit chassis crossmember, fit bolts and tighten to
25 Nm (18 lbf.ft).
11. Locate brake hose bracket and tighten bolt to
20 Nm (15 lbf.ft).
12. Position anti-roll bar links to the axle, fit the nuts
and tighten to 100 Nm (74 lbf.ft).
13. Fit steering knuckle.
Ball joint - lower - steering knuckle
$% 60.15.03
CAUTION: Each ball joint can be replaced up to
three times before the axle yoke bore becomes
oversize. Before commencing work, thoroughly
clean surface of joint and check for yellow paint
marks approx. 12 mm (0.5 in) wide. If 3 marks are
found, the axle case must be renewed.
Remove
1. Remove steering knuckle.
2. Fit tool LRT-54-008/22 to tool LRT-54-008.
3. Fit tool LRT-54-008/24 to tool LRT-54-008 and
secure with screw.
4. Fit tool LRT-54-008/23 to underside of lower
ball joint.
5. With assistance, fit tool LRT-54-008 assembly
to lower ball joint.
6. Press ball joint from axle. When ram lead
screw reaches the end of its stroke, retract the
lead screw and screw the ram further into the
tool. Repeat the operation until the ball joint is
released from the axle.
7. Remove tools and the lower ball joint from axle
yoke.
Parts & tools for this job Staging For Land Rover Discovery
- TOOLTie rod end toolSearch: tie rod end puller
- TOOLBall joint separatorSearch: ball joint separator
- FLUIDPower steering fluidSearch: Land Rover power steering fluid
Links open Amazon search results in a new tab. As an Amazon Associate I earn from qualifying purchases.