
Door - tail
- Make
- Land Rover
- Model
- Discovery II
- Section
- REPAIRS › Door - tail
DOORS
REPAIRS
76-1-3
Door - tail
$% 76.28.19.99
Remove
1. Remove spare wheel from tail door.
2. Remove tail door trim casing.
DOORS, REPAIRS, Trim casing - tail
3. Carefully release water shedder from tail door.
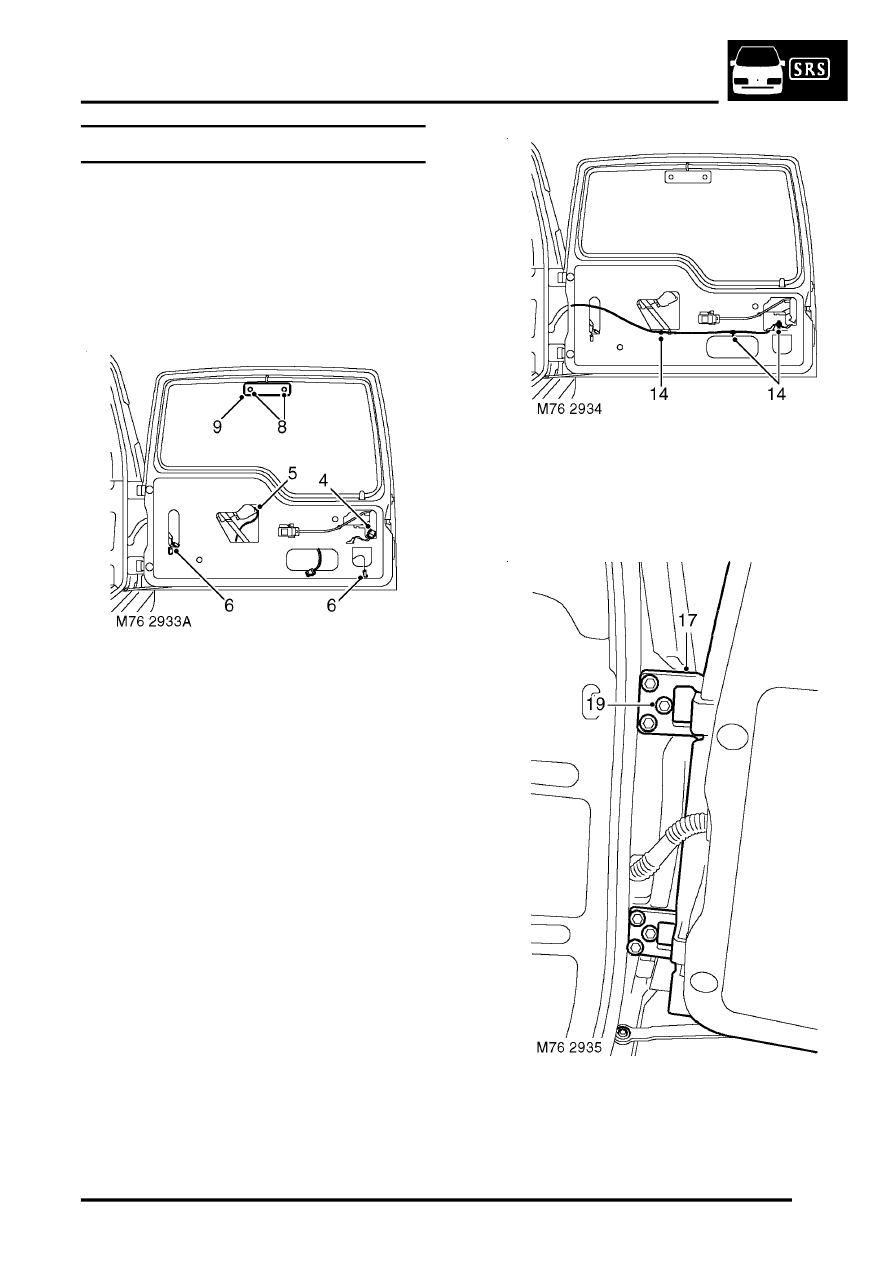
4. Disconnect multiplug from door latch.
5. Disconnect multiplug from rear wiper motor.
6. Disconnect 2 Lucars from Heated Rear
Window (HRW).
7. Disconnect multiplug from number plate lamp.
8. Remove 2 screws securing Centre High
Mounted Stop Lamp (CHMSL) cover to tail door
glass.
9. Remove CHMSL cover.
10. Disconnect 2 Lucars from CHMSL.
11. Attach draw string to CHMSL wires and draw
wires through tail door. Disconnect draw string
from wires.
12. Tape draw string in tail door to retain its
position.
13. Release washer tube from rear of wiper arm.
14. Release 3 clips securing harness to tail door.
15. Release harness sleeve from door outer edge
and feed harness and washer tube through
door.
16. Remove spring clip securing check strap to tail
door aperture and collect washer.
17. Mark position of hinges.
18. Support the tail door on a jack, using a block of
wood to protect the door.
19. Remove 6 bolts securing tail door hinges to
body and, with assistance, remove tail door.
Parts & tools for this job Staging For Land Rover Discovery
- TOOLTrim removal tool kitSearch: trim removal tool kit
- PARTTouch-up paintSearch: Land Rover touch up paint
- PARTPanel clip assortmentSearch: Land Rover panel clips assortment
Links open Amazon search results in a new tab. As an Amazon Associate I earn from qualifying purchases.