
AUTOMATIC GEARBOX - ZF4HP22 - 24 (Description): DESCRIPTION AND OPERATION (page 2 of 13)
- Make
- Land Rover
- Model
- Discovery II
- Section
- DESCRIPTION AND OPERATION
AUTOMATIC GEARBOX - ZF4HP22 - 24
DESCRIPTION AND OPERATION
44-5
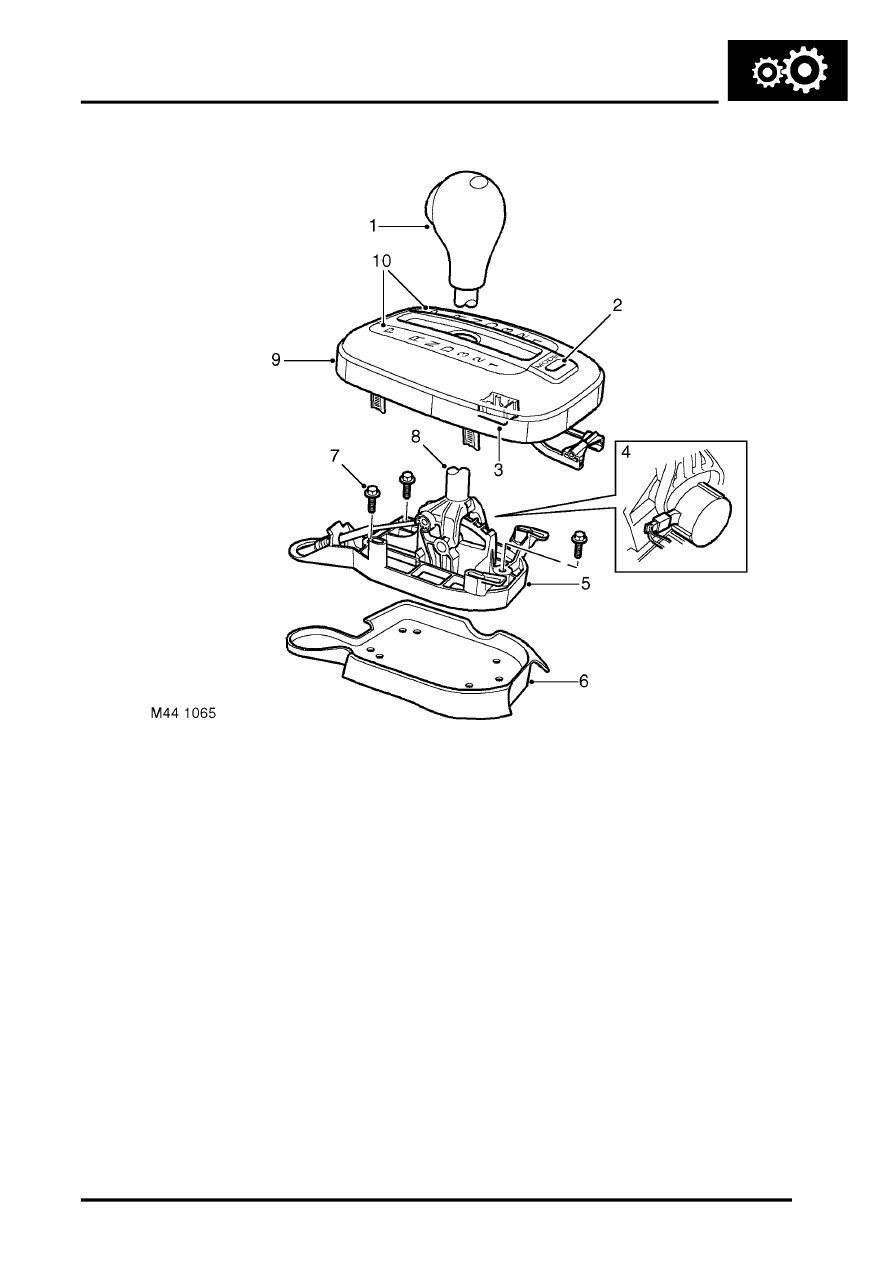
Selector lever assembly
1 Release button
2 Mode switch
3 Electrical connector
4 Interlock solenoid (where fitted)
5 Base
6 Gasket
7 Securing bolt
8 Lever
9 Cover
10 Position indicators
The selector lever assembly consists of a lever and a cover attached to a base. The base is located on a gasket and
secured to the transmission tunnel. The lever is hinged to the base. A latch in the lever engages with detents in the
base to provide the lever positions P, R, N, D, 3, 2, 1. The latch is disengaged by pressing a release button on the
lever knob. Except for lever movement between positions D and 3, the button must be pressed before the lever can
be moved. In some markets, vehicles incorporate an interlock solenoid at the bottom of the lever, which prevents the
lever being moved from P unless the ignition switch is in position II and the foot brake is applied. If the battery
becomes flat, the interlock system will prevent selector lever movement and removal of the ignition key.
The cover incorporates lever position indicators and the mode switch. The lever position indicators illuminate to show
the position of the selector lever. Illumination is controlled by the Body Control Unit (BCU). The mode switch is a non-
latching hinged switch that, when pressed, connects an earth to the EAT ECU to request a change of mode.
An electrical connector at the rear of the cover connects the selector lever assembly to the vehicle wiring.
Selector cable
The selector cable is a Bowden type cable that connects the selector lever assembly to a selector lever on the
gearbox. 'C' clips secure the ends of the outer cable to brackets on the selector lever assembly and the selector lever.
The inner cable is adjustable at the connection of the inner cable with the gearbox selector lever.
Parts & tools for this job Staging For Land Rover Discovery
- PARTTransmission filter kitSearch: Land Rover Discovery transmission filter kit
- FLUIDAutomatic transmission fluidSearch: Land Rover automatic transmission fluid
- TOOLFluid transfer pumpSearch: fluid transfer pump
Links open Amazon search results in a new tab. As an Amazon Associate I earn from qualifying purchases.