
Extension - gearbox rear (page 2 of 3)
- Make
- Land Rover
- Model
- Discovery II
- Section
- OVERHAUL
MANUAL GEARBOX - R380
OVERHAUL
37-39
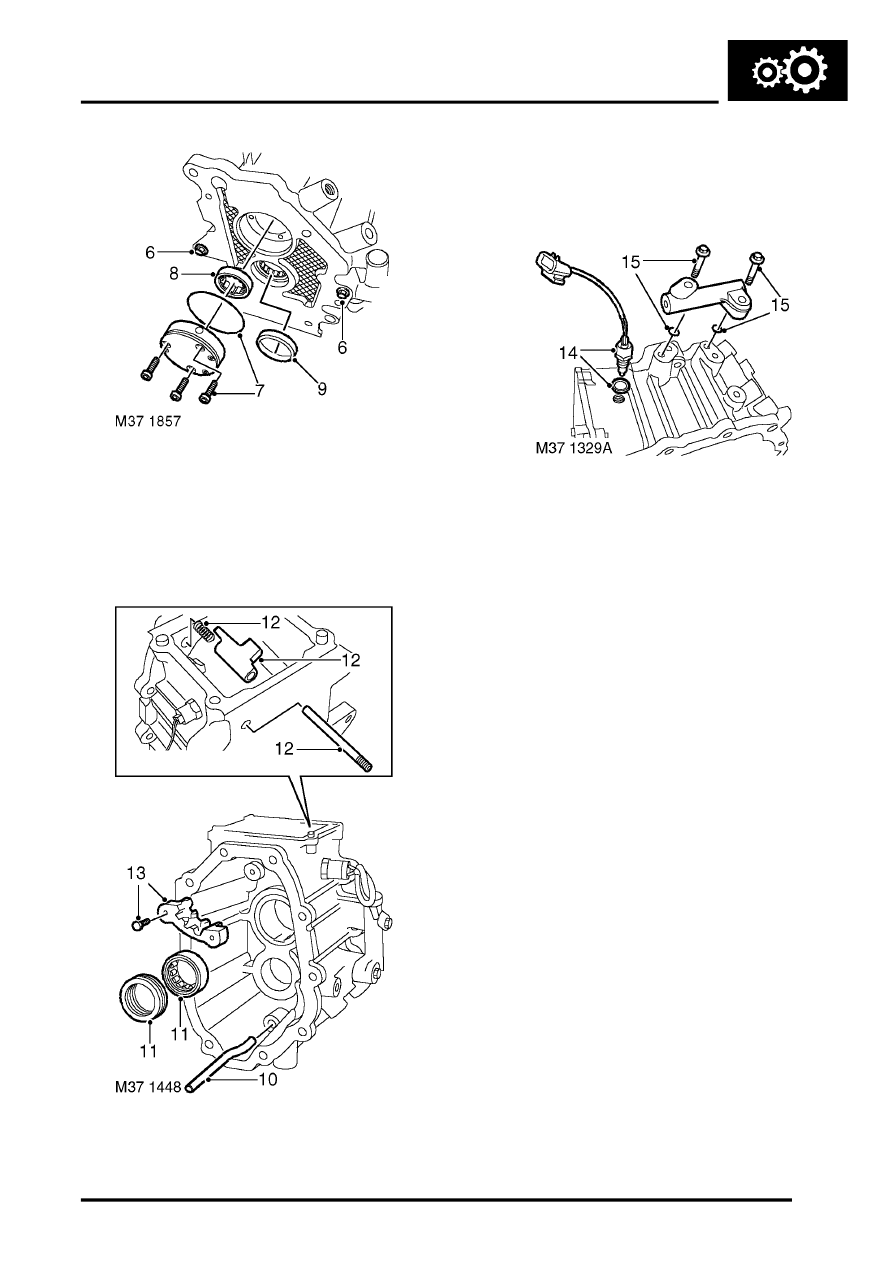
6. Fit 2 off 8x35 mm slave bolts to secure centre
plate to gearbox casing.
7. Remove 3 Torx screws, remove oil pump and
discard 'O' ring.
8. Drift out layshaft support bearing.
9. Remove and discard output shaft rear oil seal.
10. Remove oil pick-up pipe.
11. Drift out output shaft support bearing and oil
pick-up ring.
12. Remove reverse inhibitor shaft, cam and
spring.
13. Remove 2 bolts and remove gate plate.
14. Remove reverse light switch and discard
sealing washer.
15. Remove 2 bolts, remove oil cooler by-pass and
discard 'O' rings.
Reassembly
1. Clean extension housing and mating faces.
2. Clean oil cooler by-pass.
3. Using new 'O' rings, fit oil cooler by-pass and
tighten bolts to 15 Nm (11 lbf.ft).
4. Using new sealing washer, fit reverse light
switch and tighten to 24 Nm (17 lbf.ft).
5. Fit reverse inhibitor spring and cam.
6. Clean threads of reverse inhibitor shaft and
gate plate bolts.
7. Apply sealant, Part No. STC 50552 to threads
of reverse inhibitor shaft, fit and tighten shaft.
8. Apply sealant, Part No. STC 50552 to threads
of gate plate bolts.
9. Position gate plate and tighten bolts to 15 Nm
(11 lbf.ft).
10. Fit output shaft support bearing and oil pick-up
ring. Align tag with centre of drain slot.
11. Fit layshaft support bearing.
Parts & tools for this job Staging For Land Rover Discovery
- PARTClutch kitSearch: Land Rover Discovery clutch kit
- TOOLClutch alignment toolSearch: clutch alignment tool
- FLUIDGear oilSearch: Land Rover Discovery manual gearbox oil
Links open Amazon search results in a new tab. As an Amazon Associate I earn from qualifying purchases.