
Receiver drier and dual pressure switch (page 2 of 2)
- Make
- Land Rover
- Model
- Discovery II
- Section
- REPAIRS
AIR CONDITIONING
82-34
REPAIRS
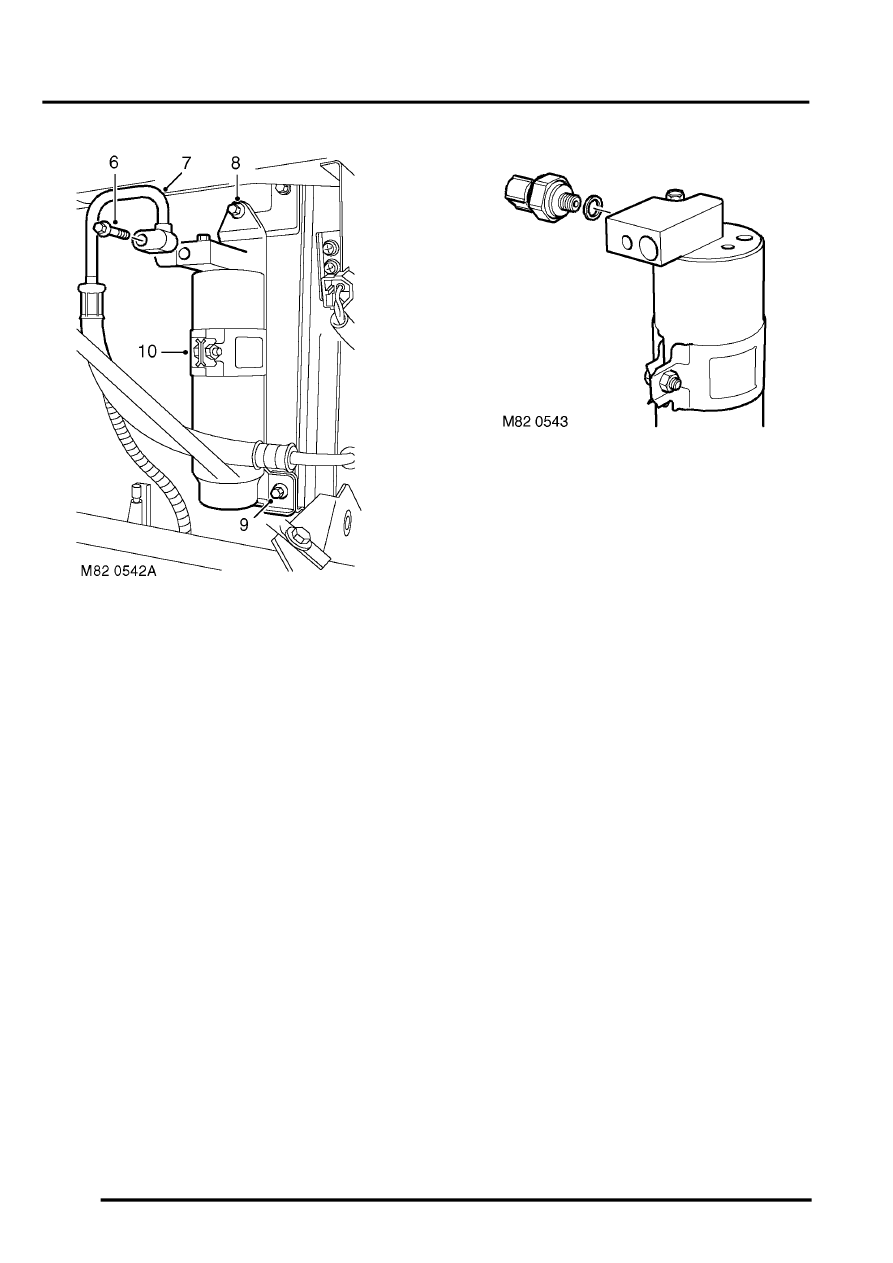
6. Remove bolt securing evaporator pipe to
receiver drier.
7. Disconnect evaporator pipe from receiver
drier.
CAUTION: Always fit plugs to open
connections to prevent contamination.
8. Remove bolt securing top of receiver drier
mounting bracket to condenser.
9. Remove bolt securing bottom of receiver drier
mounting bracket to condenser.
10. Remove receiver drier assembly.
11. Loosen mounting bracket clamping bolt.
12. Remove receiver drier from mounting bracket.
13. Remove dual pressure switch from receiver
drier
Refit
1. Fit dual pressure switch to receiver drier and
tighten to 10 Nm (7 lbf.ft).
2. Fit receiver drier to mounting bracket and
tighten clamping bolt.
3. Fit receiver drier assembly to condenser.
4. Fit bolts securing receiver drier mounting
bracket to condenser and tighten to 5 Nm (3.7
lbf.ft).
5. Remove caps from air conditioning pipes and
receiver drier.
6. Remove old 'O' rings from pipes.
7. Fit new 'O' rings to pipes and lubricate with
refrigerant oil.
8. Connect air conditioning pipes to receiver
drier.
9. Fit bolts securing air conditioning pipes to
receiver drier and tighten to 5 Nm (3.7 lbf.ft).
10. Connect multiplug to dual pressure switch.
11. Fit front grille.
12. Recharge air conditioning system.
RECOVERY, RECYCLING AND
RECHARGING, Refrigerant recovery,
recycling and recharging.
Parts & tools for this job Staging For Land Rover Discovery
- TOOLOBD2 scannerSearch: OBD2 scanner
- TOOLDigital multimeterSearch: automotive digital multimeter
- TOOLBack-probe test leadsSearch: back probe test leads
Links open Amazon search results in a new tab. As an Amazon Associate I earn from qualifying purchases.