
Bush - differential mounting - each (page 2 of 2)
- Make
- Land Rover
- Model
- Range Rover L322 Range Rover Service Procedures
- Section
- REPAIRS
FINAL DRIVE
REPAIRS
51-7
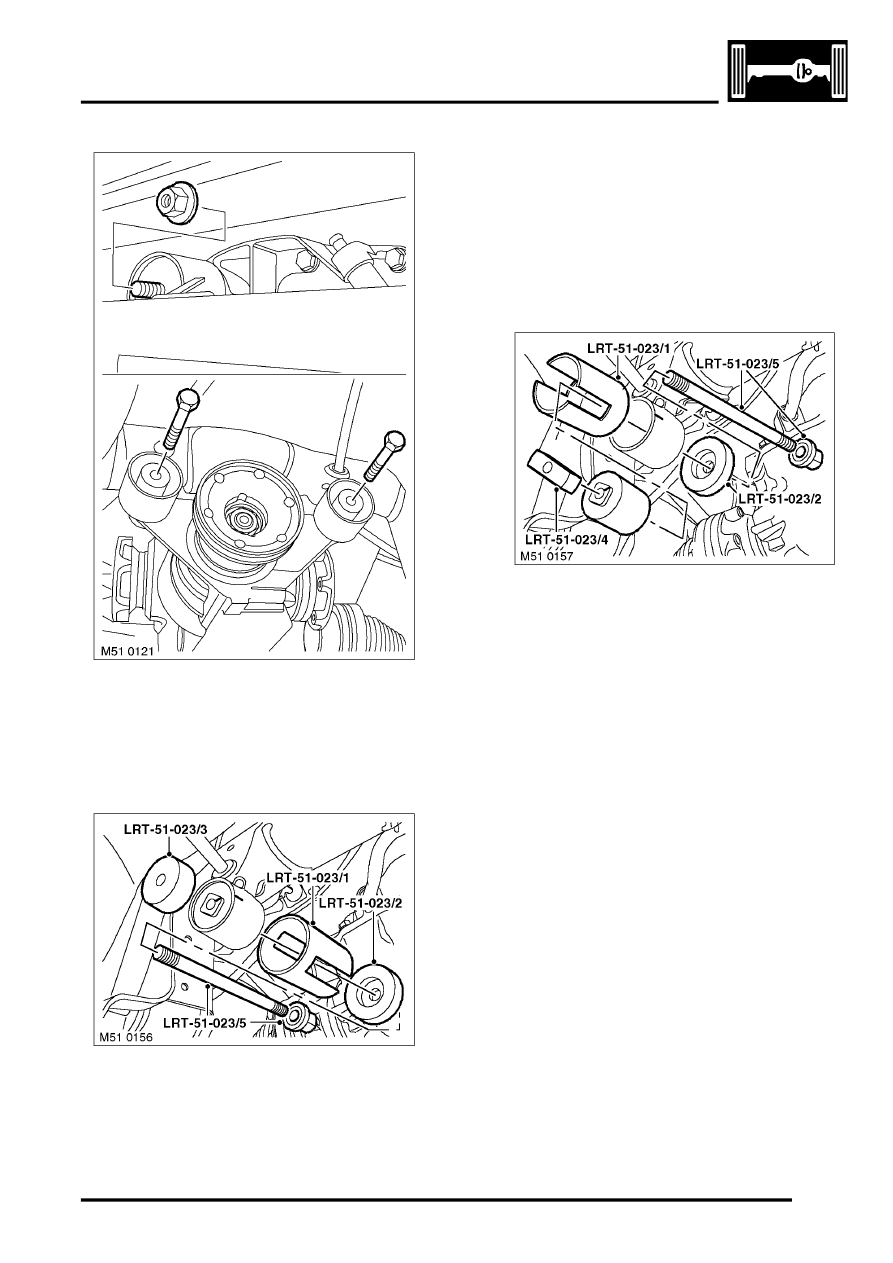
6. Remove and discard 2 bolts and 1 nut and bolt
securing differential to sub-frame mountings.
7. Carefully lower jack, allow differential and drive
shafts to rest on lower suspension arms.
8. Rotate differential through 90
°
for access.
9. Fit LRT-51-023/3 to LRT-51-023/5. Fit and
finger tighten nut.
10. Fit LRT-51-023/1.
CAUTION: Ensure slots face away from
bush.
11. Fit LRT-51-023/2 to LRT-51-023/1, fit nut to
drawbar and finger tighten.
12. Note fitted position of bush and paint mark sub-
frame.
13. Remove bush from rear sub-frame.
14. Dismantle tool and recover bush.
Refit
1. Clean bush housing and mating faces.
2. Apply rubber lubricant to new bush and bore.
3. Fit new bush to LRT-51-023/1.
4. Fit LRT-51-023/4 through LRT-51-023/1 to
retain bush.
5. Locate LRT-51-023-/5 through bush housing in
subframe and screw to LRT-51-023/4.
6. Fit LRT-51-023/2 to LRT-51-023/5. Fit and
finger tighten nut.
7. Fit bush to rear sub-frame.
CAUTION: Bush must be fitted so that it is
flush with differential mating face.
8. Remove and dismantle tool.
9. Position jack and raise differential into position.
10. Fit new bolts securing differential to subframe
and tighten bolts to 100 Nm (74 lbf.ft) and new
rear nut and bolt to 165 Nm (121 lbf.ft).
11. Remove support jack
12. Fit and secure differential breather pipe to clips
on body.
13. Fit rear propeller shaft.
DRIVESHAFTS, REPAIRS, Propeller
14. Connect battery earth lead.
Parts & tools for this job Staging For Land Rover Range Rover
- TOOLTorque wrenchSearch: 3/8 inch torque wrench
- TOOLSocket setSearch: socket set metric
- BOOKHaynes manualSearch: Haynes manual Land Rover Range Rover
Links open Amazon search results in a new tab. As an Amazon Associate I earn from qualifying purchases.