
CENTRE CONSOLE (page 2 of 2)
- Make
- Land Rover
- Model
- Range Rover P38
- Section
- REPAIR
76
CHASSIS AND BODY
NEW RANGE ROVER
6
REPAIR
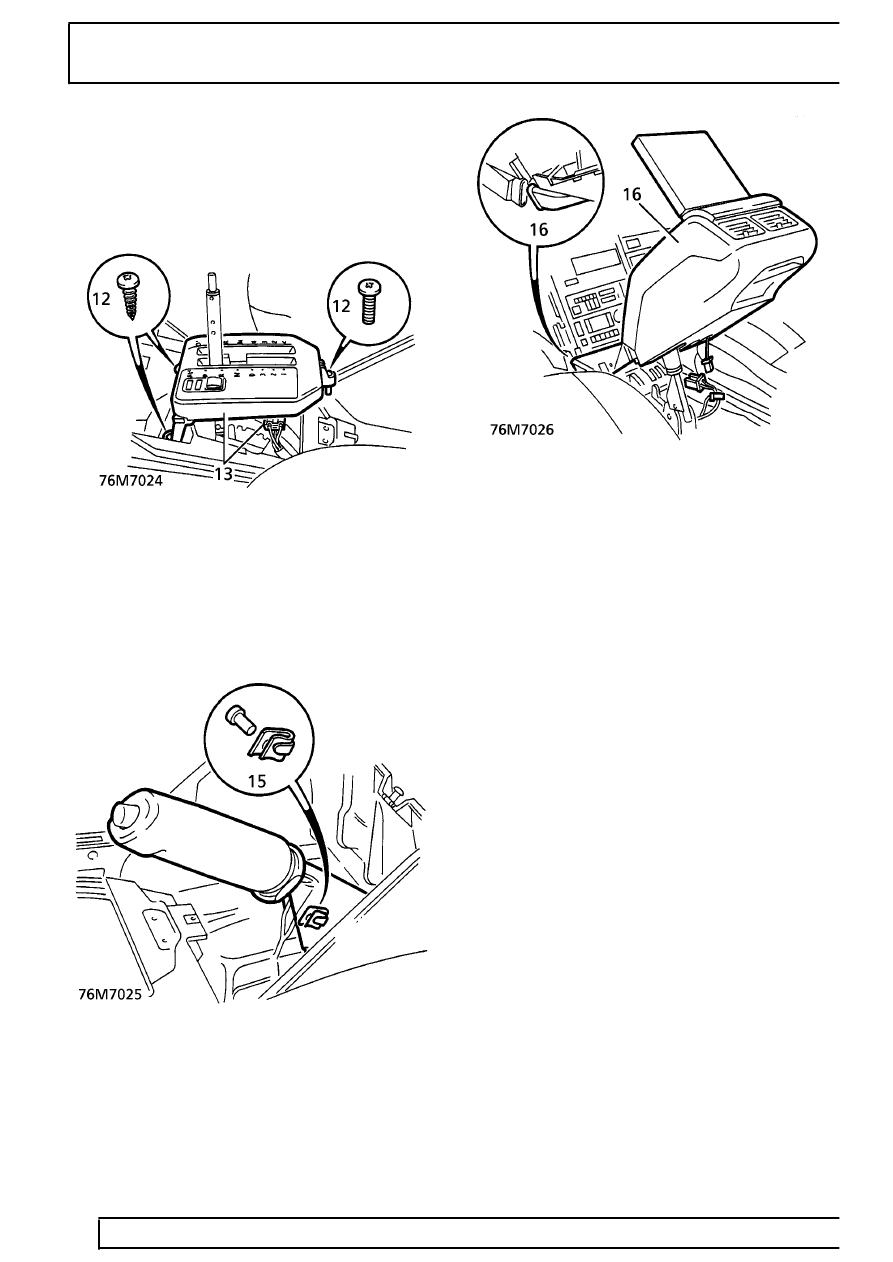
12. Remove 3 screws securing selector graphics
plate.
13. Raise selector graphics plate, disconnect
multiplug.
14. Remove selector graphics plate.
15. All models:
Remove clip securing park brake lever clevis pin,
remove clevis pin. Raise park brake lever to
vertical position.
16. Raise rear of console to disengage rear vent
ducts. Remove centre console.
Refit
17. Fit centre console, ensuring that ducts to rear
fresh air vents are correctly engaged.
18. Fit nuts securing centre console to floor.
19. Automatic - position graphics plate over selector
lever, connect multiplug.
20. Align graphics plate to console, secure with
screws.
21. Fit selector lever, secure with screws.
22. Manual - secure front of centre console to floor
with bolts.
23. Fit gear knob.
24. Lower park brake lever, fit clevis pin and secure
pin with clip.
25. Position gear/selector lever applique, connect
cigar lighter multiplug and insert illumination bulb
in holder.
26. Engage applique clips to console. Secure
applique with screw.
27. Position console side panels. Firmly push
forward to engage sprag clips into fascia switch
pack. Fit and tighten screws.
28. Return front seats to original positions.
29. Fit base to console bin, tighten with screws.
30. Connect rear footwell lamp multiplug.
31. Fit electric window switch pack.
See
ELECTRICAL, Repair.
Parts & tools for this job Staging For Land Rover Range Rover
- TOOLTrim removal tool kitSearch: trim removal tool kit
- PARTTouch-up paintSearch: Land Rover touch up paint
- PARTPanel clip assortmentSearch: Land Rover panel clips assortment
Links open Amazon search results in a new tab. As an Amazon Associate I earn from qualifying purchases.