
Gaiter - PAS rack
- Make
- Land Rover
- Model
- Freelander Service Procedures
- Section
- REPAIRS › Gaiter - PAS rack
STEERING
57-8
REPAIRS
Gaiter - PAS rack
$% 57.10.29
Remove
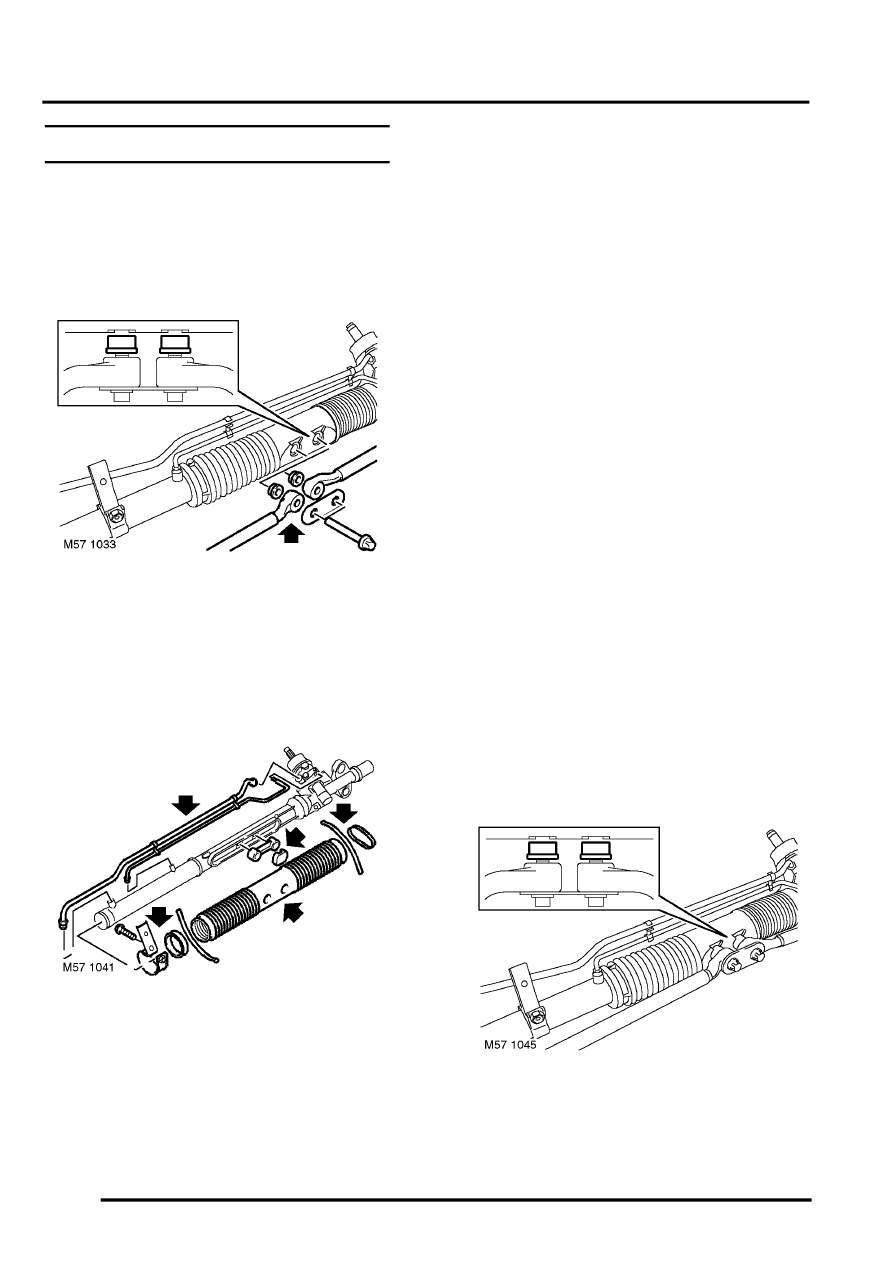
1. Remove PAS rack.
2. Hold PAS rack securely and remove 2 Torx
bolts securing track rods. Discard bolts.
3. Remove support plate.
4. Remove track rods and spacers.
CAUTION: Note orientation of spacers
before dismantling.
5. Remove clips from PAS rack ram feed pipes.
6. Loosen 4 pipe unions and remove both ram
feed pipes.
CAUTION: Always fit plugs to open
connections to prevent contamination.
7. Remove clamp bolt from fluid pipe support
bracket and remove bracket.
8. Remove 2 gaiter securing clips.
9. Remove gaiter sealing ring.
10. Remove gaiter.
11. Remove gaiter sealing band.
12. Remove slider and clip assembly.
13. Remove clip from slider.
Refit
1. Clean remains of lubricant from PAS rack slider
and clip.
2. Fit clip to slider and fit slider assembly to PAS
rack.
3. Apply grease supplied in the gaiter kit to
exposed rack shaft, slider and clip.
4. Fit gaiter sealing band.
5. Fit gaiter.
6. Fit gaiter sealing ring.
7. Align gaiter to slider and having ensured slider
is correctly located, use track rod securing bolts
to hold gaiter in position, without tightening
bolts, so to activate Loctite.
CAUTION: Do not screw bolts in more than
4 or 5 turns.
8. Ensure gaiter is not twisted, and fit gaiter
securing clips.
9. Fit fluid pipe support bracket and secure with
bolt.
10. Ensure pipe unions and rack ports are clean.
11. Fit both ram feed pipes and tighten small
diameter pipe to 18 Nm (13 lbf.ft)and large
diameter pipe to 24 Nm (18 lbf.ft).
12. Fit clips to pipes.
13. Remove track rod bolts securing bolts used to
align gaiter, fit spacers, track rods and support
plate to PAS rack.
CAUTION: Ensure spacers are aligned and
fitted correctly.
14. Hold track rods parallel with PAS rack and
tighten new Torx bolts to 100 Nm (74 lbf.ft).
15. Fit PAS rack.
Parts & tools for this job Staging For Land Rover Freelander
- TOOLTie rod end toolSearch: tie rod end puller
- TOOLBall joint separatorSearch: ball joint separator
- FLUIDPower steering fluidSearch: Land Rover power steering fluid
Links open Amazon search results in a new tab. As an Amazon Associate I earn from qualifying purchases.