
ENGINE - K SERIES KV6 (page 6 of 8)
- Make
- Land Rover
- Model
- Freelander Service Procedures
ENGINE - K SERIES KV6
12-3-112 OVERHAUL
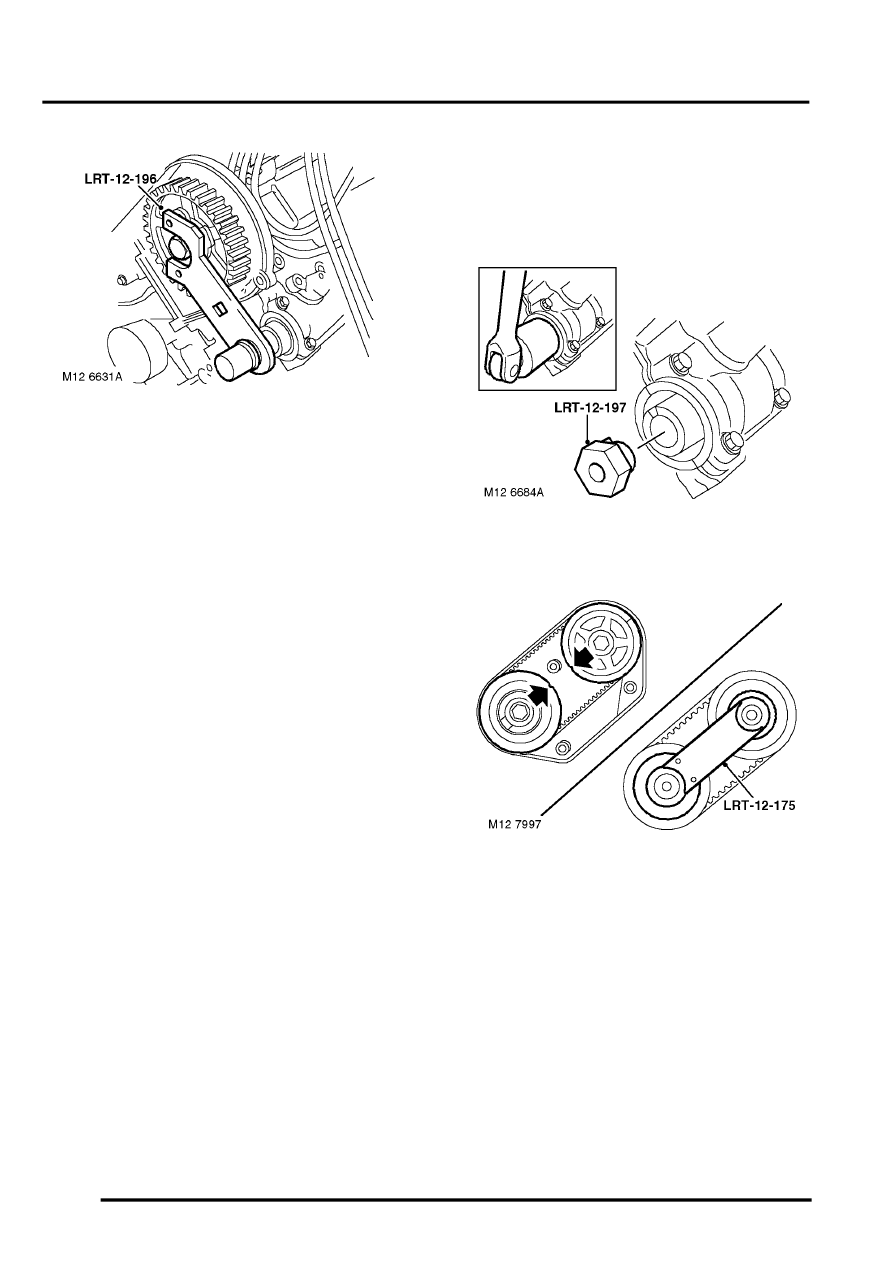
35. Position tools LRT-12-196 to LH and RH front
inlet camshaft gears and into the end of each
exhaust camshaft.
CAUTION: Special tools must be fitted when
tightening or loosening gear retaining bolts,
otherwise damage to camshafts may occur.
36. Remove and discard bolts retaining front inlet
camshaft gears to camshafts.
37. Remove tools LRT-12-196 from both inlet
camshaft gears and exhaust camshafts.
38. Remove camshaft drive gears and hub
assemblies.
Refit
NOTE: Following front or rear timing belt
refitment, it is possible that, after rotating the
engine and positioning the crankshaft pulley to
the 'SAFE' position, the timing marks on the
rear timing gears may be misaligned. This
misalignment is acceptable provided that the
timing belt refitting procedure was carried out
correctly.
1. Clean camshaft gears and hubs, crankshaft
gear, tensioner and water pump pulleys.
CAUTION: If sintered gears have been
subjected to prolonged oil contamination,
they must be soaked in solvent and then
thoroughly washed in clean solvent before
refitting. Because of the porous
construction of sintered material, oil
impregnated in the gears will emerge and
contaminate the timing belts.
2. Fit hubs to camshaft gears and fit gears to
camshafts.
3. Fit new camshaft gear bolts; tighten bolts
sufficiently to allow gears to rotate without
tipping.
4. Position timing belt to crankshaft gear.
NOTE: To prevent the timing belt from
disengaging from the crankshaft gear when
fitting, fit a suitable wedge between the belt and
oil pump belt guard.
5. Fit tool LRT-12-197 into each exhaust
camshaft in turn.
6. Using assistance, rotate each exhaust
camshaft slightly and align timing marks on LH
and RH rear camshaft gears.
7. Remove tool LRT-12-197.
8. Fit tools LRT-12-175 to LH and RH rear
camshaft gears.
9. Rotate both front camshaft gears fully
clockwise as viewed from front of engine.
10. Using fingers only, fit timing belt to gears,
starting at the crankshaft gear and working in
an anti-clockwise direction, keeping the belt run
as taut as possible and turning the camshaft
gears only a minimum amount anti-clockwise to
fit timing belt.
CAUTION: Gears must not be rotated anti-
clockwise more than one tooth.
Parts & tools for this job Staging For Land Rover Freelander
- PARTEngine gasket setSearch: Land Rover Freelander engine gasket set
- TOOLTorque wrenchSearch: 3/8 inch torque wrench
- TOOLFeeler gauge setSearch: feeler gauge set
Links open Amazon search results in a new tab. As an Amazon Associate I earn from qualifying purchases.