
Alternator - r.r.
- Make
- Lancia
- Model
- Thesis Factory Service Manual
- Year
- 2002–2009
- Section
- Current generation › Alternator - r.r.
ALTERNATOR - R.R.
Removing
- Position the vehicle on a lift.
- Open the boot and disconnect the negative battery terminal.
See in Op. 7040D50 ENGINE COMPARTMENT UPPER SOUND INSULATION SHIELD - R.R.
See in Op. 4450B04 Right FRONT WHEEL (one) - R.R.
See in Op. 7055B64 Engine compartment DUST SEAL in front wheel arch (one), left or right - R.R.
See in Op. 7055B54 PROTECTION/GUARD under engine - R.R.
See in Op. 1048A21 AIR INLET HOSE FROM INTAKE TO FILTER - R.R.
See in Op. 1048A28 vacuum air circuit resonator pipe - r+r
See in Op. 1008C10 Power unit REACTION ROD - Replace
See in Op. 1048A11 COMPLETE AIR FILTER -R.R.
See in Op. 1072B50 Air CHAMBER - R.R.
See in Op. 2710A31 INTERMEDIATE DRIVE SHAFT - R.R.
See in Op. 1084B30 CARTRIDGE ENGINE OIL FILTER -R.R.
See in Op. 1076B84 EXHAUST PIPE BETWEEN RIGHT PRECONVERTER AND CATALYTIC CONVERTER - R.R.
See in Op. 1080B39 RIGHT CATALYTIC PRECONVERTER - R.R. or Replace Gasket
See in Op. 1092G20 Engine components single belt FIXED TENSIONER - R.R.
See in Op. 1084A42 Engine oil pressure warning light SWITCH - R.R.
- Raise the vehicle.
- Position a container to collect the radiator coolant.
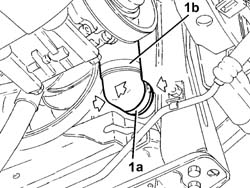
1. Open the rapid attachment band (1a) and disconnect the lower pipe (1b) from the radiator.
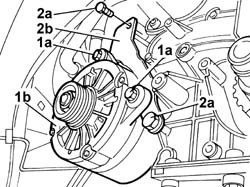
1. Completely loosen the upper and lower bolts (1a) fixing the alternator (1b) to the mounting.
2. Loosen the lower and the upper bolts (2a) fixing the bracket (2b).
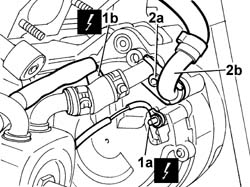
1. Undo the nuts fixing the alternator energizing (1a) and supply cables (1b).
| Description | Connector | |
|---|---|---|
| 1a | Alternator | A010A |
| Description | Connector | |
|---|---|---|
| 1b | Alternator | A010B |
- Position a container to collect the radiator coolant.
2. Undo the bolt (2a) fixing the water inlet/outlet pipes connector and disconnect the return pipe (2b) saving the seal.
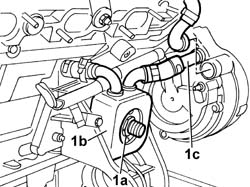
1. Undo the hexagonal nut (1a) located in the centre of the heat exchanger (1b) and move the heat exchanger as far to the side as is necessary to release the coolant inlet connector (1c) from the alternator, saving the seal.
- Remove the bolts fixing the alternator loosened previously and release the alternator from the wheel arch side.
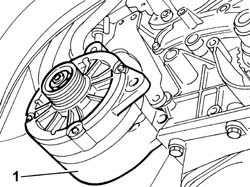
Refitting
- Position the alternator complete with bolts without tightening them.
- Position the coolant inlet connector complete with gasket on the alternator, then place the gearbox oil cooling radiator back in its housing and tighten the centre connector to the recommended torque.
| Value - daNm | Fastening | Component | Ø | |
|---|---|---|---|---|
| 3 | Connector | ENGINE OIL HEAT EXCHANGER | M18 X 1,5 |
- Position the coolant return connector, complete with seal, in the alternator housing and tighten the fixing bolt.
- Position the electrical connections for the alternator energizing and supply cables and tighten the fixing nuts.
| Description | Connector | |
|---|---|---|
| Alternator | A010A |
| Description | Connector | |
|---|---|---|
| Alternator | A010B |
| Value - daNm | Fastening | Component | Ø | |
|---|---|---|---|---|
| 0.9 | Nut | ALTERNATOR | M8 |
| Value - daNm | Fastening | Component | Ø | |
|---|---|---|---|---|
| 0.5 | Nut | ALTERNATOR | M8 |
- Tighten the upper and lower bolts fixing the alternator to the mounting.
- Tighten the upper and lower bolts fixing the spacer bracket to the recommended torque.
| Value - daNm | Fastening | Component | Ø | |
|---|---|---|---|---|
| 0.6 | Bolt | ALTERNATOR BRACKETS | M6 |
- Connect the lower engine coolant radiator pipe using the rapid connector band.
- Lower the vehicle.
See in Op. 1084A42 Engine oil pressure warning light SWITCH - R.R.
See in Op. 1092G20 Engine components single belt FIXED TENSIONER - R.R.
See in Op. 1080B39 RIGHT CATALYTIC PRECONVERTER - R.R. or Replace Gasket
See in Op. 1076B84 EXHAUST PIPE BETWEEN RIGHT PRECONVERTER AND CATALYTIC CONVERTER - R.R.
See in Op. 1084B30 CARTRIDGE ENGINE OIL FILTER -R.R.
See in Op. 2710A31 INTERMEDIATE DRIVE SHAFT - R.R.
See in Op. 1072B50 Air CHAMBER - R.R.
See in Op. 1048A11 COMPLETE AIR FILTER -R.R.
See in Op. 1008C10 Power unit REACTION ROD - Replace
See in Op. 1048A28 vacuum air circuit resonator pipe - r+r
See in Op. 1048A21 AIR INLET HOSE FROM INTAKE TO FILTER - R.R.
See in Op. 7055B54 PROTECTION/GUARD under engine - R.R.
See in Op. 7055B64 Engine compartment DUST SEAL in front wheel arch (one), left or right - R.R.
See in Op. 4450B04 Right FRONT WHEEL (one) - R.R.
See in Op. 0010T11 ENGINE OIL - Check level and top up if necessary
See in Op. 0010T21 ENGINE COOLANT - Check density and top up if necessary
See in Op. 7040D50 ENGINE COMPARTMENT UPPER SOUND INSULATION SHIELD - R.R.
- Connect the negative battery lead, then close the boot.
- Remove the vehicle from the lift.
Removing
- Position the vehicle on a lift.
- Open the boot and disconnect the negative battery terminal.
See in Op. 7040D50 ENGINE COMPARTMENT UPPER SOUND INSULATION SHIELD - R.R.
See in Op. 7055B54 PROTECTION/GUARD under engine - R.R.
See in Op. 4450B12 Front WHEELS (two) - R.R.
See in Op. 7055B42 FRONT WHEEL ARCH LINER (one), left or right - R.R.
See in Op. 7055B64 Engine compartment DUST SEAL in front wheel arch (one), left or right - R.R.
See in Op. 1092G10 Engine components single drive BELT - R.R.
See in Op. 1092A10 Auxiliary shaft pulley - R.R.
See in Op. 1092G14 Engine components single belt MOVING TENSIONER - R.R.
1. Open the protective cover (1a) and disconnect the alternator electrical connections (1b).
| Description | Connector | |
|---|---|---|
| 1b | Alternator | A010A |
| Description | Connector | |
|---|---|---|
| 1b | Alternator | A010B |
2. Undo the upper bolts (2a) and the lower bolts (2b) fixing the alternator to the mounting.
3. Remove the alternator from the housing on the mounting.
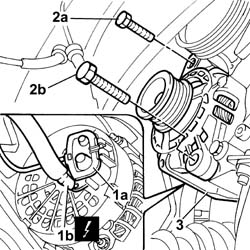
Refitting
- Place the alternator in the housing.
- Tighten the upper and lower fixing bolts to torque.
| Value - daNm | Fastening | Component | Ø | |
|---|---|---|---|---|
| 5 | Nut | ALTERNATOR ASSEMBLY | M10 X 1.25 |
| Value - daNm | Fastening | Component | Ø | |
|---|---|---|---|---|
| 7 | Nut | ALTERNATOR ASSEMBLY | M12 X 1.25 |
- Connect the electrical connectors and close the protective cover.
| Description | Connector | |
|---|---|---|
| Alternator | A010A |
| Description | Connector | |
|---|---|---|
| Alternator | A010B |
See in Op. 1092G14 Engine components single belt MOVING TENSIONER - R.R.
See in Op. 1092A10 Auxiliary shaft pulley - R.R.
See in Op. 1092G10 Engine components single drive BELT - R.R.
See in Op. 7055B64 Engine compartment DUST SEAL in front wheel arch (one), left or right - R.R.
See in Op. 7055B42 FRONT WHEEL ARCH LINER (one), left or right - R.R.
See in Op. 4450B12 Front WHEELS (two) - R.R.
See in Op. 7055B54 PROTECTION/GUARD under engine - R.R.
See in Op. 7040D50 ENGINE COMPARTMENT UPPER SOUND INSULATION SHIELD - R.R.
- Connect the negative battery terminal.
- Remove the vehicle from the lift.
Removing
- Position the vehicle on a lift.
- Open the boot and disconnect the negative battery terminal.
See in Op. 7055B54 PROTECTION/GUARD under engine - R.R.
See in Op. 4450B04 Right FRONT WHEEL (one) - R.R.
See in Op. 7055B42 FRONT WHEEL ARCH LINER (one), left or right - R.R.
See in Op. 7055B64 Engine compartment DUST SEAL in front wheel arch (one), left or right - R.R.
See in Op. 1016A10 SOUND-PROOFING COVER - R.R.
See in Op. 7040D50 ENGINE COMPARTMENT UPPER SOUND INSULATION SHIELD - R.R.
See in Op. 1048B44 RIGID air supply PIPE from heat exchanger to intake manifold - R.R.
See in Op. 1048A56 UPPER RESONATOR - R.R.
See in Op. 1092G10 Engine components single drive BELT - R.R.
See in Op. 1092A10 Crankshaft PULLEY - R.R.
See in Op. 1092G15 Engine components single belt MOVING TENSIONER - R.R. with belt removed
1. Undo the two retaining bolts (1a) and remove the power assisted steering pump guard (1b).
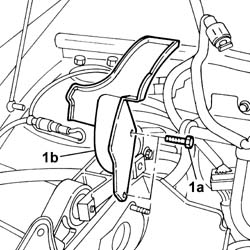
1. Undo the fixing bolts (1a) and remove the alterantor rear mounting bracket (1b).
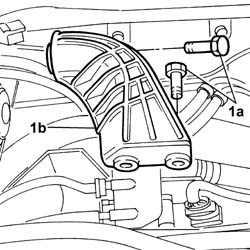
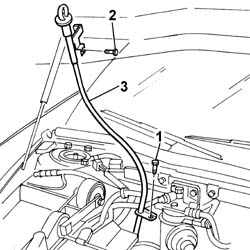
1. Undo the lower bolt securing the engine oil dipstick tube.
- Lower the lift.
2. Undo the upper bolt securing the engine oil dipstick tube.
3. Release the coupling for the engine wiring from the fastening on the pipe, then remove the engine oil dipstick pipe from the top part of the engine compartment.
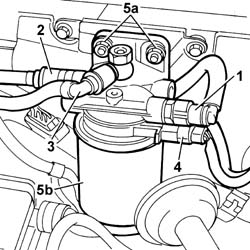
1. Disconnect the front fuel supply pipe from the fuel filter.
2. Disconnect the supply pipe to the pressure pump from the fuel filter.
3. Disconnect the supply pipe to the fuel return manifold from the fuel filter.
4. Disconnect the electrical connections (4a) and (4b) for the diesel heating resistances.
| Description | Connector | |
|---|---|---|
| 4a | Diesel pre-heating resistance | O020A |
| Description | Connector | |
|---|---|---|
| 4a | Diesel pre-heating resistance | O020B |
- Disconnect the electrical connection for the water presence sensor.
| Description | Connector | |
|---|---|---|
| Water in diesel filter sensor | K031 |
5. Undo the fixing nuts (5a) and remove the fuel filter assembly (5b).
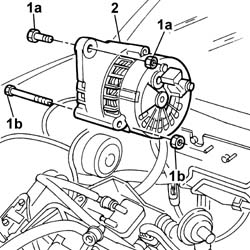
- Open the protective cover (1a) and disconnect the alternator electrical connections (1b).
| Description | Connector | |
|---|---|---|
| Alternator | A010A |
| Description | Connector | |
|---|---|---|
| Alternator | A010B |
1. Undo the upper bolts (1a) and the lower bolts (1b) fixing the alternator to the mounting.
- Lower the vehicle.
2. Remove the alternator from the housing in the mounting releasing it via the top of the engine compartment.
Refitting
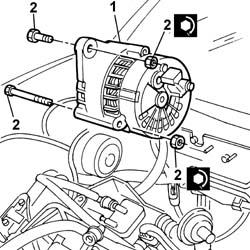
1. Place the alternator in the housing.
- Raise the vehicle.
2. Tighten the upper and lower fixing bolts to torque.
| Value - daNm | Fastening | Component | Ø | |
|---|---|---|---|---|
| 2 | 5 | Nut | ALTERNATOR ASSEMBLY | M10 X 1.25 |
| Value - daNm | Fastening | Component | Ø | |
|---|---|---|---|---|
| 2 | 7 | Nut | ALTERNATOR ASSEMBLY | M12 X 1.25 |
- Connect the electrical connectors and close the protective cover.
| Description | Connector | |
|---|---|---|
| Alternator | A010A |
| Description | Connector | |
|---|---|---|
| Alternator | A010B |
- Fit the fuel filter assembly and tighten the fixing nuts to torque.
| Value - daNm | Fastening | Component | Ø | |
|---|---|---|---|---|
| 2.4 | Nut | FUEL FILTER | M8 |
- Connect the electrical connections for the sensors.
| Description | Connector | |
|---|---|---|
| Water in diesel filter sensor | K031 |
| Description | Connector | |
|---|---|---|
| Diesel pre-heating resistance | O020A |
| Description | Connector | |
|---|---|---|
| Diesel pre-heating resistance | O020B |
- Connect the fuel pipes disconnected previously.
- Fit the engine oil dipstick pipe in the top part of the engine comparement.
- Secure the engine cable coupling to the engine oil dipstick pipe.
- Raise the vehicle.
- Tighten the lower bolt securing the engine oil dipstick tube.
- Fit the rear alternator mounting bracket and tighten the fixing bolts.
- Fit the power assisted steering pump guard and tighten the retaining bolts.
See in Op. 1092G15 Engine components single belt MOVING TENSIONER - R.R. with belt removed
See in Op. 1092A10 Crankshaft PULLEY - R.R.
See in Op. 1092G10 Engine components single drive BELT - R.R.
See in Op. 1048A56 UPPER RESONATOR - R.R.
See in Op. 1048B44 RIGID air supply PIPE from heat exchanger to intake manifold - R.R.
See in Op. 7040D50 ENGINE COMPARTMENT UPPER SOUND INSULATION SHIELD - R.R.
See in Op. 1016A10 SOUND-PROOFING COVER - R.R.
See in Op. 7055B64 Engine compartment DUST SEAL in front wheel arch (one), left or right - R.R.
See in Op. 7055B42 FRONT WHEEL ARCH LINER (one), left or right - R.R.
See in Op. 4450B04 Right FRONT WHEEL (one) - R.R.
See in Op. 7055B54 PROTECTION/GUARD under engine - R.R.
- Connect the negative battery terminal.
- Remove the vehicle from the lift.
Parts & tools for this job Staging For 2002 Lancia Thesis
- TOOLBattery testerSearch: car battery tester
- TOOLDigital multimeterSearch: automotive digital multimeter
- TOOLBattery terminal cleanerSearch: battery terminal cleaner
Links open Amazon search results in a new tab. As an Amazon Associate I earn from qualifying purchases.