
Damper (page 3 of 3)
- Make
- Land Rover
- Model
- Freelander Service Procedures
- Section
- REPAIRS
REAR SUSPENSION
REPAIRS
64-7
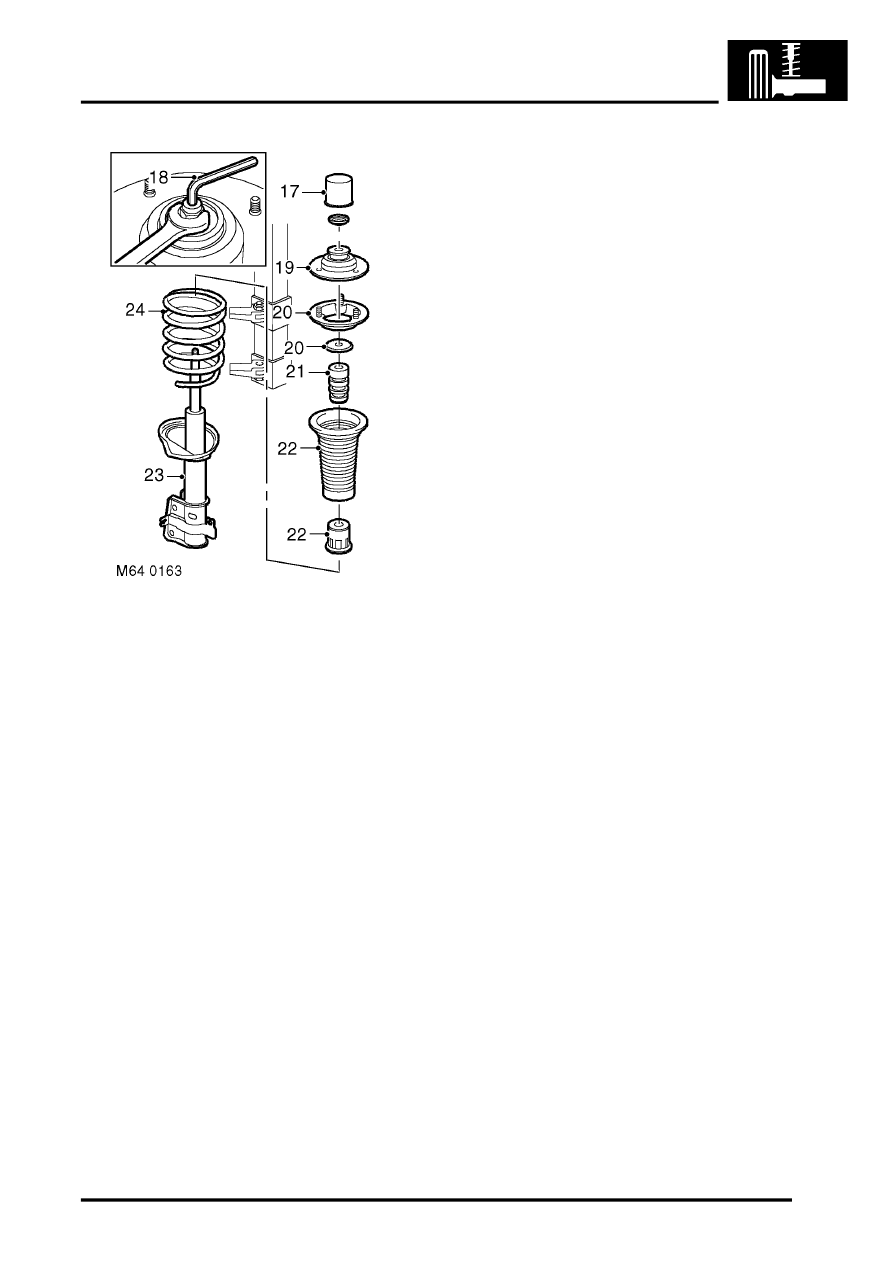
17. Remove cover from top mounting.
18. Compress spring by 2 to 3 cm until loose, hold
damper shaft with Allen key, remove and
discard mounting plate nut.
19. Remove top mounting plate.
20. Remove rebound washer and mounting plate.
21. Remove spring aid and bump plate.
22. Remove spring seat, dust cover and bump stop
cup.
23. Remove damper from spring.
24. Release and remove spring from compressor.
Refit
1. Inspect damper, spring mounting rubbers and
bearing for deterioration and damage.
2. Clean mating faces of spring, mounting and
mounting plate.
3. Clean damper shaft and bump stop plate.
4. Position spring and damper assembly to spring
compressor. Compress spring.
5. Fit damper to spring, ensure spring locates in
cut recess in damper plate.
6. Fit bump stop, bump stop cup and dust cover to
damper.
7. Fit spring aid and bump plate.
8. Fit mounting plate and rebound washer.
9. Using new nut, hold damper shaft with Allen
key and tighten nut to 57 Nm (42 lbf.ft).
CAUTION: Note alignment of top mounting,
spring and damper dust cover.
10. Fit top mounting cover.
11. Release and remove spring from compressor.
12. Clean mating face of top mounting plate.
13. Fit rubber seal to top mounting.
14. Position damper assembly and align top
mounting to body, fit nuts and tighten to 45 Nm
(33 lbf.ft).
15. Fit rear quarter lower trim casings.
REPAIRS, Trim casing - rear quarter - lower
- 3 door.
REPAIRS, Trim casing - rear quarter - lower
- 5 door.
16. Fit hub to damper and tighten bolts to 205 Nm
(151 lbf.ft).
17. Clean ABS sensor, smear sensor with an anti-
seize grease and fit sensor to hub.
CAUTION: Ensure ABS sensor is fully
located into hub, so that sensor touches
pole wheel teeth.
18. Secure brake hose and ABS sensor harness to
damper.
19. Secure brake hose with 'C' clip.
20. Remove plugs and clean brake pipe male end.
21. Align hose to brake pipe and tighten union to 14
Nm (10 lbf.ft).
22. Remove clamp from brake hose.
23. Bleed brake system.
24. Fit road wheel(s) and tighten nuts to 115 Nm
(85 lbf.ft).
25. Remove stands and lower vehicle.
Parts & tools for this job Staging For Land Rover Freelander
- TOOLCoil spring compressorSearch: coil spring compressor
- TOOLBall joint separatorSearch: ball joint separator
- PARTRear shock absorbersSearch: Land Rover Freelander rear shock absorbers
Links open Amazon search results in a new tab. As an Amazon Associate I earn from qualifying purchases.