
Camshaft timing belt (page 8 of 8)
- Make
- Land Rover
- Model
- Freelander Service Procedures
- Section
- REPAIRS
ENGINE - K SERIES KV6
REPAIRS 12-3-65
11. With assistance, position tensioner, fit new
Patchlok bolts and tighten to 25 Nm (18 lbf.ft).
CAUTION: Ensure tensioner plunger is
contacting underside of tensioner
backplate.
12. Remove tools LRT-12-175 from rear timing belt
gears.
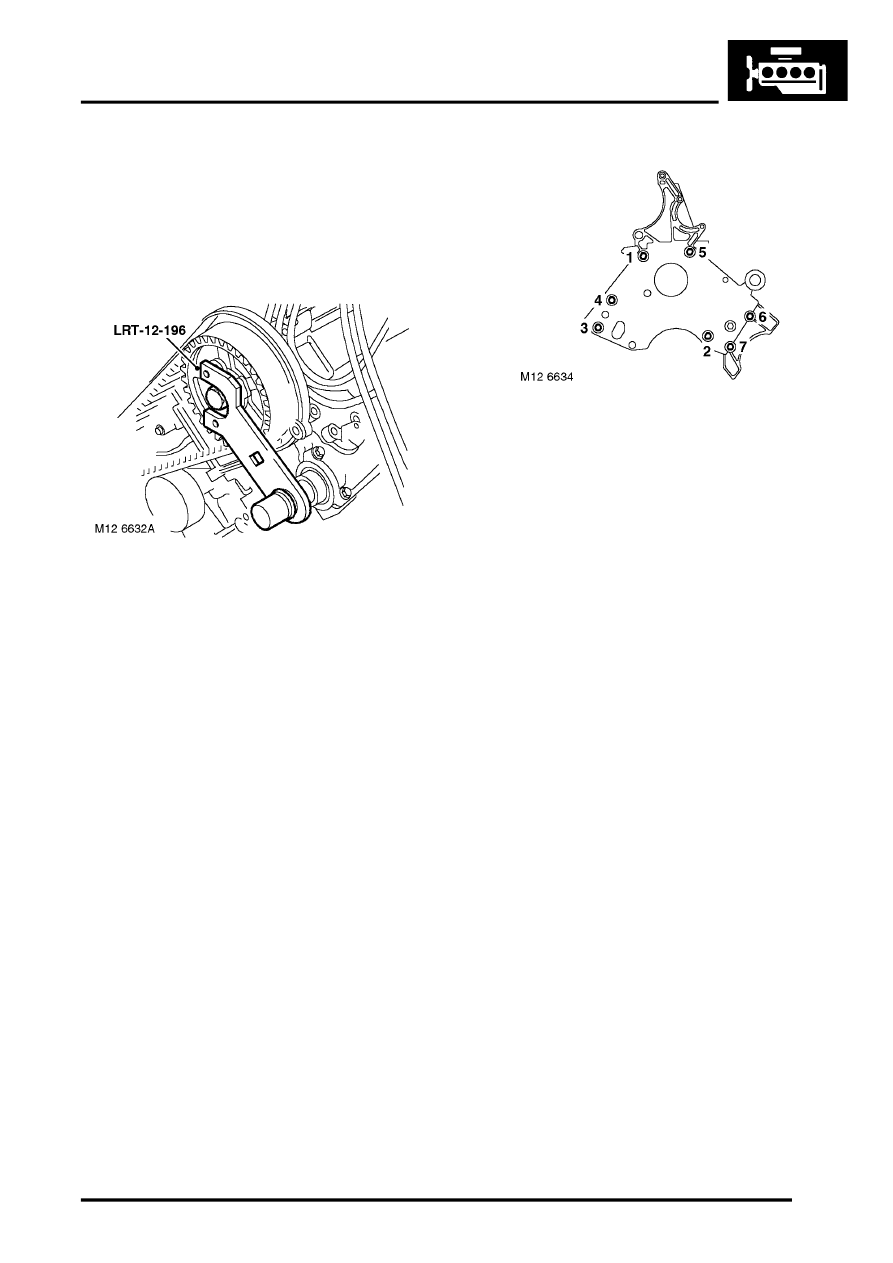
13. Fit tools LRT-12-196 to both front inlet
camshaft gears and into the end of each
exhaust camshaft.
CAUTION: Special tools must be fitted when
tightening or loosening gear retaining bolts,
otherwise damage to camshafts may occur.
14. Tighten front inlet camshaft gear bolts to:
l
Stage 1 - 27 Nm (20 lbf.ft)
l
Stage 2 - Further 90
°
15. Remove tools LRT-12-196 from both inlet
camshaft gears and exhaust camshafts.
16. Remove wedge from between drive belt and oil
pump belt guard.
17. Remove 1.5 mm diameter pin from tensioner.
18. Fit rubber blanking plug around tensioner.
19. Remove timing pin LRT-12-232.
20. Clean exhaust camshaft front cap seal
locations and fit new cap seals.
CAUTION: The sealing edge of the cap seal
and mating face must be clean and dry.
21. Position engine front mounting plate and
manoeuvre plate into position. Fit bolts but do
not tighten at this stage.
22. Fit bolts securing IRD support bracket to front
mounting plate but do not tighten at this stage.
23. Tighten bolts in the sequence shown:
l
Bolt No. 1 - 25 Nm (18 lbf.ft)
l
Bolt No. 5 - 45 Nm (33 lbf.ft)
l
Bolts Nos. 2, 3, 4, 6 and 7 - 85 Nm (63 lbf.ft)
24. Position engine lifting bracket, fit bolts securing
lifting bracket and front mounting plate to
cylinder block and RH cylinder head. Tighten
M10 bolts to 45 Nm (33 lbf.ft) and M8 bolt to 25
Nm (18 lbf.ft).
25. Clean end of dipstick tube.
26. Position dipstick tube to sump and cylinder
block, fit bolt and tighten to 9 Nm (7 lbf.ft).
27. Position A/C compressor to front mounting
plate and cylinder block, align heat shield, fit
and tighten bolts to 25 Nm (18 lbf.ft).
28. Clean lower timing belt cover.
29. Position lower timing belt cover, fit and tighten
bolts to 9 Nm (7 lbf.ft).
30. Clean crankshaft pulley.
31. Fit crankshaft pulley to crankshaft gear and
ensure that the indent on pulley locates over
the lug on crankshaft gear.
32. Fit crankshaft pulley bolt and washer, position
LRT-12-161 with LRT-12-199 into crankshaft
pulley. Tighten pulley bolt to 160 Nm (118
lbf.ft).
33. Remove tools LRT-12-161 and LRT-12-
199from crankshaft pulley.
34. Clean ancillary drive belt tensioner.
35. Position ancillary belt tensioner, fit bolts and
tighten to 25 Nm (18 lbf.ft).
36. Clean LH and RH front timing belt covers.
37. Position LH and RH front timing belt covers, fit
and tighten bolts to 4 Nm (3 lbf.ft).
38. Clean idler pulley, position pulley to engine
front mounting plate and tighten Allen bolt to 45
Nm (33 lbf.ft).
39. Position alternator to front mounting plate.
Parts & tools for this job Staging For Land Rover Freelander
- PARTTiming belt kitSearch: Land Rover Freelander timing belt kit
- TOOLEngine timing tool setSearch: Land Rover engine timing tool set
- TOOLTorque wrenchSearch: 3/8 inch torque wrench
Links open Amazon search results in a new tab. As an Amazon Associate I earn from qualifying purchases.