
Selector housing
- Make
- Land Rover
- Model
- Freelander Service Procedures
- Section
- REPAIRS › Selector housing
AUTOMATIC GEARBOX - JATCO
REPAIRS
44-5
REPAIRS
Selector housing
$% 44.15.04
Remove
1. Raise front of vehicle.
WARNING: Do not work on or under a
vehicle supported only by a jack. Always
support the vehicle on safety stands.
2. Remove front console.
REPAIRS, Console - front - up to 04MY.
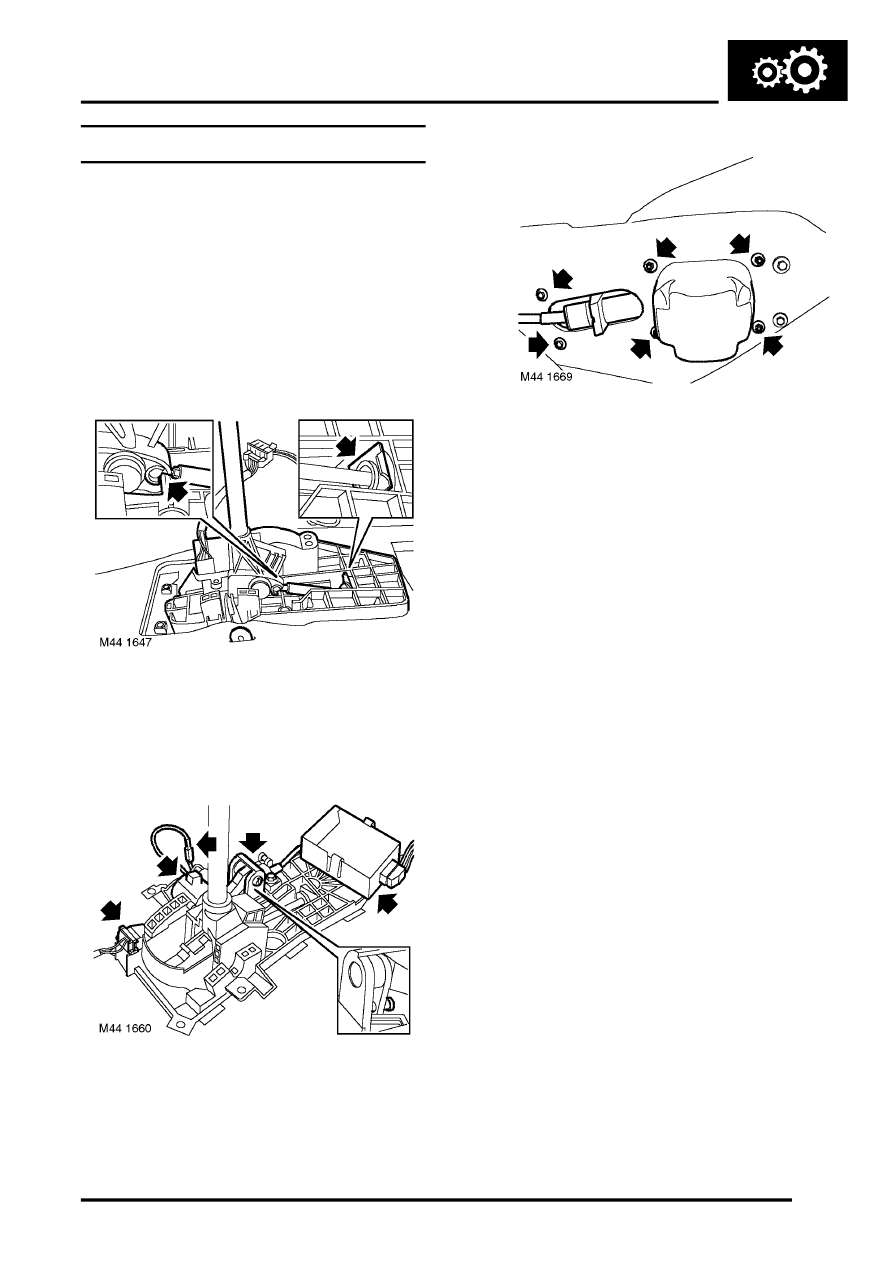
3. Release inner cable from selector lever.
4. Remove 'C' clip securing outer cable to selector
housing.
5. If fitted, release mirror fold ECU and place
aside.
6. Disconnect shift interlock solenoid connector.
7. Disconnect multiplug from sport/manual switch.
8. If fitted, remove bolt and disconnect cable from
key interlock mechanism.
9. Remove 6 nuts securing selector housing.
10. Remove selector housing.
11. Remove screw and remove mirror fold ECU
housing.
Refit
1. Position mirror fold ECU housing and secure
with screw.
2. Fit selector housing, fit nuts and tighten to 10
Nm (7.5 lbf.ft).
3. Connect key interlock mechanism inner cable.
Locate outer cable, fit clamp and clamp bolt but
do not tighten clamp bolt at this stage.
4. Connect multiplug to sport/manual switch.
5. Connect shift interlock solenoid connector.
6. Secure inner cable to selector lever.
7. Secure outer cable to selector housing with 'C'
clip.
8. Check key interlock cable adjustment.
9. Fit front console.
REPAIRS, Console - front - up to 04MY.
10. Remove stand(s) and lower vehicle.
Parts & tools for this job Staging For Land Rover Freelander
- PARTTransmission filter kitSearch: Land Rover Freelander transmission filter kit
- FLUIDAutomatic transmission fluidSearch: Land Rover automatic transmission fluid
- TOOLFluid transfer pumpSearch: fluid transfer pump
Links open Amazon search results in a new tab. As an Amazon Associate I earn from qualifying purchases.