
Converter VALVE ON power steering box - R.R.
- Make
- Lancia
- Model
- Thesis Factory Service Manual
- Year
- 2002–2009
- Section
- Power assisted steering › Converter VALVE ON power steering box - R.R.
Converter VALVE ON power steering box - R.R.
Removing
- Working from inside the vehicle, follow the instructions below making sure that the wheels are perfectly straight and that the ignition key is not inserted:
1. Undo the bolts fixing the trim under the dashboard, driver's side.
2. Remove the trim under the dashboard, driver's side.
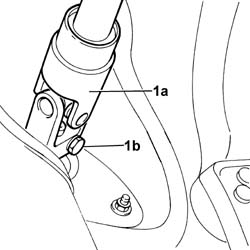
1. Release the steering column universal joint (1a) undoing the fixing bolt (1b).
- Position the vehicle on a lift.
- Open the boot, remove the cover on the left hand side and disconnect the negative battery lead.
See in Op. 4450B04 Right FRONT WHEEL (one) - R.R.
See in Op. 4450B02 Left FRONT WHEEL (one) - R.R.
- Raise the vehicle on the lift.
See in Op. 7055B54 PROTECTION/GUARD under engine - R.R.
See in Op. 7055B64 Engine compartment DUST SEAL in front wheel arch (one), left or right - R.R.
- Left side
See in Op. 7055B42 FRONT WHEEL ARCH LINER (one), left or right - R.R.
- Left side.
- [5050A12]
See in Op. 1088B10 Engine coolant SUPPLY RESERVOIR - R.R.
See in Op. 1008C10 Power unit REACTION ROD - Replace
See in Op. 1048A21 AIR INLET HOSE FROM INTAKE TO FILTER - R.R.
See in Op. 1048A28 vacuum air circuit resonator pipe - r+r
See in Op. 1016A42 LEFT CYLINDER HEAD IGNITION COIL COVER - R.R.
See in Op. 1048A23 Cold AIR INTAKE for air filter - R.R.
See in Op. 1048A11 COMPLETE AIR FILTER -R.R.
See in Op. 1088E10 Radiator cooling FAN - R.R.
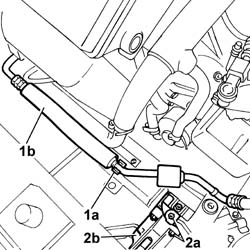
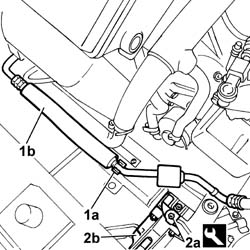
1. Release the air conditioning system pipe (1b) from the retaining spring (1a) on the frame.
2. Undo the nuts (2a) fixing the coolant radiator mounting plates (2a) on the frame.
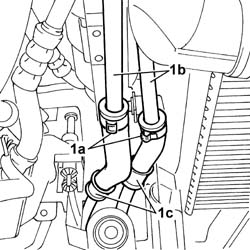
1. Open the bands (1a) retaining the power assisted steering pipes (1b) to the heat exchanger (1c) and disconnect them.
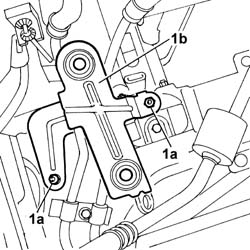
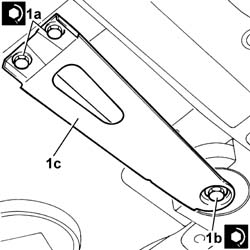
1. Undo the two fixing nuts (1a) and remove the air filter casing mounting bracket (1b).
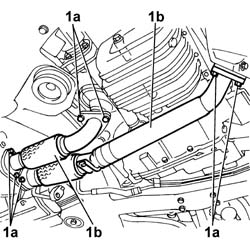
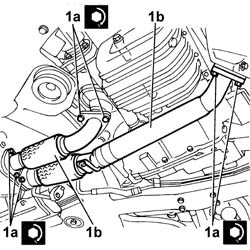
1. Undo the nuts (1a) fixing the flanges for the pipes (1b) between the pre-catalyzers and the catalyzer and remove the actual pipes complete with the gaskets underneath.
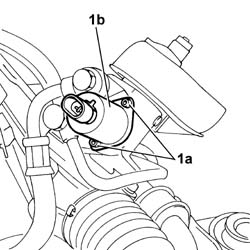
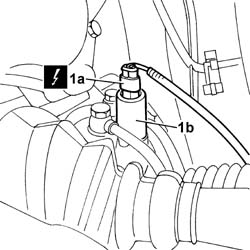
1. Working on the gearbox side, disconnect the electrical connection (1a) for the servotronic actuator (1b) located on the steering box.
| Description | Connector | |
|---|---|---|
| 1a | Servotronik solenoid valve | L070 |
- Secure the engine coolant radiator to the bodyshell, as appropriate.
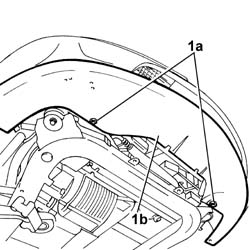
1. With the vehicle raised, undo the bolts (1a) fixing the bumper (1b) to the radiator mounting brackets, then remove the actual brackets.
- Position a suitable container for collecting the power assisted steering fluid.
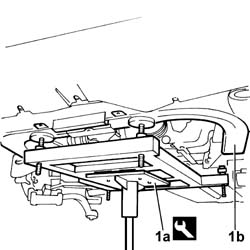
1. Position the tool for supporting the power unit-chassis assembly (1a), complete with hydraulic jack, under the housings in the engine support frame (1b).
| Description | Code | Function | |
|---|---|---|---|
| 1a | Power unit support frame | 1.870.835.000 | Removing-refitting power unit |
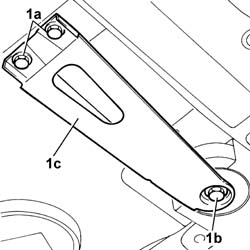
1. Undo the two rear bolts (1a) and the front bolt (1b) fixing each of the two rear engine mounting brackets (1c).
1. Undo the two front bolts (1a) fixing the frame (1b) to the bodyshell.
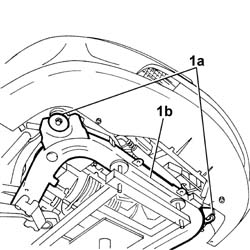
- Partly lower the jack and consequently the frame, then position a container for collecting the power assisted steering fluid.
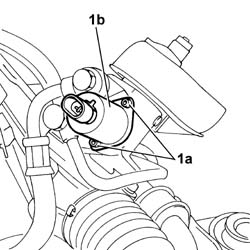
1. Undo the fixing bolts (1a) and remove the converter valve (1b) with the seals.
Refitting
- Check that the seals are correctly positioned, then position the converter valve tightening the bolts fixing it to the steering box.
- Raise the jack, correctly repositioning the front suspension frame.
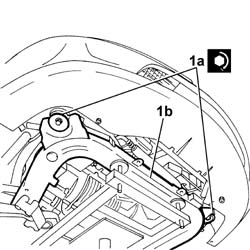
1. Tighten the two front bolts (1a) fixing the frame (1b) to the bodyshell to the recommended torque.
| Value - daNm | Fastening | Component | Ø | |
|---|---|---|---|---|
| 1a | 13 | Bolt | FRONT SUSPENSION SUBFRAME | M12 X 1.25 |
1. Tighten the two rear bolts (1a) and the front bolt (1b) fixing each of the two rear engine mounting brackets (1c).
| Value - daNm | Fastening | Component | Ø | |
|---|---|---|---|---|
| 1b | 13 | Bolt | FRONT SUSPENSION SUBFRAME | M12 X 1.25 |
| Value - daNm | Fastening | Component | Ø | |
|---|---|---|---|---|
| 1a | 5 | Bolt | FRONT SUSPENSION SUBFRAME | M12 X 1.25 |
- Remove the tool supporting the power unit - chassis assembly.
- With the vehicle raised, position the radiator mounting brackets, then tighten the bolts fixing the bumper to the mounting brackets.
- Position the radiator on the mounting brackets.
- Working on the gearbox side, connect the electrical connection for the servotronic actuator located on the steering box.
| Description | Connector | |
|---|---|---|
| Servotronik solenoid valve | L070 |
1. Position the pipes between the pre-catalyzers and the catalyzer, complete with seals, then tighten the nuts (1a) fixing the pipe flanges (1b) to the recommended torque.
| Value - daNm | Fastening | Component | Ø | |
|---|---|---|---|---|
| 1a | 2.8 | Nut | EXHAUST PIPE MOUNTS/FASTENERS | M8 |
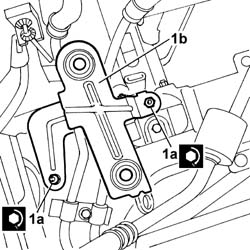
1. Position the air filter casing mounting bracket (1b), then tighten the two fixing nuts (1a) to the recommended torque.
| Value - daNm | Fastening | Component | Ø | |
|---|---|---|---|---|
| 1a | 0.5 | Nut | AIR CLEANER CASE MOUNT | M6 |
- Connect the power assisted steering pipes (1b) to the heat exchanger (1c) then close the retaining bands (1a).
1. Secure the air conditioning system pipe (1b) to the retaining spring (1a) on the frame.
2. Tighten the nuts (2a) fixing the coolant radiator mounting plates (2a) on the frame to the recommended torque.
| Value - daNm | Fastening | Component | Ø | |
|---|---|---|---|---|
| 1a | 0.5 | Nut | COOLANT RADIATOR SUPPORT BEAM | M6 |
See in Op. 1088E10 Radiator cooling FAN - R.R.
See in Op. 1048A11 COMPLETE AIR FILTER -R.R.
See in Op. 1048A23 Cold AIR INTAKE for air filter - R.R.
See in Op. 1048A28 vacuum air circuit resonator pipe - r+r
See in Op. 1048A21 AIR INLET HOSE FROM INTAKE TO FILTER - R.R.
See in Op. 1008C10 Power unit REACTION ROD - Replace
See in Op. 1088B10 Engine coolant SUPPLY RESERVOIR - R.R.
- [5050A12]
See in Op. 7055B42 FRONT WHEEL ARCH LINER (one), left or right - R.R.
- Left side
See in Op. 7055B64 Engine compartment DUST SEAL in front wheel arch (one), left or right - R.R.
- Left side
See in Op. 7055B54 PROTECTION/GUARD under engine - R.R.
- Lower the vehicle
See in Op. 4450B02 Left FRONT WHEEL (one) - R.R.
See in Op. 4450B04 Right FRONT WHEEL (one) - R.R.
- Connect the negative battery lead, then close the boot.
- Tighten the bolt fixing the steering column to the steering box to the recommended torque.
| Value - daNm | Fastening | Component | Ø | |
|---|---|---|---|---|
| 2 | Bolt | STEERING SHAFT MOUNTING | M8 |
- Remove the vehicle from the lift.
- [0010T70]
Removing
See in Op. 4410D10 Front suspension FRAME - R.R.
1. Undo the fixing bolts (1a) and remove the converter valve on the power assisted steering box (1b).
Refitting
- Fit the converter valve on the power assisted steering box and tighten the fixing bolts.
Parts & tools for this job Staging For 2002 Lancia Thesis
- PARTEngine gasket setSearch: Lancia Thesis 2002 engine gasket set
- TOOLTorque wrenchSearch: 3/8 inch torque wrench
- TOOLFeeler gauge setSearch: feeler gauge set
Links open Amazon search results in a new tab. As an Amazon Associate I earn from qualifying purchases.