
Radiator cooling FAN - R.R.
- Make
- Lancia
- Model
- Thesis Factory Service Manual
- Year
- 2002–2009
- Section
- Engine cooling › Radiator cooling FAN - R.R.
Radiator cooling FAN - R.R.
Removing
- Position the vehicle on a lift.
See in Op. 7055B54 PROTECTION/GUARD under engine - R.R.
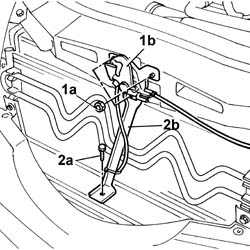
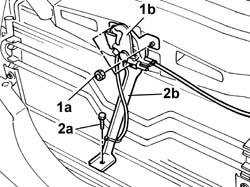
1. Undo the fixing nuts (1a) and remove the bonnet lock (1b) from its housing in the crossmember.
2. Undo the lower nut (2a) and remove the lock reinforcement bracket (2b).
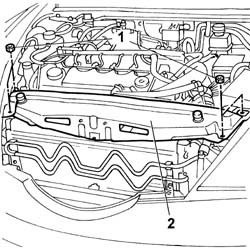
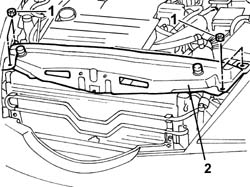
1. Undo the fixing nuts.
2. Remove the upper front crossmember.
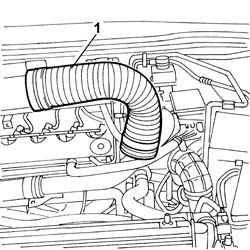
1. Remove the cold air intake from the connector on the air filter.
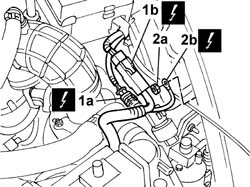
1. Disconnect the electrical connections (1a) and (1b) for the engine cables/fan-radiator cables coupling.
2. Undo the nut (2a) and disconnect the earth lead (2b) from the bodyshell.
| Description | Connector | |
|---|---|---|
| 1 | Front/radiator coupling | D009A |
| Description | Connector | |
|---|---|---|
| 1 | Front/radiator coupling | D009B |
| Description | Connector | |
|---|---|---|
| 2b | Right front earth | C011 |
- Position a suitable container for collecting the engine coolant at the outlet of the upper pipe and the radiator.
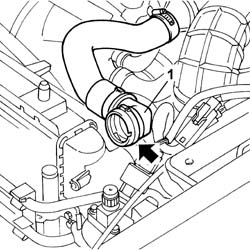
1. Disconnect the upper radiator pipe.
- Remove the container for collecting the engine coolant and seal the housing in the radiator.
To disconnect the pipe, press the spring manually and release the rapid connector for the pipe from the retainer on the radiator.
See in Op. 1048A10 AIR FILTER CASING - R.R.
- Raise the lift.
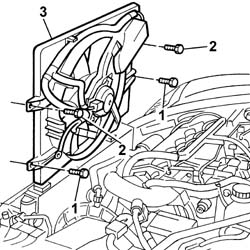
1. Undo the lower bolts fixing the fan to the radiator assembly.
- Lower the lift.
2. Undo the upper bolts fixing the fan to the radiator assembly.
3. Remove the fan assembly from the upper part of the engine compartment.
Refitting
- Fit the fan assembly in the special housing.
- tighten the upper fixing bolts, raise the lift and tighten the lower fixing bolts.
See in Op. 1048A10 AIR FILTER CASING - R.R.
- Connect the uppper engine coolant pipe to the radiator.
- Connect the electrical connections for the engine cables/fan-radiator cables coupling.
| Description | Connector | |
|---|---|---|
| Front/radiator coupling | D009A |
| Description | Connector | |
|---|---|---|
| Front/radiator coupling | D009B |
- Connect the earth lead to the bodyshell and secure it using the fixing nut.
| Description | Connector | |
|---|---|---|
| Right front earth | C011 |
- Fit the cold air intake to the air filter connector.
- Fit the upper front crossmember and tighten the fixing nuts to torque.
| Value - daNm | Fastening | Component | Ø | |
|---|---|---|---|---|
| 0.6 | Bolts | FRONT WING CROSSMEMBER HEADLAMP HOUSINGS | M6 |
- Fit the bonnet lid lock complete with bracket and tighten the nuts fixing it to the upper crossmember and to the lower crossmember.
See in Op. 7055B54 PROTECTION/GUARD under engine - R.R.
- Remove the vehicle from the lift.
Removing
- Position the vehicle on a lift.
- Make sure that the ignition key is in the OFF position, then open the boot, remove the cover on the left hand side and disconnect the negative battery lead.
See in Op. 7040D50 ENGINE COMPARTMENT UPPER SOUND INSULATION SHIELD - R.R.
See in Op. 1048A10 COMPLETE AIR FILTER -R.R.
See in Op. 1048A50 air inlet pipe to turbocharger - r + r
See in Op. 1048A21 AIR INLET HOSE FROM INTAKE TO FILTER - R.R.
See in Op. 7055B54 PROTECTION/GUARD under engine - R.R.
1. Undo the fixing nuts (1a) and remove the bonnet lock (1b) from its housing in the crossmember.
2. Undo the lower bolt (2a) and remove the lock reinforcement bracket (2b).
1. Undo the four fixing bolts.
2. Remove the upper crossmember.
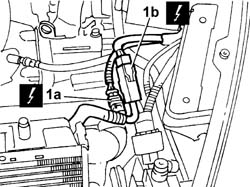
1. Disconnect the electrical connections for the engine cables/radiator fan cables coupling.
| Description | Connector | |
|---|---|---|
| 1a | Front/radiator coupling | D009A |
| Description | Connector | |
|---|---|---|
| 1b | Front/radiator coupling | D009B |
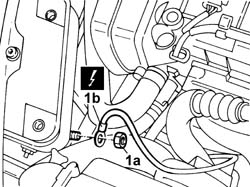
1. Undo the nut (1a) and disconnect the earth lead (1b) from the bodyshell.
| Description | Connector | |
|---|---|---|
| 1b | Right front earth | C011 |
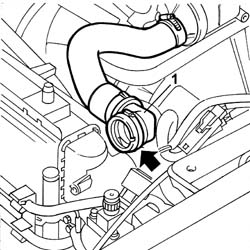
- Position a container under the vehicle to collect the coolant.
1. Disconnect the upper hose from the radiator (rapid connector)
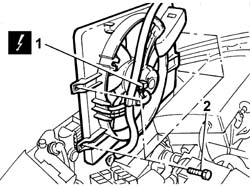
1. Disconnect the electrical connection.
2. Undo the four bolts fixing the fan to the radiator and extract it.
Refitting
- Position the radiator cooling fan and secure it using the bolts.
- Connect the engine fan motor electrical connection.
- Connect the electrical connections for the engine cables/radiator fan cables coupling.
| Description | Connector | |
|---|---|---|
| Front/radiator coupling | D009A |
| Description | Connector | |
|---|---|---|
| Front/radiator coupling | D009B |
- Connect the earth lead to the bodyshell.
| Description | Connector | |
|---|---|---|
| Right front earth | C011 |
- Connect the upper hose to the radiator.
- Fit the upper crossmember and secure it using the bolts.
- Fit the bonnet lock and the reinforcement bracket.
See in Op. 1048A10 COMPLETE AIR FILTER -R.R.
See in Op. 1048A50 air inlet pipe to turbocharger - r + r
See in Op. 1048A21 AIR INLET HOSE FROM INTAKE TO FILTER - R.R.
- Connect the negative battery lead, then close the boot.
See in Op. 0010T21 ENGINE COOLANT - Check density and top up if necessary
See in Op. 7040D50 ENGINE COMPARTMENT UPPER SOUND INSULATION SHIELD - R.R.
See in Op. 7055B54 PROTECTION/GUARD under engine - R.R.
- Remove the vehicle from the lift.
Removing
- Position the vehicle on a lift.
- Make sure that the ignition key is in the OFF position, then disconnect the negative battery lead.
See in Op. 7040D50 ENGINE COMPARTMENT UPPER SOUND INSULATION SHIELD - R.R.
See in Op. 1048A28 vacuum air circuit resonator pipe - r+r
See in Op. 1048A21 AIR INLET HOSE FROM INTAKE TO FILTER - R.R.
See in Op. 1048A23 Cold AIR INTAKE for air filter - R.R.
See in Op. 1048A10 COMPLETE AIR FILTER -R.R.
- Raise the vehicle.
See in Op. 7055B54 PROTECTION/GUARD under engine - R.R.
1. Undo the fixing nuts (1a) and remove the bonnet lock (1b) from its housing in the crossmember.
2. Undo the lower nut (2a) and remove the lock reinforcement bracket (2b).
1. Undo the four fixing bolts and remove the upper crossmember.
1. Disconnect the electrical connections (1a) and (1b) for the engine cables/radiator fan cables coupling.
| Description | Connector | |
|---|---|---|
| 1 | Front/radiator coupling | D009A |
| Description | Connector | |
|---|---|---|
| b | Front/radiator coupling | D009B |
2. Undo the nut (2a) and disconnect the earth lead (2b) from the bodyshell.
| Description | Connector | |
|---|---|---|
| 2b | Right front earth | C011 |
- Position a container under the vehicle to collect the coolant.
- Lower the lift.
- Disconnect the upper hose from the radiator (rapid connector)
1. Disconnect the electrical connection.
2. Undo the four bolts fixing the fan to the radiator and extract it.
Refitting
- Position the radiator cooling fan and secure it using the bolts.
- Connect the electrical connections for the engine cables/radiator fan cables coupling.
| Description | Connector | |
|---|---|---|
| Front/radiator coupling | D009A |
| Description | Connector | |
|---|---|---|
| Front/radiator coupling | D009B |
- Connect the earth lead to the bodyshell.
| Description | Connector | |
|---|---|---|
| Right front earth | C011 |
- Fit the upper crossmember and secure it using the bolts.
- Fit the bonnet lock and the reinforcement bracket.
- Connect the upper hose to the radiator.
See in Op. 1048A10 COMPLETE AIR FILTER -R.R.
See in Op. 1048A23 Cold AIR INTAKE for air filter - R.R.
See in Op. 1048A21 AIR INLET HOSE FROM INTAKE TO FILTER - R.R.
See in Op. 1048A28 vacuum air circuit resonator pipe - r+r
- Connect the negative battery lead.
- [0010T21]
- Raise the vehicle on the lift.
See in Op. 7055B54 PROTECTION/GUARD under engine - R.R.
See in Op. 7040D50 ENGINE COMPARTMENT UPPER SOUND INSULATION SHIELD - R.R.
- Remove the vehicle from the lift.
- Procedure not yet available
Removing
- Position the vehicle on a lift.
See in Op. 7055B54 PROTECTION/GUARD under engine - R.R.
See in Op. 7040D50 ENGINE COMPARTMENT UPPER SOUND INSULATION SHIELD - R.R.
See in Op. 1016A10 SOUND-PROOFING COVER - R.R.
See in Op. 1048B44 RIGID air supply PIPE from heat exchanger to intake manifold - R.R.
See in Op. 1048A56 UPPER RESONATOR - R.R.
See in Op. 1048A50 air inlet pipe to turbocharger - r + r
See in Op. 1048A21 AIR INLET HOSE FROM INTAKE TO FILTER - R.R.
See in Op. 1048A10 COMPLETE AIR FILTER -R.R.
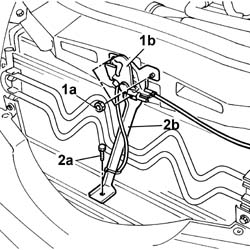
1. Undo the fixing nuts (1a) and remove the bonnet lock (1b) from the housing in the crossmember.
2. Undo the lower nut (2a) and remove the lock reinforcement bracket (2b).
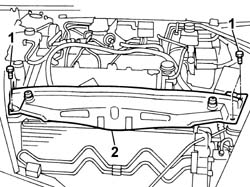
1. Undo the retaining bolts.
2. Remove the upper front crossmember.
- Position a suitable container for collecting the engine coolant at the outlet of the upper pipe and the radiator.
1. Disconnect the upper radiator pipe.
- Remove the container for collecting the engine coolant and seal the housing in the radiator.
To disconnect the pipe, press the spring manually and release the rapid connector for the pipe from the retainer on the radiator.
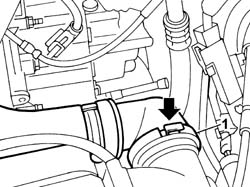
1. Undo the nut and disconnect the earth lead from the bodyshell.
| Description | Connector | |
|---|---|---|
| 1 | Right front earth | C011 |
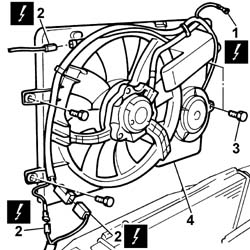
2. Disconnect the electrical connections for the engine cables/fan-radiator cables coupling.
| Description | Connector | |
|---|---|---|
| 2 | Front/radiator coupling | D009A |
| Description | Connector | |
|---|---|---|
| 2 | Front/radiator coupling | D009C |
| Description | Connector | |
|---|---|---|
| 2 | Front/radiator coupling | D009B |
3. Undo the upper and lower bolts fixing the fan to the radiator assembly.
4. Remove the fan assembly from the upper part of the engine compartment.
Refitting
- Fit the fan assembly in the special housing.
- Tighten the upper and lower fixing bolts.
- Connect the electrical connections for the engine cables/fan-radiator cables coupling.
| Description | Connector | |
|---|---|---|
| Front/radiator coupling | D009A |
| Description | Connector | |
|---|---|---|
| Front/radiator coupling | D009B |
| Description | Connector | |
|---|---|---|
| Front/radiator coupling | D009C |
- Connect the earth lead to the bodyshell and secure it using the fixing nut.
| Description | Connector | |
|---|---|---|
| Right front earth | C011 |
- Connect the uppper engine coolant pipe to the radiator.
- Fit the upper front crossmember and tighten the fixing bolts to torque.
| Value - daNm | Fastening | Component | Ø | |
|---|---|---|---|---|
| 0.6 | Bolts | FRONT WING CROSSMEMBER HEADLAMP HOUSINGS | M6 |
- Fit the bonnet lid lock complete with bracket and tighten the nuts fixing it to the upper crossmember and to the lower crossmember.
See in Op. 1048A10 COMPLETE AIR FILTER -R.R.
See in Op. 1048A21 AIR INLET HOSE FROM INTAKE TO FILTER - R.R.
See in Op. 1048A50 air inlet pipe to turbocharger - r + r
See in Op. 1048A56 UPPER RESONATOR - R.R.
See in Op. 1048B44 RIGID air supply PIPE from heat exchanger to intake manifold - R.R.
See in Op. 1016A10 SOUND-PROOFING COVER - R.R.
See in Op. 7040D50 ENGINE COMPARTMENT UPPER SOUND INSULATION SHIELD - R.R.
See in Op. 7055B54 PROTECTION/GUARD under engine - R.R.
- Fill the engine cooling system as described in the operation:
See in Op. 0010T20 Engine REFRIGERANT FLUID - Change
- Remove the vehicle from the lift.
Parts & tools for this job Staging For 2002 Lancia Thesis
- FLUIDCoolantSearch: Lancia coolant antifreeze
- PARTThermostatSearch: Lancia Thesis 2002 thermostat
- TOOLCooling system pressure testerSearch: cooling system pressure tester
Links open Amazon search results in a new tab. As an Amazon Associate I earn from qualifying purchases.