
Engine coolant SUPPLY RESERVOIR - R.R.
- Make
- Lancia
- Model
- Thesis Factory Service Manual
- Year
- 2002–2009
- Section
- Engine cooling › Engine coolant SUPPLY RESERVOIR - R.R.
Engine coolant SUPPLY RESERVOIR - R.R.
Removing
See in Op. 1016A10
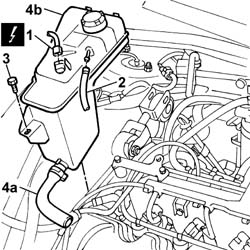
1. Disconnect the electrical connection for the sensor on the engine coolant reservoir.
| Description | Connector | |
|---|---|---|
| 1 | Engine coolant level sensor | K026 |
2. Disconnect the engine coolant recirculation pipe.
3. Undo the bolt fixing the reservoir to the bodyshell.
4. Disconnect the engine coolant supply pipe (4a) to the rigid pipe and remove the supply reservoir (4b).
Refitting
- Connect the engine coolant supply pipe (4a) to the rigid pipe and fit the supply reservoir in the housing.
- Tighten the bolt fixing the reservoir to the bodyshell.
- Connect the engine coolant recirculation pipe.
- Connect the electrical connection for the sensor on the engine coolant reservoir.
| Description | Connector | |
|---|---|---|
| Engine coolant level sensor | K026 |
See in Op. 1016A10
- 0010T21
Removing
See in Op. 7055B54 PROTECTION/GUARD under engine - R.R.
See in Op. 1016A40 Ignition COIL COVER on cylinder head - R.R.
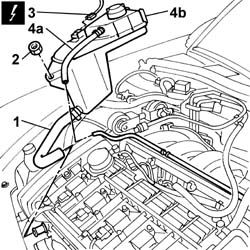
1. Disconnect the band retaining the coolant pipe to the cylinder head.
2. Undo the nut fixing the expansion tank (this nut also fastens the windscreen washer fluid reservoir).
3. Disconnect the electrical connection for the engine coolant level.
| Description | Connector | |
|---|---|---|
| 3 | Engine coolant level sensor | K026 |
4. Disconnect the pipe (4a) and lift the expansion tank (4b) and remove it.
Coolant the coolant that comes out.
Refitting
- Place the engine coolant tank back in its housing.
- Connect the engine cooling system pipes.
- Connect the electrical connection for the engine coolant level.
| Description | Connector | |
|---|---|---|
| Engine coolant level sensor | K026 |
- Tighten the nut fixing the engine coolant tank.
See in Op. 1016A40 Ignition COIL COVER on cylinder head - R.R.
See in Op. 0010T20 Engine REFRIGERANT FLUID - Change
See in Op. 7055B54 PROTECTION/GUARD under engine - R.R.
Removing
- Open the boot, remove the cover on the left hand side and disconnect the negative battery lead.
See in Op. 7040D50 ENGINE COMPARTMENT UPPER SOUND INSULATION SHIELD - R.R.
- Drain the engine coolant tank using a suitable syringe.
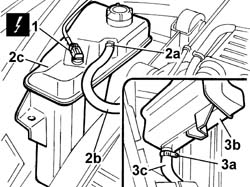
1. Disconnect the electrical connection for the engine coolant level.
| Description | Connector | |
|---|---|---|
| 1 | Engine coolant level sensor | K026 |
2. Open the band (2a) and disconnect the coolant return pipe (2b) from the thermostat unit, then lift up the tank (2c).
3. Open the retaining band (3a) and disconnect the coolant supply pipe (3b) from the engine coolant tank (3c), then remove the tank.
Refitting
- Close the band retaining the coolant pipe, then position the tank.
- Connect the coolant return pipe from the thermostat unit to the tank and close the retaining band.
- Connect the electrical connection for the engine coolant level sensor.
| Description | Connector | |
|---|---|---|
| Engine coolant level sensor | K026 |
See in Op. 7040D50 ENGINE COMPARTMENT UPPER SOUND INSULATION SHIELD - R.R.
- Connect the negative battery lead, then close the boot.
See in Op. 0010T21 ENGINE COOLANT - Check density and top up if necessary
- [0010T21]
Removing
See in Op. 1016A10 SOUND-PROOFING COVER - R.R.
See in Op. 7040D50 ENGINE COMPARTMENT UPPER SOUND INSULATION SHIELD - R.R.
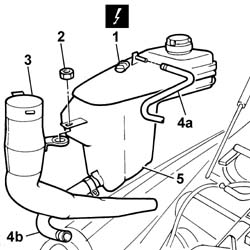
1. Disconnect the electrical connection for the engine coolant level sensor.
| Description | Connector | |
|---|---|---|
| 1 | Engine coolant level sensor | K026 |
2. Undo the nut fixing the engine coolant reservoir and the screen washer fluid filler pipe.
3. Remove the windscreen washer fluid filler pipe.
- Position a suitable container for collecting the engine coolant.
4. Disconnect the flexible engine coolant recirculation pipes from the reservoir (4a) and the flexible pipe from the rigid pipe (4b).
5. Remove the engine coolant reservoir.
Refitting
- Connect the engine coolant pipes to the reservoir.
- Position the engine coolant reservoir in the special housing together with the screen washer fluid filler pipe.
- Tighten the engine coolant reservoir fixing nut.
- Connect the electrical connection for the engine coolant level sensor.
| Description | Connector | |
|---|---|---|
| Engine coolant level sensor | K026 |
See in Op. 1016A10 SOUND-PROOFING COVER - R.R.
See in Op. 7040D50 ENGINE COMPARTMENT UPPER SOUND INSULATION SHIELD - R.R.
See in Op. 0010T21 ENGINE COOLANT - Check density and top up if necessary
Parts & tools for this job Staging For 2002 Lancia Thesis
- PARTEngine gasket setSearch: Lancia Thesis 2002 engine gasket set
- TOOLTorque wrenchSearch: 3/8 inch torque wrench
- TOOLFeeler gauge setSearch: feeler gauge set
Links open Amazon search results in a new tab. As an Amazon Associate I earn from qualifying purchases.