
Oil seal - differential housing
- Make
- Land Rover
- Model
- Freelander Service Procedures
- Section
- REPAIRS › Oil seal - differential housing
REAR AXLE & FINAL DRIVE
51-6
REPAIRS
Refit
1. Fit new collapsible spacer.
2. Fit pinion bearing and oil thrower.
3. Clean pinion flange and oil seal recess.
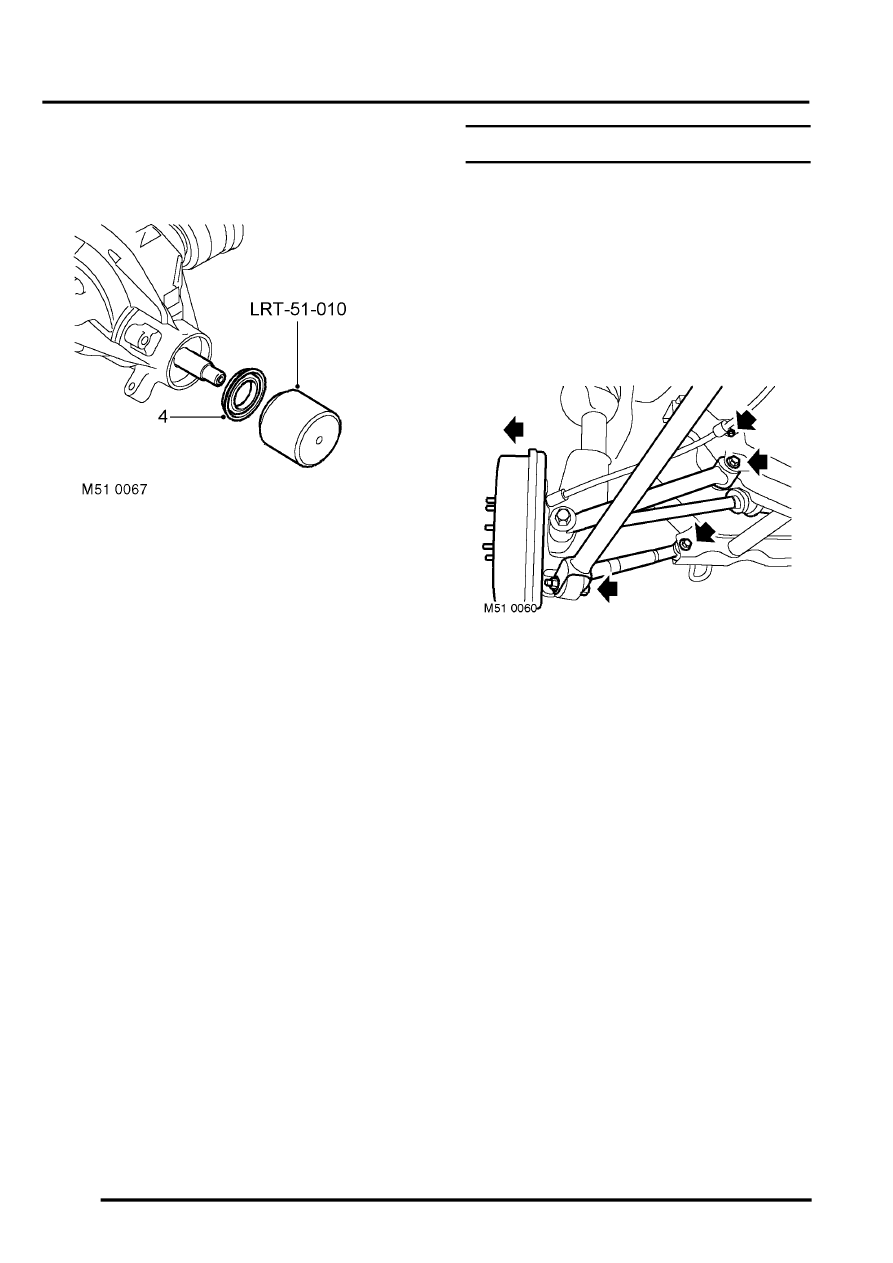
4. Fit new oil seal using LRT-51-010.
5. Fit pinion flange and washer.
6. Restrain pinion flange using LRT- 51-003.
7. Fit new pinion nut and tighten to 190 Nm (140
lbf.ft).
8. Check for end float on pinion. If end float exists
continue to tighten pinion nut until end float is
removed.
9. Continue to tighten pinion nut until correct
preload is obtained.
10. Pinion preload is 1.7 - 2.8 Nm (1.2 - 2.1 lbf.ft), if
higher replace collapsible spacer.
CAUTION: Do not tighten pinion nut to more
than 373 Nm (275 lbf.ft), or the collapsible
spacer will compress too far.
11. Clean propeller shaft flange and mating face.
12. Position propeller shaft to rear axle and align
reference marks.
13. Tighten propeller shaft nuts and bolts to 65 Nm
(48 lbf.ft).
14. Fit drive shafts.
REPAIRS, Oil seal - differential housing.
15. Check differential oil level.
Oil seal - differential housing
$% 51.20.36
Remove
1. Raise rear of vehicle.
WARNING: Do not work on or under a
vehicle supported only by a jack. Always
support the vehicle on safety stands.
2. Remove road wheel.
3. Remove bolt securing handbrake cable to
subframe.
4. Remove nut and bolt securing trailing link to
rear hub, collect spacer from under bolt head.
5. Remove nut and bolt securing fixed transverse
link to subframe. Collect dynamic damper.
6. Remove nut and bolt securing adjustable
transverse link to subframe.
7. Position drain tin to catch oil spillage.
8. With assistance pull hub assembly outwards.
Parts & tools for this job Staging For Land Rover Freelander
- PARTOil filterSearch: Land Rover Freelander oil filter
- TOOLOil filter wrenchSearch: oil filter wrench
- FLUIDEngine oilSearch: Land Rover Freelander engine oil
Links open Amazon search results in a new tab. As an Amazon Associate I earn from qualifying purchases.