
CONNECTING ROD and PISTON SET - R&R
- Make
- Lancia
- Model
- Thesis Factory Service Manual
- Year
- 2002–2009
- Section
- Pistons and connecting rods › CONNECTING ROD and PISTON SET - R&R
CONNECTING ROD and PISTON SET - R&R
- This operation should be carried out with the engine at the bench. After having removed the power unit, separate the gearbox-differential unit from the engine and position the latter on the overhauling stand.
- Remove the complete connecting rod and piston set, referring to the operations illustrated in the manual for overhauling this engine type at the bench.
- Operation to be carried out with the engine on the rotating overhaul stand. To remove the pistons, follow the description in the paragraph on dismantling the cylinder block/crankcase in the manual for overhauling this version.
Removing
- Position the vehicle on a lift.
- Disconnect the negative battery terminal.
See in Op. 7055B54 PROTECTION/GUARD under engine - R.R.
See in Op. 7040D50 ENGINE COMPARTMENT UPPER SOUND INSULATION SHIELD - R.R.
See in Op. 1016A10 SOUND-PROOFING COVER - R.R.
See in Op. 1048B44 RIGID air supply PIPE from heat exchanger to intake manifold - R.R.
See in Op. 1048A56 UPPER RESONATOR - R.R.
See in Op. 1048A50 air inlet pipe to turbocharger - r + r
See in Op. 1048A21 AIR INLET HOSE FROM INTAKE TO FILTER - R.R.
See in Op. 1048A10 COMPLETE AIR FILTER -R.R.
See in Op. 1064A24 TURBOCHARGER - EXHAUST MANIFOLD - HOSE CONNECTED TO EXHAUST PIPE - R.R.
See in Op. 4450B04 Right FRONT WHEEL (one) - R.R.
See in Op. 7055B42 FRONT WHEEL ARCH LINER (one), left or right - R.R.
See in Op. 7055B64 Engine compartment DUST SEAL in front wheel arch (one), left or right - R.R.
See in Op. 1092G10 Engine components single drive BELT - R.R.
See in Op. 1092G21 Engine components single belt FIXED TENSIONER - R.R. with belt removed
See in Op. 1092A10 Crankshaft PULLEY - R.R.
See in Op. 1032D12 Timing system protective COVER(S) - R.R.
See in Op. 1016C10 SINGLE CYLINDER HEAD - R.R. and Replace gasket
See in Op. 1020A20 CRANKCASE SUMP - R.R. clean contact surfaces and apply sealant
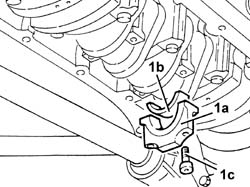
1. Undo the bolts (1a) and remove the connecting rod caps (1b) complete with half-bearings (1c).
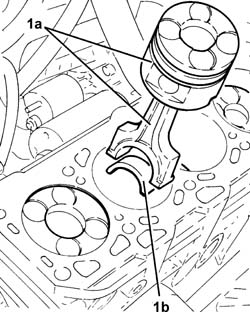
1. Release and remove the piston/connecting rod assemblies (1a) complete with half-bearings (1b).
Refitting
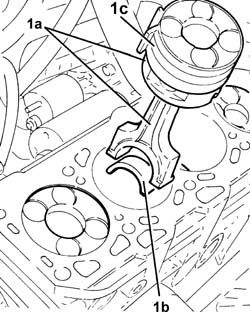
1. Place the piston/connecting rod assemblies (1a) in their housings complete with half-bearings (1b) using a suitable fitting tool (1c).
The piston-connecting rod assemblies should be fitted in the cylinder block/crankcase so that the drain on the piston skirt is aligned with the oil jet on the engine block.
- Place the caps complete with half-bearings in their housings and secure them tightening the bolts to the recommended torque.
Fit the connecting rods so that the number stamped on each rod faces towardt he same side as the number stamped on the big end (inlet side).
| Value - daNm | Fastening | Component | Ø | |
|---|---|---|---|---|
| 2.0 + 60° | Bolt | CONNECTING ROD CAPS | M9 |
- Use the tool for the angular tightening of the connecting rod cap bolts.
| Description | Code | Function | |
|---|---|---|---|
| Torque wrench | 1.860.942.000 | Connecting rod cap bolt tightening |
See in Op. 1020A20 CRANKCASE SUMP - R.R. clean contact surfaces and apply sealant
See in Op. 1016C10 SINGLE CYLINDER HEAD - R.R. and Replace gasket
See in Op. 1032D12 Timing system protective COVER(S) - R.R.
See in Op. 1092A10 Crankshaft PULLEY - R.R.
See in Op. 1092G21 Engine components single belt FIXED TENSIONER - R.R. with belt removed
See in Op. 1092G10 Engine components single drive BELT - R.R.
See in Op. 7055B64 Engine compartment DUST SEAL in front wheel arch (one), left or right - R.R.
See in Op. 7055B42 FRONT WHEEL ARCH LINER (one), left or right - R.R.
See in Op. 4450B04 Right FRONT WHEEL (one) - R.R.
See in Op. 1064A24 TURBOCHARGER - EXHAUST MANIFOLD - HOSE CONNECTED TO EXHAUST PIPE - R.R.
See in Op. 1048A10 COMPLETE AIR FILTER -R.R.
See in Op. 1048A21 AIR INLET HOSE FROM INTAKE TO FILTER - R.R.
See in Op. 1048A50 air inlet pipe to turbocharger - r + r
See in Op. 1048A56 UPPER RESONATOR - R.R.
See in Op. 1048B44 RIGID air supply PIPE from heat exchanger to intake manifold - R.R.
See in Op. 1016A10 SOUND-PROOFING COVER - R.R.
See in Op. 7040D50 ENGINE COMPARTMENT UPPER SOUND INSULATION SHIELD - R.R.
See in Op. 7055B54 PROTECTION/GUARD under engine - R.R.
- Fill the engine cooling system as described in the operation:
See in Op. 0010T20 Engine REFRIGERANT FLUID - Change
- Top up or, if necessary, change the engine oil referring to the instructions in the description:
See in Op. 0010T10 ENGINE OIL - Change
- Or:
See in Op. 0010T11 ENGINE OIL - Check level and top up if necessary
- Remove the vehicle from the lift.
Parts & tools for this job Staging For 2002 Lancia Thesis
- PARTEngine gasket setSearch: Lancia Thesis 2002 engine gasket set
- TOOLTorque wrenchSearch: 3/8 inch torque wrench
- TOOLFeeler gauge setSearch: feeler gauge set
Links open Amazon search results in a new tab. As an Amazon Associate I earn from qualifying purchases.