
Engine cooling radiator - r + r
- Make
- Alfa Romeo
- Model
- GT Factory Service Manual
- Year
- 2003–2010
- Section
- Engine cooling › Engine cooling radiator - r + r
ENGINE COOLING RADIATOR - R + R
Removing
Position the vehicle on a lift.
Make sure that the ignition key is in the OFF position, then disconnect the negative battery terminal.
| Description | Connector | |
|---|---|---|
| Battery | See A1B BATTERY ( BATTERY NEGATIVE ) |
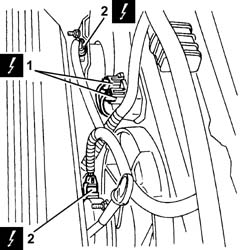
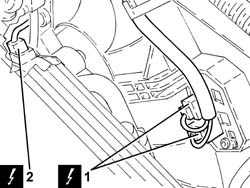
1. Disconnect the electrical connections from the engine cooling fan resistor.
| Description | Connector | |
|---|---|---|
| 1 | Engine fan adjustment resistance | See O10 ENGINE FAN ADJUSTMENT RESISTOR - 1 |
2. Disconnect the electrical connection from the radiator cooling fan and release the electrical wiring from the band.
| Description | Connector | |
|---|---|---|
| 2 | Engine fan motor | See N11 ENGINE FAN MOTOR - 1 |
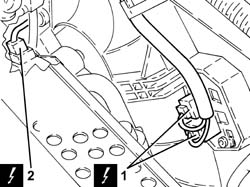
Proceed with the removal
Op. 7055B54 UNDER-ENGINE GUARD - R R.
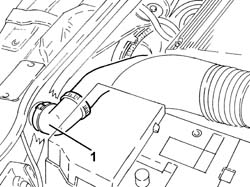
1. Disconnect the rapid connector for the lower coolant outlet hose from the radiator and drain the engine cooling system.
Manually press the clips and release the hose rapid connector.
Collect the coolant in a suitable container.
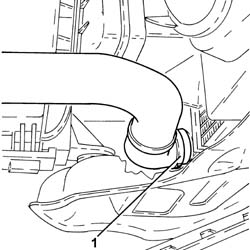
1. Disconnect the rapid connector for the radiator upper coolant inlet hose, radiator side.
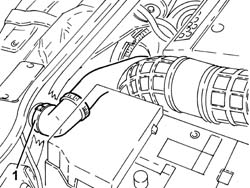
Proceed with the removal
Op. 7055B64 LH OR RH REFLECTOR(ONE) ON REAR BUMPERS - R R.
Proceed with the removal
Op. 7055B42 LH OR RH REFLECTOR(ONE) ON REAR BUMPERS - R R.
Proceed with the removal
Op. 7210E10 R.R. FRONT BUMPER.
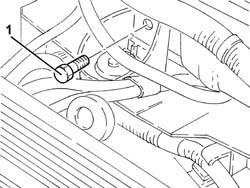
1. Undo the upper bolt fixing the engine cooling radiator crossmember to the bodyshell.
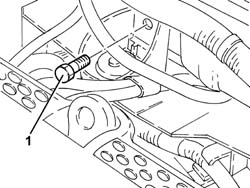
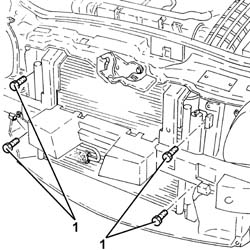
1. Unscrew the bolts securing the air duct to the engine cooling radiator.
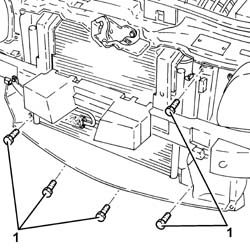
1. Undo the bolts fixing the air conditioning system condenser to the engine cooling radiator.
Fasten the air conditioning condenser to the bodyshell.
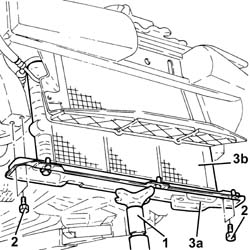
1. Position a hydraulic jack under the lower radiator crossmember.
2. Unscrew the bolts securing the lower radiator crossmember to the bodyshell.
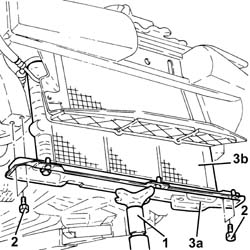
3. Lower the hydraulic jack and remove the lower radiator crossmember (3a) complete with engine cooling radiator (3b) and radiator cooling fan.
Refitting
Place the lower radiator crossmember in position complete with engine cooling radiator and radiator cooling fan using the hydraulic jack.
Tighten the bolts securing the lower radiator crossmember to the bodyshell.
Remove the hydraulic jack from underneath the lower radiator crossmember.
Tighten the bolts fixing the air conditioning system condenser to the engine cooling radiator.
Release the air conditioning condenser from the temporary fastening on the bodyshell.
Tighten the bolts securing the air duct to the engine cooling radiator.
Tighten the upper bolt fixing the engine cooling radiator to the bodyshell.
Proceed with the refitting
Op. 7210E10 R.R. FRONT BUMPER.
Proceed with the refitting
Op. 7055B42 LH OR RH REFLECTOR(ONE) ON REAR BUMPERS - R R.
Proceed with the refitting
Op. 7055B64 LH OR RH REFLECTOR(ONE) ON REAR BUMPERS - R R.
Connect the rapid connector for the radiator upper coolant inlet hose, radiator side.
Connect the rapid connector for the radiator lower coolant outlet hose.
Proceed with the refitting
Op. 7055B54 UNDER-ENGINE GUARD - R R.
Connect the electrical connection to the radiator cooling fan motor and fasten the electrical wiring to the band.
Connect the electrical connections to the engine cooling fan resistor.
Connect the negative battery terminal (-).
Refill the engine cooling system
Op. 0010T20 COOLANT CHECK DENSITY AND TOP UP IF NECESSARY.
Remove the vehicle from the lift.
Removing
Position the vehicle on a lift.
Drain the air conditioning refrigerant circuit
Op. 5040A10 EXPANSION/CONNECTION PIPE - R R.
Proceed with the removal
Op. 1048A48 THROTTLE HEATER SLEEVE - R R.
Proceed with the removal
Proceed with the removal
Op. 5530B52 BATTERY DRIP TRAY/SUPPORT - R.R..
Proceed with the removal
Op. 1048A10 AIR CLEANER FILTERING ELEMENT - REPLACE.
Proceed with the removal
Op. 7055B54 UNDER-ENGINE GUARD - R R.
Proceed with the removal
Op. 7055B64 LH OR RH REFLECTOR(ONE) ON REAR BUMPERS - R R.
Proceed with the removal
Op. 7055B42 LH OR RH REFLECTOR(ONE) ON REAR BUMPERS - R R.
Proceed with the removal
Op. 7210E10 R.R. FRONT BUMPER.
Proceed with the removal
Op. 5540B76 FRONT LIGHT CLUSTER WITH FOGLAMP ONE LH OR RH R R WITH INTERFERING PARTS REMOVED
(Left and right sides).
Proceed with the removal
Op. 7025A34 BONNET LID LOCK (ONE) - R+R OR REPAIR.
Proceed with the removal - 7210A15 R.R. FRONT WING/HEADLAMP HOUSING CROSSMEMBER
1. Disconnect the electrical connections from the engine cooling fan resistors.
| Description | Connector | |
|---|---|---|
| 1 | Engine fan adjustment resistance | See O10 ENGINE FAN ADJUSTMENT RESISTOR - 1 |
| Description | Connector | |
|---|---|---|
| 1 | Engine fan 2 adjustment resistance | See O12 ENGINE FAN ADJUSTMENT RESISTOR -2 |
2. Disconnect the electrical connections from the engine fan motors.
| Description | Connector | |
|---|---|---|
| 2 | Engine fan motor | See N11 ENGINE FAN MOTOR - 1 |
| Description | Connector | |
|---|---|---|
| 2 | Engine fan motor - 2 | See N12 ENGINE FAN MOTOR - 2 |
1. Manually press the rapid connector clips and disconnect the lower radiator coolant outlet hose, radiator side.
Collect the engine coolant in a suitable container.
2. Loosen the band and disconnect the radiator upper coolant inlet hose, radiator side.
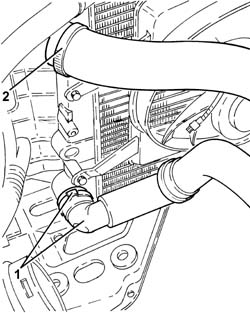
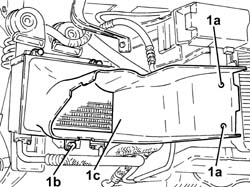
1. Release the buttons (1a), undo the bolts (1b) and remove the engine oil cooling radiator air duct (1c).
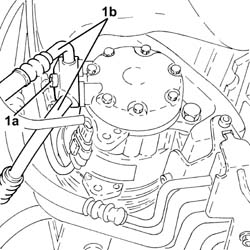
1. Undo the bolt (1a) and disconnect the coolant fluid inlet and outlet pipes (1b) from the air conditioning compressor.
Seal the connectors that have been disconnected using suitable plugs to prevent dampness and impurities from entering the system.
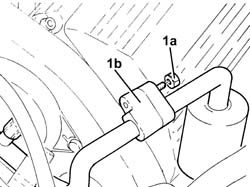
1. Undo the nut (1a) and disconnect the intermediate coupling for the pipe from the air conditioning compressor to the evaporator (1b).
Seal the connectors that have been disconnected using suitable plugs to prevent dampness and impurities from entering the system.
1. Undo the bolts (1a) and disconnect the coolant fluid inlet and outlet pipes (1b) from the air conditioning condenser.
Seal the connectors that have been disconnected using suitable plugs to prevent dampness and impurities from entering the system.
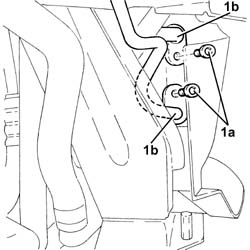
1. Remove the engine cooling radiator (1a) complete with air conditioning condenser (1b) and fans.
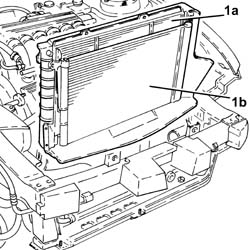
At the bench, undo the bolts and remove the fans with the single engine cooling duct.
Undo the bolts and separate the air duct and the air conditioning condenser from the engine cooling radiator.
Refitting
At the bench, assemble the air duct and the air conditioning condenser with the radiator and fasten them using the bolts.
Place the fans with the single engine cooling duct in their housings on the radiator and secure them using the bolts.
Place the engine cooling radiator complete with air conditioning condenser and fans in its housing.
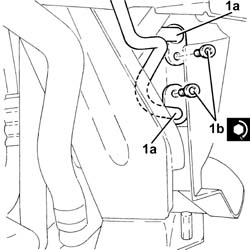
1. Connect the air conditioning condenser coolant inlet and outlet pipes (1a) and tighten the bolts (1b) to the recommended torque.
Replace any O-Rings for the connectors using green coloured seals only which are resistant to the R134a refrigerant fluid.
Lubricate the connector threads using anti-freeze.
| Fastening | Component | Ø | Value (daNm) | |
|---|---|---|---|---|
| 1b | Bolt | COOLANT SYSTEM FITTINGS | M6 | 0.7 ÷ 1.1 |
1. Connect the intermediate coupling for the pipe from the air conditioning compressor to the evaporator (1a) and tighten the nut (1b) to the recommended torque.
Replace any O-Rings for the connectors using green coloured seals only which are resistant to the R134a refrigerant fluid.
Lubricate the connector threads using anti-freeze.
| Fastening | Component | Ø | Value (daNm) | |
|---|---|---|---|---|
| 1b | Nut | COOLANT SYSTEM FITTINGS | M6 | 0.7 ÷ 1.1 |
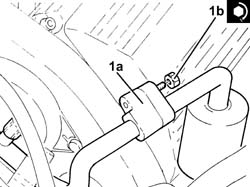
1. Connect the flange for the air conditioning compressor coolant inlet and outlet pipes (1a) and tighten the bolt (1b) to the recommended torque.
| Fastening | Component | Ø | Value (daNm) | |
|---|---|---|---|---|
| 1b | Bolt | COOLANT SYSTEM FITTINGS | M6 | 0.7 ÷ 1.1 |
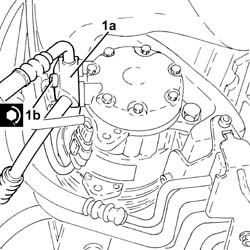
Place the air duct for the engine oil cooling radiator in position and fasten it using the bolts and the buttons.
Connect the upper coolant inlet hose to the radiator, radiator side, and tighten the band.
Connect the rapid connector for the radiator lower coolant outlet hose, radiator side.
Connect the electrical connections to the engine fan motors.
Connect the electrical connections to the engine cooling fan resistors.
Proceed with the refitting - 7210A15 R.R. FRONT WING/HEADLAMP HOUSING CROSSMEMBER
Proceed with the refitting
Op. 7025A34 BONNET LID LOCK (ONE) - R+R OR REPAIR.
Proceed with the refitting
Op. 5540B76 FRONT LIGHT CLUSTER WITH FOGLAMP ONE LH OR RH R R WITH INTERFERING PARTS REMOVED
(Left and right sides).
Proceed with the refitting
Op. 7210E10 R.R. FRONT BUMPER.
Proceed with the refitting
Op. 7055B42 LH OR RH REFLECTOR(ONE) ON REAR BUMPERS - R R.
Proceed with the refitting
Op. 7055B64 LH OR RH REFLECTOR(ONE) ON REAR BUMPERS - R R.
Proceed with the refitting
Op. 1048A10 AIR CLEANER FILTERING ELEMENT - REPLACE.
Proceed with the refitting
Op. 5530B52 BATTERY DRIP TRAY/SUPPORT - R.R..
Proceed with the refitting
Proceed with the refitting
Op. 1048A48 THROTTLE HEATER SLEEVE - R R.
Refill the engine cooling system
Op. 0010T20 COOLANT CHECK DENSITY AND TOP UP IF NECESSARY.
Refill the air conditioning refrigerant circuit
Op. 5040A10 EXPANSION/CONNECTION PIPE - R R.
Proceed with the refitting
Op. 7055B54 UNDER-ENGINE GUARD - R R.
Remove the vehicle from the lift.
Removing
Position the vehicle on a lift.
Proceed with the removal
Op. 7055B54 UNDER-ENGINE GUARD - R R.
Disconnect the coolant oulet hose from the radiator and drain the engine cooling system.
Collect the coolant in a suitable container.
Proceed with the removal - 1016A10 SOUND INSULATION COVER - R.R.
Proceed with the removal
Proceed with the removal
Op. 5530B52 BATTERY DRIP TRAY/SUPPORT - R.R..
Proceed with the removal
Op. 1048A10 AIR CLEANER FILTERING ELEMENT - REPLACE.
Proceed with the removal
Op. 1088E10 RADIATOR COOLING FAN - R + R.
Proceed with the removal
Op. 7210E10 R.R. FRONT BUMPER.
Proceed with the removal
Op. 1084C40 CONVOGLIATORE ARIA PER RADIATORE RAFFREDDAMENTO OLIO MOTORE - S.R..
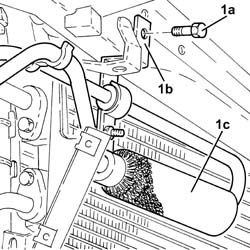
1. Undo the bolt (1a) and move the bracket (1b) sideways complete with power assisted steering system heat exchanger pipe (1c).
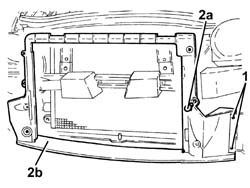
1. Release the buttons fixing the air duct to the supercharging air/air heat exchanger to the engine cooling radiator air duct.
2. Undo the bolts (2a) and remove the engine cooling radiator air duct (2b).
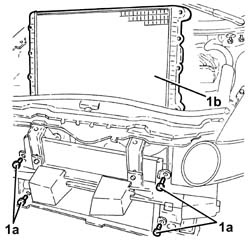
Fasten the air conditioning condenser to the bodyshell.
1. Undo the bolts (1a) and remove the engine cooling radiator (1b).
Refitting
Fit the engine cooling radiator in place and secure it using the bolts.
Release the air conditioning system condenser from the fastening on the bodyshell.
Fit the engine cooling radiator air duct in place and secure it using the bolts.
Fit the buttons fixing the air duct to the supercharging air/air heat exchanger to the engine cooling radiator air duct.
Place the bracket complete with power assisted steering system heat exchanger pipe in its housing and secure it using the bolt.
Proceed with the refitting
Op. 1084C40 CONVOGLIATORE ARIA PER RADIATORE RAFFREDDAMENTO OLIO MOTORE - S.R..
Proceed with the refitting
Op. 7210E10 R.R. FRONT BUMPER.
Proceed with the refitting
Op. 1088E10 RADIATOR COOLING FAN - R + R.
Proceed with the refitting
Op. 1048A10 AIR CLEANER FILTERING ELEMENT - REPLACE.
Proceed with the refitting
Op. 5530B52 BATTERY DRIP TRAY/SUPPORT - R.R..
Proceed with the refitting
Refill the engine cooling system
Op. 0010T20 COOLANT CHECK DENSITY AND TOP UP IF NECESSARY.
Proceed with the refitting
Op. 7055B54 UNDER-ENGINE GUARD - R R.
Proceed with the refitting - 1016A10 SOUND INSULATION COVER - R.R.
Remove the vehicle from the lift.
Removing
- Position the vehicle on a lift.
- Make sure that the ignition key is in the OFF position, then disconnect the battery terminal (-).
| Description | Connector | |
|---|---|---|
| Battery | See A001 Battery |
1. Disconnect the electrical connections from the engine cooling fan resistor.
| Description | Connector | |
|---|---|---|
| 1 | Engine fan adjustment resistance | See O10 ENGINE FAN ADJUSTMENT RESISTOR - 1 |
2. Disconnect the electrical connection from the radiator cooling fan and release the electrical wiring from the band.
| Description | Connector | |
|---|---|---|
| 2 | Engine fan motor | See N11 ENGINE FAN MOTOR - 1 |
- Disconnect the rapid connector for the lower coolant outlet hose from the radiator and drain the engine cooling system.
Manually press the clips and release the hose rapid connector.
Collect the coolant in a suitable container.
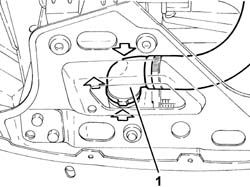
- Disconnect the rapid connector for the radiator upper coolant inlet hose, radiator side.
- Op. 7055B64 LH OR RH REFLECTOR(ONE) ON REAR BUMPERS - R R
- Op. 7055B42 LH OR RH REFLECTOR(ONE) ON REAR BUMPERS - R R
- Op. 7210E10 R.R. FRONT BUMPER
- Undo the upper bolt fixing the engine cooling radiator crossmember to the bodyshell.
- Unscrew the bolts securing the air duct to the engine cooling radiator.
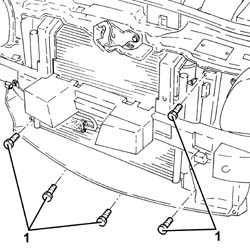
- Undo the bolts fixing the air conditioning system condenser to the engine cooling radiator.
Fasten the air conditioning condenser to the bodyshell.
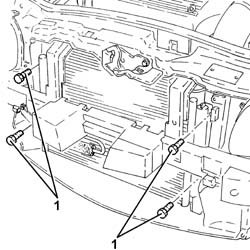
- Position a hydraulic jack under the lower radiator crossmember.
- Unscrew the bolts securing the lower radiator crossmember to the bodyshell.
- Lower the hydraulic jack and remove the lower radiator crossmember (3a) complete with engine cooling radiator (3b) and radiator cooling fan.
Refitting
- Place the lower radiator crossmember in position complete with engine cooling radiator and radiator cooling fan using the hydraulic jack.
- Tighten the bolts securing the lower radiator crossmember to the bodyshell.
- Remove the hydraulic jack from underneath the lower radiator crossmember.
- Tighten the bolts fixing the air conditioning system condenser to the engine cooling radiator.
- Release the air conditioning condenser from the temporary fastening on the bodyshell.
- Tighten the bolts securing the air duct to the engine cooling radiator.
- Tighten the upper bolt fixing the engine cooling radiator to the bodyshell.
- Op. 7210E10 R.R. FRONT BUMPER
- Op. 7055B42 LH OR RH REFLECTOR(ONE) ON REAR BUMPERS - R R
- Op. 7055B64 LH OR RH REFLECTOR(ONE) ON REAR BUMPERS - R R
- Connect the rapid connector for the radiator upper coolant inlet hose, radiator side.
- Connect the rapid connector for the radiator lower coolant outlet hose.
- Connect the electrical connection to the radiator cooling fan motor and fasten the electrical wiring to the band.
- Connect the electrical connections to the engine cooling fan resistor.
- Connect the negative battery terminal (-).
- Op. 0010T20 COOLANT CHECK DENSITY AND TOP UP IF NECESSARY
- Remove the vehicle from the lift.
Parts & tools for this job Staging For 2003 Alfa Romeo GT
- PARTEngine gasket setSearch: Alfa Romeo GT 2003 engine gasket set
- TOOLTorque wrenchSearch: 3/8 inch torque wrench
- TOOLFeeler gauge setSearch: feeler gauge set
Links open Amazon search results in a new tab. As an Amazon Associate I earn from qualifying purchases.