
Single cylinder head - r.r. and replace gasket
- Make
- Alfa Romeo
- Model
- 159 Factory Service Manual
- Year
- 2005–2011
- Section
- Cylinder head/s › Single cylinder head - r.r. and replace gasket
SINGLE CYLINDER HEAD - R.R. AND REPLACE GASKET
Removing
- Position the vehicle on a lift.
- Make sure that the ignition key is in the OFF position, then disconnect the battery terminal (-).
| Description | Connector | |
|---|---|---|
| Battery | See A001 BATTERY |
Op. 1048A34 SLEEVE(S) FROM FLOW METER TO AIR SUPPLY CAPACITY CASE - R + R
Op. 1056F17 THROTTLE BODY WITH DVL R R
Op. 1072B50 AIR CHAMBER - R.R.
Op. 1072B54 HOSES CONNECTING AIR INTAKE CHAMBER TO INTAKE MANIFOLD(S) - R.R.
Op. 1072B21 AIR INTAKE FUEL MANIFOLD INTERGRATED DUCT R R AND REPLACE GASKET
Op. 1048A28 VACUUM AIR CIRCUIT RESONATOR PIPE - R+R
Op. 1072C43 EXHAUST MANIFOLD UPPER BULKHEAD R R
Op. 1072C42 EXHAUST MANIFOLD LOWER BULKHEAD R R
- Undo the radiator coolant drain plug.
Collect the coolant in a suitable container.
- Loosen the band and disconnect the radiator lower coolant outlet hose, cylinder head side.
- Using a suitable syringe, draw off the power assisted steering fluid from the reservoir.
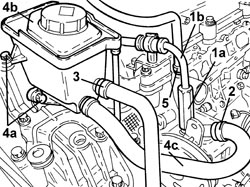
1. Undo the connector (1a) and disconnect the supply pipe from the pump to the power assisted steering box (1b), power assisted steering pump side.
2. Loosen the band and disconnect the power assisted steering fluid pipe from the reservoir to the pump, power assisted steering pump side.
3. Loosen the band and disconnect the power assisted steering fluid return pipe from the heat exchanger to the reservoir, reservoir side.
4. Undo the bolts (4a) and remove the power assisted steering fluid reservoir (4b) complete with pipe (4c).
5. Loosen the band and disconnect the coolant return pipe, cylinder head side.
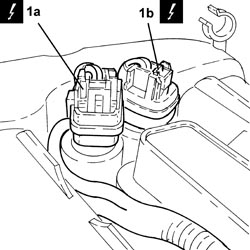
1. Disconnect the electrical connections (1a) and (1b) from the phase transformer electromagnets.
| Description | Connector | |
|---|---|---|
| 1a | Exhaust side phase transformer solenoid valve | See N093 PHASE SHIFTER SOLENOID VALVE ON EXHAUST SIDE |
| Description | Connector | |
|---|---|---|
| 1b | Inlet side phase transformer solenoid valve | See N092 PHASE SHIFTER SOLENOID VALVE ON INTAKE SIDE |
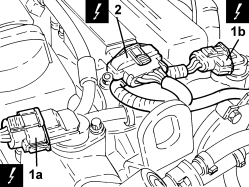
1. Disconnect the electrical connections (1a) and (1b) from the cam angle sensors.
| Description | Connector | |
|---|---|---|
| 1a | Exhaust side timing sensor | See K107 EXHAUST SIDE TIMING SENSOR |
| Description | Connector | |
|---|---|---|
| 1b | Inlet side timing sensor | See K106 INTAKE SIDE TIMING SENSOR |
2. Disconnect the electrical connections from the electronic power module.
| Description | Connector | |
|---|---|---|
| 2 | Ignition coil | See A030 IGNITION COIL |
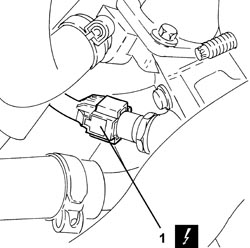
1. Disconnect the electrical connection from the engine coolant temperature sensor.
| Description | Connector | |
|---|---|---|
| 1 | Engine coolant temperature sensor/sender unit | See K036 ENGINE COOLANT TEMPERATURE SENSOR/SENDER UNIT |
- Release the engine electrical wiring from the securing bands and move it aside.
- Discharge the fuel supply system pressure.
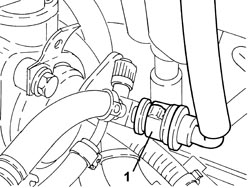
1. Disconnect the rapid connector for the fuel supply pipe, multiple connector side.
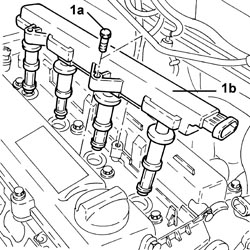
1. Undo the bolts (1a) and remove the electronic power module (1b).
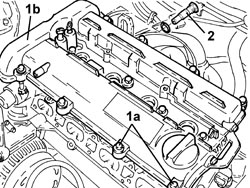
1. Undo the bolts (1a) and remove the tappet cover (1b) complete with gaskets.
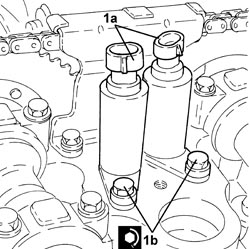
2. Unscrew the timing system hydraulic tensioner and remove.
1. If no mark (1b) is present on the fixed timing chain hydraulic tensioner (1a), replace the tensioner with a new unit including a new mobile chain tensioner pad.
1. Undo the bolts (1a) and disconnect the intermediate exhaust pipe (1b), exhaust manifold side with the catalytic converter.
2. Undo the bolts fixing the exhaust manifold and the catalytic converter to the mounting bracket.
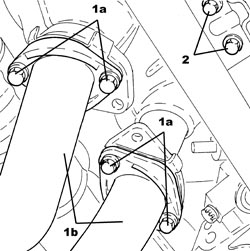
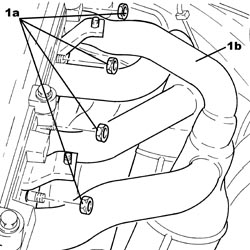
1. Undo the nuts (1a) and release the exhaust manifold and catalytic converter (1b) from the studs on the cylinder head.
- Remove the exhaust manifold and catalytic converter gasket.
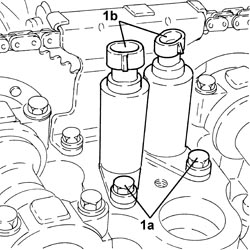
1. Undo the bolts (1a) and remove the phase transformer electromagnets (1b).
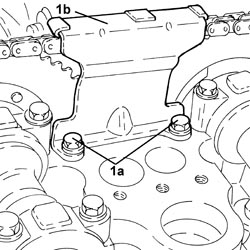
1. Undo the bolts (1a) and remove the upper timing chain tensioner pad (1b).
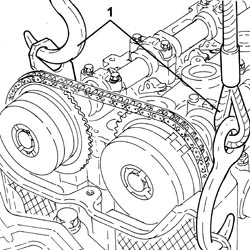
1. Support the engine using a hydraulic hoist fitted with suitable chains attached to the brackets on the actual engine.
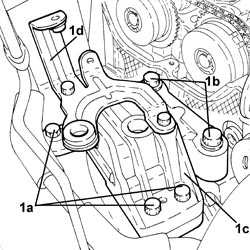
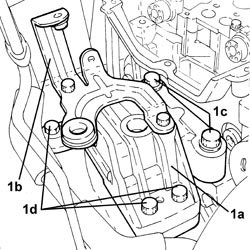
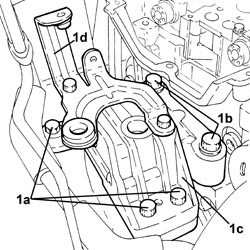
1. Undo the bolts (1a), (1b) and remove the flexible mounting for the power unit timing side front support (1c) complete with power assisted steering fluid reservoir mounting bracket (1d).
- Raise the engine as necessary using the hydraulic hoist.
1. Undo the access cap to the belt tensioner pad upper fixing bolt.
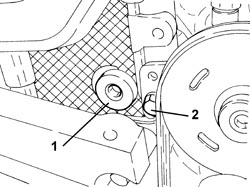
- Undo the upper fixed belt tensioner fixed pad fixing bolt.
2. Undo the bolt fixing the power assisted steering pump bracket to the cylinder head.
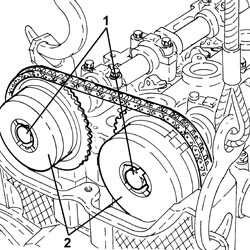
1. Undo the camshaft phase transformer fixing bolts.
Turn the hexagonal bolts on the camshafts to provide countertorque.
2. Remove the phase transformers.
- Secure the timing chain appropriately.
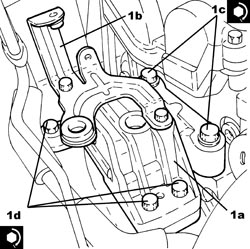
1. Place the timing side power unit front support flexible mounting (1a) in its housing complete with power assisted steering fluid reservoir mounting bracket (1b) and secure it tightening the bolts (1c) and (1d).
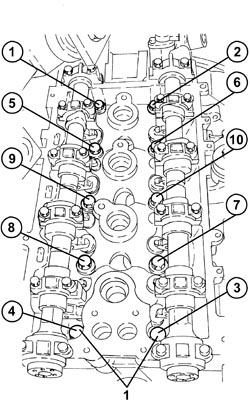
1. Undo the bolts securing the cylinder head to the engine crankcase.
The bolts are firstly loosened by 1/4 turn and then by 1/2 in the order illustrated in the diagram.
- Remove the cylinder head.
Two mechanics are needed for this operation.
Take care to release the timing chain.
- Remove the cylinder head gasket.
Refitting
- Clean any residues of gasket from the the cylinder head - engine block matching surfaces.
- Carry out a visual inspection of the components.
- The lower cylinder head plane can be refaced if the flatness is betweeb 0.05 and 0.15 mm.
- The refacing does not have to be carried out for lower flatness values.
- The refacing is not permitted for higher flatness values.
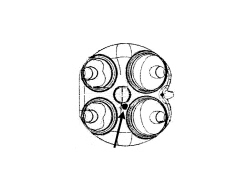
- Before refacing it is necessary to check that the minimum depth for each combustion chamber is 12.75 mm (at the point shown in the diagram) in order to guarantee the minimum combustion chamber volume.
- Place the cylinder head gasket in position.
The gasket should be positioned with the word "TOP" facing upwards.
- Place the cylinder head in position.
Two mechanics are needed for this operation.
- Check that the centering bushes are correctly positioned.
Take care to raise the timing chain.
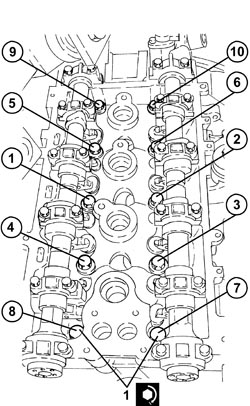
1. Tighten the cylinder head fixing bolts to the recommended torque using the angular tightening tool.
Follow the order shown in the figure for each tightening sequence.
| Component | Fastening | dia | Value (daNm) | Validity |
|---|---|---|---|---|
| Cylinder head | Bolt | M11 | (engine block side) 2.7 - 3.3 + 100° + 65° | 1.9 JTS 2.2 JTS |
| Tool | Description | Function | Validity |
|---|---|---|---|
| 1860942000 | Torque wrench | Tighten bolts to torque plus angle |
- Support the engine using a hydraulic hoist fitted with suitable chains attached to the brackets on the actual engine.
1. Undo the bolts (1a), (1b) and remove the flexible mounting for the power unit timing side front support (1c) complete with power assisted steering fluid reservoir mounting bracket (1d).
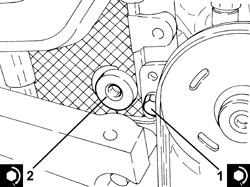
1. Tighten the bolt fixing the power assisted steering pump bracket to the cylinder head to the recommended torque.
| Component | Fastening | dia | Value (daNm) | Validity |
|---|---|---|---|---|
| Power assisted steering pump | Bolt | M8 | (cylinder head side) 1.9 - 2.1 | 1.9 JTS 2.2 JTS 3.2 JTS |
- Tighten the upper bolt fixing the fixed belt tensioner pad to the recommended torque.
| Component | Fastening | dia | Value (daNm) | Validity |
|---|---|---|---|---|
| Timing fixed chain tensioner pad | Upper bolt | M6 | (cylinder head side) 0.8 | 1.9 JTS 2.2 JTS |
2. Tighten the access cap to the belt tensioner pad upper fixing bolt to the recommended torque.
| Component | Fastening | dia | Value (daNm) | Validity |
|---|---|---|---|---|
| Cap for timing fixed chain tensioner pad upper bolt | M22 | 6.5 | 1.9 JTS 2.2 JTS |
1. Place the timing side power unit front support flexible mounting (1a) in its housing complete with power assisted steering fluid reservoir mounting bracket (1b) and secure it tightening the bolts (1c) and (1d) to the recommended torque.
| Component | Fastening | dia | Value (daNm) | Validity |
|---|---|---|---|---|
| Timing side power unit rigid support flexible mounting | Bolt (to be replaced) | M12 | (rigid support side) 6.3 - 7.7 + 90° |
| Component | Fastening | dia | Value (daNm) | Validity |
|---|---|---|---|---|
| Timing side power unit rigid support flexible mounting | Bolt (to be replaced) | M12 | (bodyshell side) 6.3 - 7.7 + 90° |
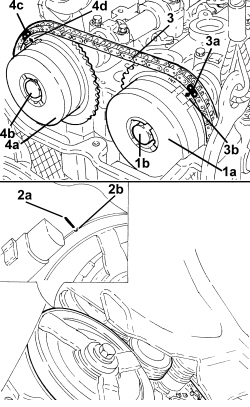
1. Place the inlet side camshaft phase transformer (1a) in its housing and secure it using a new bolt (1b) without tightening it.
2. If necessary, rotate the crankshaft until cylinder no. 4 is at T.D.C. in the explosion stroke; in this condition the reference (2a) on the inner part of the crankshaft pulley should be in line with the reference (2b) on the timing chain cover.
Rotate the crankshaft slowly and evenly (in the direction of rotation).
Ensure the timing chain is not stuck.
3. Fit the timing chain on the inlet side camshaft phase transformer.
The light blue mesh (3a) should be in line with the reference (3b) on the inlet side camshaft phase transformer.
4. Place the exhaust side camshaft phase transformer (4a) in its housing and secure it using a new bolt (4b) without tightening it.
Rotate the exhaust side camshaft using the hexagon until the pink mesh (4c) is in line with the reference (4d) on the exhaust side camshaft phase transformer.
Check that the timing chain is correctly fitted on the drive gear (on the crankshaft) checking that there are three chain links between the head support surface and the timing references on the phase transformers.
- Remove the hydraulic hoist fitted with suitable chains for supporting the engine.
1. Place the phase transformer electromagnets (1a) in their housings and secure them tightening the bolts (1b) to the recommended torque.
The white phase transformer electromagnet is the inlet side one and the black phase transformer electromagnet is the exhaust side one.
| Component | Fastening | dia | Value (daNm) | Validity |
|---|---|---|---|---|
| Phase transformer solenoids | Bolt | M6 | (cylinder head side) 1.0 | 1.9 JTS 2.2 JTS 3.2 JTS |
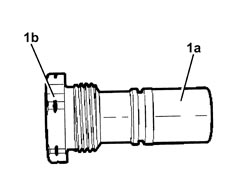
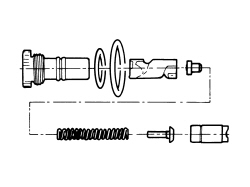
- The following drawing shows the fixed timing chain hydraulic tensioner disassembled.
Replace the seals.
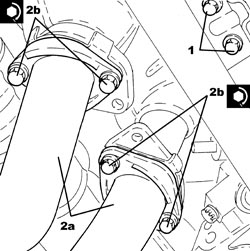
1. Tighten the bolts fixing the exhaust manifold and the catalytic converter to the mounting bracket.
2. Connect the intermediate exhaust pipe (2b), exhaust manifold side with the catalytic converter and tighten the bolts (2b) to the recommended torque.
| Component | Fastening | dia | Value (daNm) | Validity |
|---|---|---|---|---|
| Intermediate exhaust pipe with flexible section | Bolt | M8 | (exhaust manifold side with catalytic converter) 2.2 - 2.6 | 1.9 JTS 2.2 JTS |
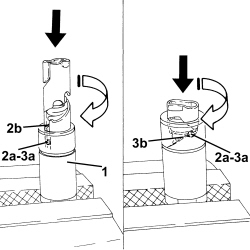
- Before it is possible to refit the timing fixed hydraulic tensioner it must be pre-loaded as described below.
1. Position the piston in a vice with protective jaws, holding it by the square end.
2. Insert the piston into the tensioner case by pressing and turning as shown in the figure until the pin (2a) fits into the groove (2b).
3. Press and simultaneously turn the piston until the pin (3a) fits into the groove (3b).
- Insert the assembled piston into the tensioner body.
- Refit the timing chain hydraulic tensioner into its seat and tighten to the specified torque.
| Component | Fastening | dia | Value (daNm) | Validity |
|---|---|---|---|---|
| Timing fixed hydraulic tensioner | M27 | 7.5 | 1.9 JTS 2.2 JTS |
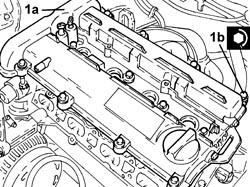
1. Place the tappet cover (1a) complete with gaskets in its housing and secure it tightening the bolts (1b) to the recommended torque.
| Component | Fastening | dia | Value (daNm) | Validity |
|---|---|---|---|---|
| Tappet cover | Bolt | M6 | (cylinder head side) 0.7 - 0.9 | 1.9 JTS 2.2 JTS |
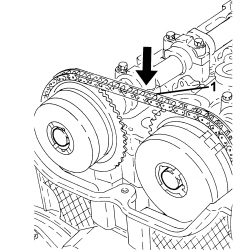
1. Move the timing chain hydraulic tensioner to operating position by exercising overall pressure by hand on the chain in the area shown in the figure. This puts the chain under tension, which in turn acts on the mobile pad to release the mobile tensioner piston.
When the piston is activated the spring will make a noise.
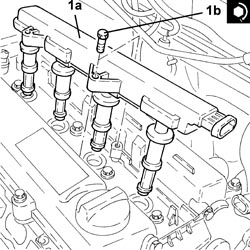
1. Place the electronic power module (1a) in its housing and secure it tightening the bolts (1b) to the recommended torque.
| Component | Fastening | dia | Value (daNm) | Validity |
|---|---|---|---|---|
| Ignition coil module | Bolt | M6 | (tappet cover side) 2.2 | 1.9 JTS 2.2 JTS |
If the chain remains slack, the tensioner is not in the operating position.
- Rotate the crankshaft through 720°, then place cylinder no. 4 at T.D.C. during the explosion stroke; in this condition the reference on the inner part of the crankshaft pulley should be aligned with the reference on the timing chain cover.
When the crankshaft is rotated the tensioner piston should follow the chain during the rotation stage.
- Check the timing making sure that the timing references correspond.
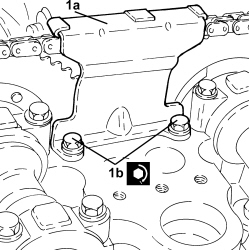
1. Place the upper timing chain pad (1a) in its housing and fasten it tightening the bolts (1b) to the recommended torque.
| Component | Fastening | dia | Value (daNm) | Validity |
|---|---|---|---|---|
| Timing upper chain tensioner pad | Bolt | M6 | (cylinder head side) 1.0 | 1.9 JTS 2.2 JTS |
- Connect the rapid connector for the fuel supply pipe, multiple connector side.
- Place the engine electrical wiring in position and fasten it with the bands.
- Connect the electrical connection to the engine coolant temperature sensor.
- Connect the electrical connections to the electronic power module.
- Connect the electrical connections to the cam angle sensors.
- Connect the electrical connections to the phase transformer electromagnets.
- Connect the coolant return pipe, cylinder head side, and tighten the band.
- Place the power assisted steering fluid reservoir complete with pipe in its housing and secure it using the bolts.
- Connect the return pipe from the heat exchanger to the power assisted steering fluid reservoir, reservoir side and tighten the band.
- Connect the supply pipe from the fluid reservoir to the power assisted steering pump, power assisted steering pump side, and tighten the band.
- Connect the supply pipe from the pump to the power assisted steering box, power assisted steering pump side and tighten the connector to the recommended torque.
| Component | Fastening | dia | Value (daNm) | Validity |
|---|---|---|---|---|
| Supply pipe from pump to power assisted steering box | Connector | M16 | (power assisted steering pump side) 3.6 - 4.4 |
- Connect the radiator lower coolant inlet hose, cylinder head side, and tighten the band.
- Tighten the radiator coolant drain plug.
Op. 1072C42 EXHAUST MANIFOLD LOWER BULKHEAD R R
Op. 1072C43 EXHAUST MANIFOLD UPPER BULKHEAD R R
Op. 1048A28 VACUUM AIR CIRCUIT RESONATOR PIPE - R+R
Op. 1072B21 AIR INTAKE FUEL MANIFOLD INTERGRATED DUCT R R AND REPLACE GASKET
Op. 1072B54 HOSES CONNECTING AIR INTAKE CHAMBER TO INTAKE MANIFOLD(S) - R.R.
Op. 1072B50 AIR CHAMBER - R.R.
Op. 1056F17 THROTTLE BODY WITH DVL R R
Op. 1048A34 SLEEVE(S) FROM FLOW METER TO AIR SUPPLY CAPACITY CASE - R + R
Op. 0010T20 ENGINE COOLANT - CHANGE
Op. 0010T71 POWER STEERING FLUID CHECK LEVEL AND TOP UP IF NECESSARY
Op. 0010T75 HYDRAULIC POWER STEERING SYSTEM BLEED AIR
- Connect the negative battery terminal.
- Remove the vehicle from the lift.
Removing
- Position the vehicle on a lift.
Op. 1016A10 SOUND-PROOFING COVER - R.R
Op. 5530B52 BATTERY SUPPORT/DRIP TRAY - R.R
Op. 1084A16 OIL DIPSTICK PIPE - R.R
Op. 1048A50 TURBOCHARGER AIR INTAKE PIPE - R.R.
Op. 1048A28 VACUUM AIR CIRCUIT RESONATOR PIPE - R+R
Op. 4450B12 FRONT WHEELS (TWO) - R+R
Op. 7055B66 ENGINE COMPARTMENT DUST COVER IN RIGHT FRONT WHEEL ARCH - R.R.
Op. 7055B91 RIGHT FRONT WHEEL ARCH LINER - R.R.
Op. 7055B54 UNDER ENGINE PROTECTION/GUARD - R.R.
1. Undo the radiator coolant drain plug.
Collect the coolant in a suitable container.
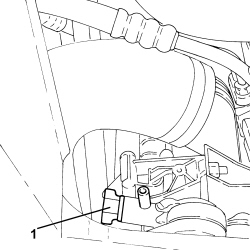
- Draw off the power assisted steering fluid from the reservoir using a suitable syringe.
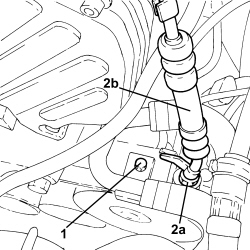
1. Undo the power assisted steering inlet pipe fixing bolt.
2. Undo the connector (2a) and disconnect the supply pipe from the pump to the power assisted steering box (2b), power steering pump side.
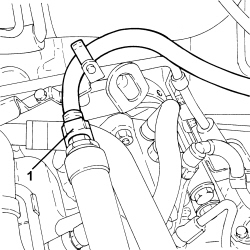
1. Disconnect the rapid connector for the fuel return pipe to the tank, fuel return manifold side.
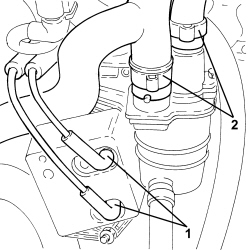
1. Disconnect the vacuum intake pipes from the vacuum reservoir.
2. Loosen the bands and disconnect the engine oil vapour recovery pipes, engine oil vapour separator side.
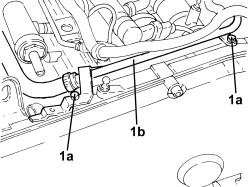
1. Undo the bolts (1a) and remove the oil vapour recovery pipe between the separator and the turbo (1b).
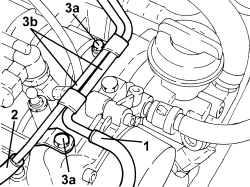
1. Disconnect the flexible pipe from the rigid vacuum intake pipe from the vacuum pump.
2. Disconnect the flexible pipe from the rigid vacuum intake pipe for the turbocharger vane position actuator control solenoid.
3. Undo the bolts (3a) and remove the vacuum pipes (3b).
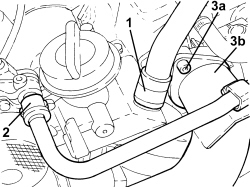
1. Loosen the band and disconnect the engine oil vapour recovery pipe, engine oil filler side.
2. Disconnect the rapid connector for the vacuum intake pipe from the vacuum pump.
3. Undo the bolts (3a) and disconnect the air supply hose from the heat exchanger to the intake manifold (3b), throttle body side.
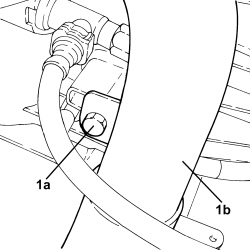
1. Undo the bolt (1a) and move the air supply hose from the heat exchanger to the intake manifold (1b) to the side.
1. Disconnect the electrical connection from the air flow meter.
| Description | Connector | |
|---|---|---|
| 1 | Air flow meter | See K041 AIR FLOW METER |
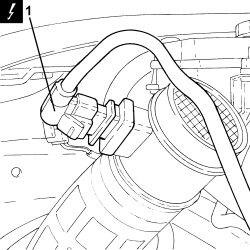
1. Disconnect the electrical connection for the fuel pressure regulator.
| Description | Connector | |
|---|---|---|
| 1 | Fuel pressure regulator | See N077 FUEL PRESSURE REGULATOR |
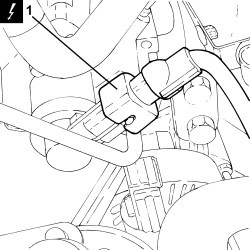
1. Disconnect the electrical connection from the throttle casing.
| Description | Connector | |
|---|---|---|
| 1 | Integrated throttle casing actuator | See N075 THROTTLE BODY ACTUATOR |
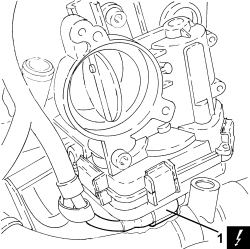
1. Disconnect the electrical connection from the engine coolant temperature sensor.
| Description | Connector | |
|---|---|---|
| 1 | Engine coolant temperature sensor/sender unit | See K036 ENGINE COOLANT TEMPERATURE SENSOR/SENDER UNIT |
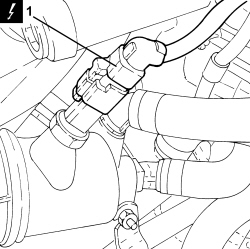
1. Disconnect the electrical connection from the cam angle sensor.
| Description | Connector | |
|---|---|---|
| 1 | Timing sensor | See K047 TIMING SENSOR |
2. Disconnect the electrical connection of the air conditioner compressor.
| Description | Connector | |
|---|---|---|
| 2 | Air conditioning compressor engagement electro-magnet | See L020 AIR CONDITIONING COMPRESSOR ENGAGEMENT ELECTRO-MAGNET |
3. Disconnect the electrical connections from the injectors.
| Description | Connector | |
|---|---|---|
| 3 | Injector | See N070 INJECTOR |
4. Disconnect the electrical connection from the fuel pressure regulator on the injector single manifold.
| Description | Connector | |
|---|---|---|
| 4 | Fuel pressure regulator on rail | See N087 FUEL PRESSURE REGULATOR ON RAIL |
5. Disconnect the electrical connection from the fuel pressure sensor.
| Description | Connector | |
|---|---|---|
| 5 | Fuel pressure sensor | See K083 FUEL PRESSURE SENSOR |
6. Disconnect the electrical connections from the heater plugs.
| Description | Connector | |
|---|---|---|
| 6 | Heater plugs | See A040 HEATER PLUGS |
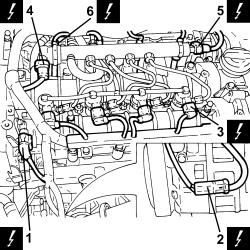
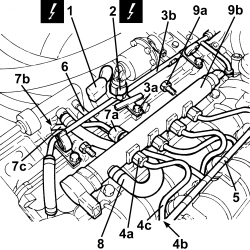
1. Disconnect the electrical connection for the pressure relief sensor.
| Description | Connector | |
|---|---|---|
| 1 | Supercharging sensor | See K082 SUPERCHARGING SENSOR |
2. Disconnect the electrical connection from the EGR system solenoid valve
| Description | Connector | |
|---|---|---|
| 2 | EGR solenoid valve | See L030 EGR SOLENOID VALVE |
3. Loosen the bands, undo the bolts (3a) and remove the coolant return pipe to the engine coolant reservoir (3b).
4. Unscrew the connectors (4a) and (4b) and remove the pipes from the fuel manifold to the injectors (4c).
5. Manually push the clips and disconnect the pipe from the injectors to the fuel recovery manifold, injector side.
6. Disconnect the pipe from the injectors to the fuel recovery manifold, fuel recovery manifold side and remove it.
7. Undo the connectors (7a), (7b) and remove the pipe from the pressure pump to the fuel manifold (7c).
8. Loosen the bands and remove the fuel return pipe from the fuel manifold to the fuel return manifold.
9. Undo the fixing bolts (9a) and remove the single fuel manifold pipe (9b).
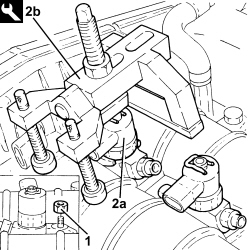
1. Undo the injector bracket retaining nuts.
2. Remove the injectors (2a) complete with brackets using the tools (2b).
If the injectors are being reused, mark the cylinder to which they belong so that they can be correctly refitted.
If a new injector/new inectors are fitted:
- determine the identification code stamped on the top surface;
- check, using an Examiner, the the new injector(s) is (are) recognized by the engine management control unit.
Start the removal beginning with the injector for cylinder no. 1 and continue with the injectors for cylinders 2, 3, 4 and 5.
| Tool | Description | Function | Validity |
|---|---|---|---|
| 1870897300 | Extractor | Removing injectors | 1.9 JTD 8V 1.9 JTD 16V 2.4 JTD 20V |
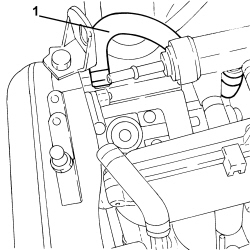
1. Loosen the band and disconnect the fuel return pipe from the pressure pump to the fuel return manifold, pressure pump side.
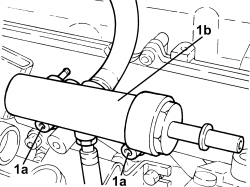
1. Undo the bolts (1a) and remove the fuel return manifold (1a) with pipes.
Op. 1088D14 UPPER RADIATOR COOLANT OUTLET HOSE - R.R.
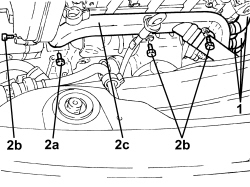
1. Loosen the bands and disconnect the pipes from the water pump rigid inlet pipe.
2. Undo the bolts (2a), (2b) and remove the water pump rigid inlet pipe to the water pump (2c).
- Remove the gasket.
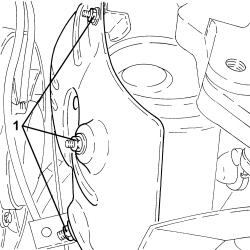
1. Undo the lower nuts fixing the exhaust manifold heat shield.
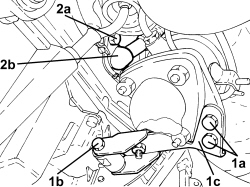
1. Undo the bolts (1a), (1b) and remove the catalytic converter mounting bracket (1c).
2. Undo the bolts (2a) securing the engine oil return pipe from the turbocharger (2b), crankcase sump side.
1. Undo the nuts fixing the intermediate exhaust pipe mounting bracket.
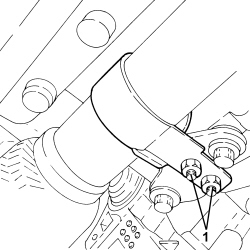
1. Undo the upper bolts (1a) and remove the exhaust manifold heat shield (1b).
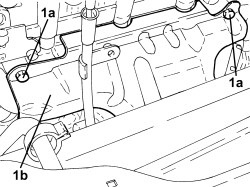
1. Undo the bolts (1a), loosen the collar (1b) and remove the E.G.R. system water/exhaust gas heat exchanger inlet pipe (1c).
2. Remove the seals.
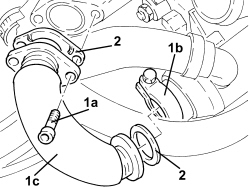
1. Undo the nuts (1a) and move the turbocharger (1b) complete with catalytic converter and exhaust pipe and secure them appropriately.
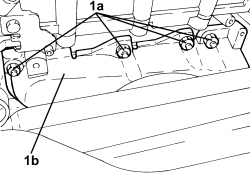
1. Undo the bolts (1a) and remove the engine oil filler (1b).
2. Remove the gasket.
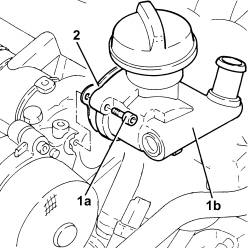
1. Undo the bolts (1a) and remove the vacuum unit (1b).
2. Remove the gasket.
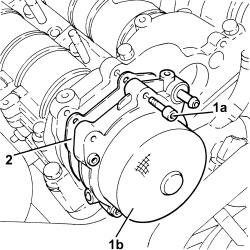
1. Undo the bolts (1a) and remove the throttle body (1b).
- Remove the gasket.
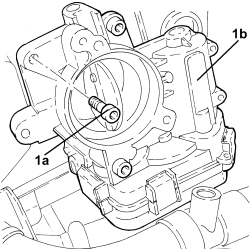
1. Loosen the bands and disconnect the pipes from the thermostat.
2. Undo the nut fixing the engine coolant return pipe from the engine oil heat exchanger.
3. Undo the bolts (3a) and remove the thermostat (3b) complete with O-ring.
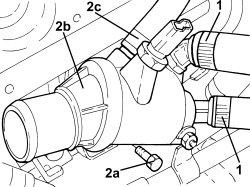
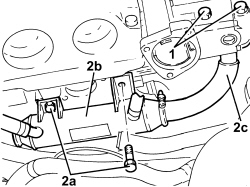
1. Undo the bolts fixing the exhaust gas outlet from the water/exhaust gas heat exchanger for the E.G.R. system, E.G.R. solenoid valve side.
2. Undo the bolts (2a) and remove the water/exhaust gas heat exchanger for the E.G.R. system (2b) complete with exhaust gas outlet pipe (2c).
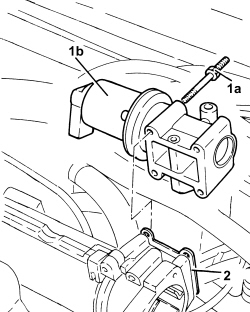
1. Undo the fixing bolts (1a) and remove the E.G.R. system solenoid valve (1b).
2. Remove the gasket.
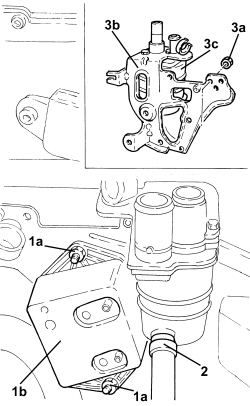
1. Undo the nuts (1a) and remove the vacuum reservoir (1b).
2. Loosen the band and disconnect the condensed engine oil recovery pipe, engine oil vapour separator side.
3. Undo the fastenings (3a) and remove the bracket (3b) complete with engine oil vapour separator (3c).
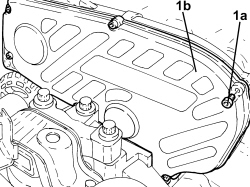
1. Undo the bolts (1a) and remove the protective timing cover (1b).
Op. 4410D16 BRACKET (ONE) RETAINING CHASSIS TO BODY - R R
Op. 1092G10 SINGLE ENGINE BELT - R.R
Op. 1092A10 CRANKSHAFT PULLEY - R + R
- Position a hydraulic jack beneath the engine.
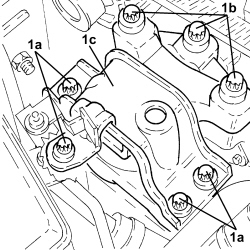
1. Undo the bolts (1a), (1b), then remove the power unit timing side front support flexible mounting (1c).
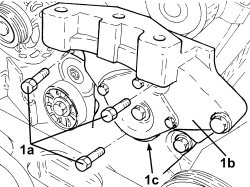
1. Undo the bolts (1a) and remove the power unit timing side rigid support (1b) complete with fixed tensioner (1c).
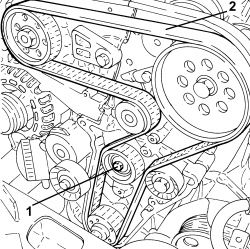
1. Loosen the bolt retaining the timing belt moving tensioner.
2. Release and remove the toothed timing drive belt.
- Fit the timing side power unit rigid support temporarily in its housing and secure it using the bolts.
- Fit the timing side power unit front support flexible mounting temporarily in its housing and secure it using the bolts.
- Remove the hydraulic jack from beneath the engine.
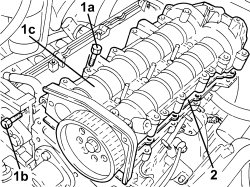
1. Undo the bolts (1a) and (1b) and remove the camshaft housing assembly (1c).
2. Remove the gasket.
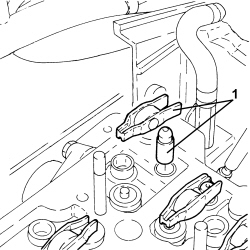
1. Remove the hydraulic tappets.
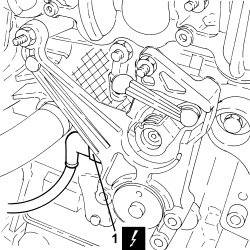
1. Disconnect the electrical connection from the throttle control shaft valve for the inlet ducts.
| Description | Connector | |
|---|---|---|
| 1 | Flow modifier solenoid valve | See L064 FLOW MODIFYING SOLENOID VALVE |
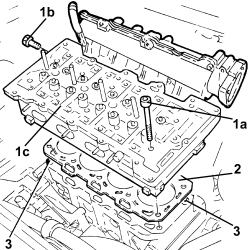
1. Undo the bolts (1a) and (1b) and remove the lower cylinder head assembly (1c).
2. Remove the cylinder head gasket.
3. Remove the locating bushes.
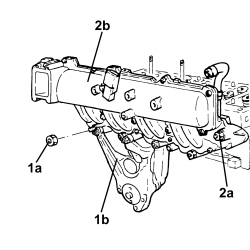
- Disconnect the linkage for the throttle control shaft valve for the inlet ducts.
1. Working at the bench, undo the nuts (1a) and remove the throttle control shaft valve for the inlet ducts (1b).
2. Undo the nuts (2a) and remove the air chamber (2b) complete with gasket.
Refitting
- Clean any residues of the old gasket from the lower cylinder head plane.
- Check that the flatness of the lower cylinder head plane corresponds to the recommended values.
| Measurement | Value | Validity | ||
|---|---|---|---|---|
| Cylinder head lower surface flatness | 0.1 mm | 1.9 JTD 8V 2.4 JTD 20V | ||
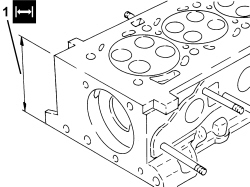
1. If the planarity of the lower cylinder head plane does not correspond to the recommended figures, regrind it without exceeding the minimum permitted height.
| Measurement | Value | Validity | ||
|---|---|---|---|---|
| Cylinder head lower plane minimum permitted height | 107.0 ± 0.05 mm | 1.9 JTD 16V | ||
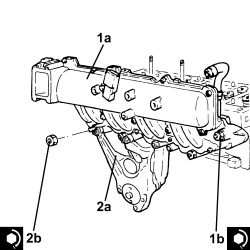
1. Fit the air chamber (1a) complete with gasket back in its housing and secure it tightening the nuts (2b) to the recommended torque.
| Component | Fastening | dia | Value (daNm) | Validity |
|---|---|---|---|---|
| Intake manifold | Nut | M8 | (cylinder head side) 2.3 - 2.8 | 1.9 JTD 16V 2.4 JTD 20V |
2. Place the throttle control shaft valve for the inlet ducts (2a) back in its housing and secure it tightening the nuts (2b) to the recommended torque.
| Component | Fastening | dia | Value (daNm) | Validity |
|---|---|---|---|---|
| Throttle carrier shaft control valve for inlet ducts | Nut | M | 1.9 JTD 16V 2.4 JTD 20V |
- Connect the linkage of the intake duct throttle spindle control valve.
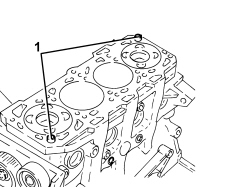
1. Position the cylinder head locating bushes on the crankcase as shown in the figure.
The locating bushes between the crankcase and cylinder head are shorter (12.5 mm) than the bushes between the cylinder head and the cylinder head extension. Take gret care not to reverse them as this could impair engine operation.
- Fit a new cylinder head gasket taking care to ensure that it is the same size as the one removed.
Position the first cylinder at T.D.C.; rotate the crankshaft a further two teeth of the toothed timing drive pulley to lower the pistons thereby preventing any interference with the valves whilst fitting the cylinder head.
- Position the cylinder head on the cylinder block/crankcase.
Do not reuse the cylinder head bolts more than four times because they undergo permanent lengthening whenever they are tightened.
Replace the bolts if the number of times that the bolts have been tightenened to the cylinder head is unknown.
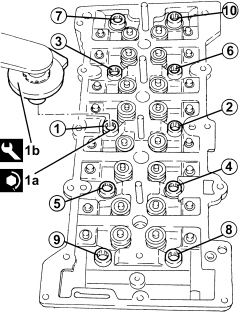
1. Tighten the cylinder head bolts (1a) to the recommended torque using the angular tightening tool (1b).
| Component | Fastening | dia | Value (daNm) | Validity |
|---|---|---|---|---|
| Cylinder head | Bolt | M12 | (engine block side) 6.2 - 6.8 + 90° + 90° + 90° | 1.9 JTD 16V |
| Tool | Description | Function | Validity |
|---|---|---|---|
| 1860942000 | Torque wrench | Tighten bolts to torque plus angle |
Follow the order shown in the figure for each tightening sequence.
- Connect the electrical connection to the throttle control shaft valve for the inlet ducts.
- Place the hydraulic tappets in their housings.
1. Position the cylinder head locating bushes on the cylinder head as shown in the figure.
The locating bushes between the cylinder head and cylinder head extension are shorter (16.0 mm) than the bushes between the crankcase and the cylinder head. Take great care not to reverse them as this could impair engine operation.
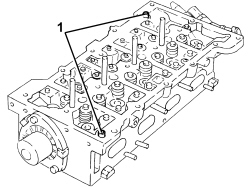
- Replace the upper cylinder head gasket.
1. Position the cylinder head extension (1a) in its housing and secure it by tightening the bolts (1b) and the new bolts (1c) to the recommended torque.
| Component | Fastening | dia | Value (daNm) | Validity |
|---|---|---|---|---|
| Camshaft housing | Bolt | M8 | (cylinder head side) 2.3 - 2.8 | 1.9 JTD 16V 2.4 JTD 20V |
| Component | Fastening | dia | Value (daNm) | Validity |
|---|---|---|---|---|
| Pressure pump mounting | Bolt (pretreated to be replaced) | M8 | (cylinder head extension side) 2.3 - 2.8 | 1.9 JTD 16V |
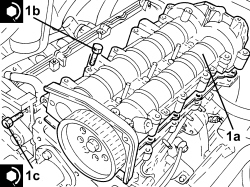
- Position a hydraulic jack beneath the engine.
1. Undo the bolts (1a), (1b), then remove the power unit timing side front support flexible mounting (1c) fitted temporarily.
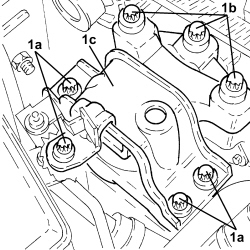
1. Undo the bolts (1a) and remove the power unit timing side rigid support (1b) complete with fixed tensioner (1c) fitted temporarily.
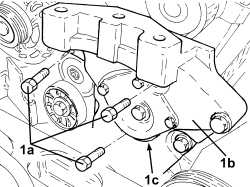
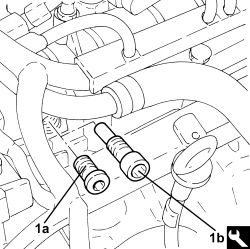
1. Remove the plug (1a) and refit the exhaust camshaft template (1b).
| Tool | Description | Function | Validity |
|---|---|---|---|
| 1870896900 | Template | Engine tuning | 1.9 JTD 16V 2.4 JTD 20V |
Only fit the exhaust side camshaft template because the intake side template seat is not accessible.
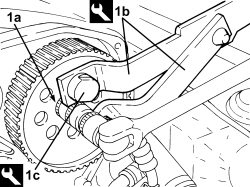
1. Loosen the bolt (1a) fixing the exhaust side camshaft toohted pulley using tools (1b) and (1c) for counter-torque.
| Tool | Description | Function | Validity |
|---|---|---|---|
| 1870815000 | Counter-torque | Loosen/ tighten nut securing front driveshaft to wheel hub Loosen/ tighten bolt securing exhaust side camshaft drive toothed drive pulley |
| Tool | Description | Function | Validity |
|---|---|---|---|
| 1870836000 | Pins | Loosen/ tighten bolt securing exhaust side camshaft drive toothed drive pulley | 1.9 JTD 8V 1.9 JTD 16V 2.4 JTD 20V |
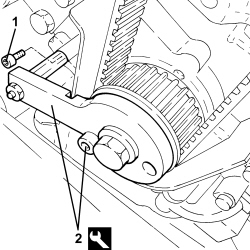
1. Undo the bolt fixing the crankcase front cover shown in the diagram.
- Temporarily fit the toothed timing drive belt on the toothed drive pulley.
2. Fit the tool and fasten it using the calibrated screw.
The crankshaft must be rotated, using small movements, to allow the locating dowel on the timing drive pulley to be inserted in the opening in the tool.
| Tool | Description | Function | Validity |
|---|---|---|---|
| 2000003000 | Template | Engine tuning | 1.9 JTD 8V 1.9 JTD 16V 2.4 JTD 20V |
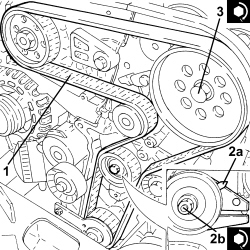
1. Fit the toothed timing belt completely taking care to ensure that the yellow references on it are aligned with the references on the toothed pullies.
2. Use a screwdriver for leverage on the tensioner arm until the reference (2a) for the tensioner is in the maximum tension position and tighten the tensioner bolts (2b) to the recommended torque in this position.
| Component | Fastening | dia | Value (daNm) | Validity |
|---|---|---|---|---|
| Timing moving tensioner | Nut | M8 | 2.3 ÷ 2.8 | 1.9 JTD 8V 1.9 JTD 16V 2.4 JTD 20V |
3. Tighten the bolt fixing the exhaust side camshaft toothed pulley to the recommended torque using the tool for counter-torque.
| Component | Fastening | dia | Value (daNm) | Validity |
|---|---|---|---|---|
| Driven toothed pulley | Bolt | M12 | (camshaft side) 2.9 - 3.2 + 40° | 1.9 JTD 8V 1.9 JTD 16V 2.4 JTD 20V |
| Tool | Description | Function | Validity |
|---|---|---|---|
| 1870815000 | Counter-torque | Loosen/ tighten nut securing front driveshaft to wheel hub Loosen/ tighten bolt securing exhaust side camshaft drive toothed drive pulley |
| Tool | Description | Function | Validity |
|---|---|---|---|
| 1870836000 | Pins | Loosen/ tighten bolt securing exhaust side camshaft drive toothed drive pulley | 1.9 JTD 8V 1.9 JTD 16V 2.4 JTD 20V |
- Remove the timing tools.
| Tool | Description | Function | Validity |
|---|---|---|---|
| 1870896900 | Template | Engine tuning | 1.9 JTD 16V 2.4 JTD 20V |
Remove the exhaust camshaft side template because the intake side camshaft has not been fitted.
| Tool | Description | Function | Validity |
|---|---|---|---|
| 2000003000 | Template | Engine tuning | 1.9 JTD 8V 1.9 JTD 16V 2.4 JTD 20V |
- Rotate the crankshaft through two revolutions.
1. Loosen the moving timing tensioner nut.
2. Use a screwdriver for leverage on the tensioner arm until the reference (2a) for the tensioner is in line with the reference opening (2b) and tighten the tensioner bolt (2c) to the recommended torque in this position.
| Component | Fastening | dia | Value (daNm) | Validity |
|---|---|---|---|---|
| Timing moving tensioner | Nut | M8 | 2.3 ÷ 2.8 | 1.9 JTD 8V 1.9 JTD 16V 2.4 JTD 20V |
- Recheck the timing by refitting the timing tools.
Only fit the exhaust side camshaft template because the intake side template seat is not accessible.
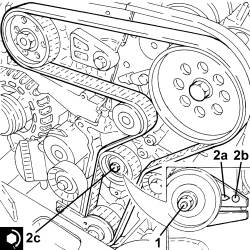
- Tighten the bolt fixing the crankcase front cover removed previously.
- Tighten the plug on the cylinder head extension for fitting the exhaust side timing tool.
1. Place the power unit timing side rigid support (1a) in its housing and secure it tightening the bolts (1b) to the recommended torque.
| Component | Fastening | dia | Value (daNm) | Validity |
|---|---|---|---|---|
| Timing side power unit rigid support | Bolt | M10 | (engine crankcase side) 4.5 - 5.5 | 1.9 JTD 8V 1.9 JTD 16V 2.4 JTD 20V |
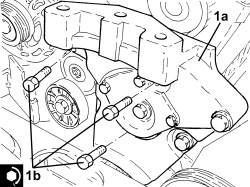
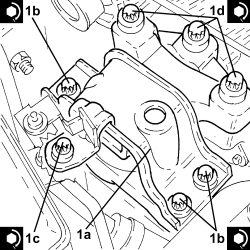
1. Place the timing power unit front support flexible mounting (1a) in its housing and secure it tightening the new bolts (1b), bolts (1c) and the new bolts (1d) to the recommended torque.
| Component | Fastening | dia | Value (daNm) | Validity |
|---|---|---|---|---|
| Timing side power unit rigid support flexible mounting | Bolt (to be replaced) | M12 | (bodyshell side) 6.3 - 7.7 + 90° |
| Component | Fastening | dia | Value (daNm) | Validity |
|---|---|---|---|---|
| Timing side power unit rigid support flexible mounting | Bolt | M10 | (bodyshell side) 5.4 - 6.6 |
| Component | Fastening | dia | Value (daNm) | Validity |
|---|---|---|---|---|
| Timing side power unit rigid support flexible mounting | Bolt (to be replaced) | M12 | (rigid support side) 6.3 - 7.7 + 90° |
- Remove the hydraulic jack under the engine crankcase sump.
- Remove the hydraulic jack from beneath the engine.
Op. 1092A10 CRANKSHAFT PULLEY - R + R
Op. 1092G10 SINGLE ENGINE BELT - R.R
Op. 4410D16 BRACKET (ONE) RETAINING CHASSIS TO BODY - R R
- Fit the timing belt covers and secure them using the bolts.
- Place the bracket complete with engine oil vapour separator in its housing and secure it.
- Connect the condensed oil recovery pipe, engine oil vapour separator side, and tighten the band.
- Place the vacuum reservoir back in its housing and secure it using the nuts.
1. Place the gasket back in its housing.
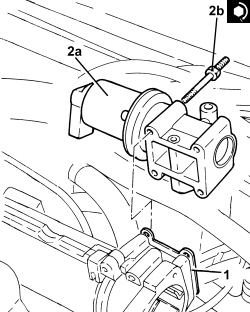
2. Place the E.G.R. system solenoid valve (2a) in its housing and fasten it tightening the bolts (2b) to the recommended torque.
| Component | Fastening | dia | Value (daNm) | Validity |
|---|---|---|---|---|
| E.G.R. system solenoid valve | Bolt | M8 | (chamber side) 2.3 - 2.8 | 1.9 JTD 16V 2.4 JTD 20V |
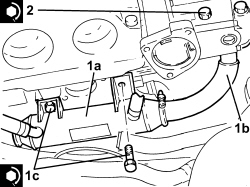
1. Replace the E.G.R. system exhaust gas/water heat exchanger (1a) back in its housing complete with exhaust gas outlet pipe (1b) and secure by tightening the bolts (1c) to the specified torque.
| Component | Fastening | dia | Value (daNm) | Validity |
|---|---|---|---|---|
| Exhaust gas/water heat exchanger for E.G.R. system | Bolt | M8 | (cylinder head side) 2.3 - 2.8 | 1.9 JTD 8V 1.9 JTD 16V 2.4 JTD 20V |
2. Tighten the bolts fixing the exhaust gas outlet from the water/exhaust gas heat exchanger for the E.G.R. system, E.G.R. solenoid valve side to the recommended torque.
| Component | Fastening | dia | Value (daNm) | Validity |
|---|---|---|---|---|
| Exhaust gas/water heat exchanger for E.G.R. system | Bolt | M8 | (EGR solenoid side) 2.3 - 2.8 | 1.9 JTD 8V 1.9 JTD 16V 2.4 JTD 20V |
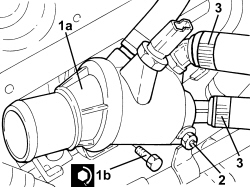
1. Place the thermostat (1a) in its housing with the O-ring and secure it by tightening the bolts (1b) to the recommended torque.
| Component | Fastening | dia | Value (daNm) | Validity |
|---|---|---|---|---|
| Thermostat | Bolt | M8 | (cylinder head side) 2.5 | 1.9 JTD 16V 2.4 JTD 20V |
2. Tighten the nut fixing the engine coolant return pipe from the engine oil heat exchanger.
3. Connect the pipes to the thermostat and tighten the bands.
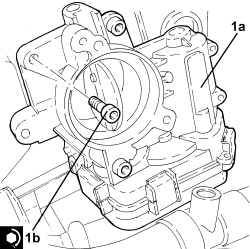
- Place the gasket back in its housing.
1. Place the throttle body (1a) in its housing and secure it tightening the bolts (1b) to the recommended torque.
| Component | Fastening | dia | Value (daNm) | Validity |
|---|---|---|---|---|
| Throttle body | Bolt | M8 | (chamber side) 2.5 | 1.9 JTD 16V 2.4 JTD 20V |
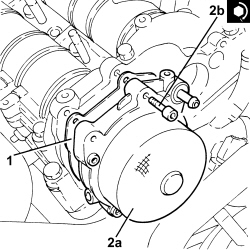
1. Place the gasket back in its housing.
2. Place the vacuum unit (2a) in its housing and secure it by tightening the new bolts (2b) to the recommended torque.
| Component | Fastening | dia | Value (daNm) | Validity |
|---|---|---|---|---|
| Vacuum unit | Bolt (pretreated to be replaced) | M6 | (cylinder head extension side) 0.5 + 50° | 1.9 JTD 16V 2.4 JTD 20V |
1. Place the gasket back in its housing.
2. Place the engine oil filler (2a) in its housing and secure it by tightening the bolts (2b) to the recommended torque.
| Component | Fastening | dia | Value (daNm) | Validity |
|---|---|---|---|---|
| Engine oil filler | Bolt | M6 | (cylinder head extension side) 0.8 - 1.0 | 1.9 JTD 16V 2.4 JTD 20V |
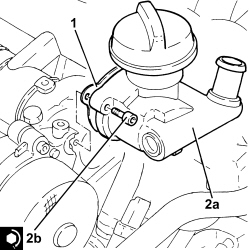
1. Place the turbocharger (1a) back in its housing complete with catalytic converter and intermediate exhaust pipe and tighten the nuts (1d) to the recommended torque.
| Component | Fastening | dia | Value (daNm) | Validity |
|---|---|---|---|---|
| Turbocharger and exhaust manifold assembly | Nut | M8 | (cylinder head side) 1.8 - 2.2 | 1.9 JTD 16V |
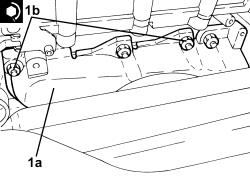
1. Place the E.G.R. system exhaust gas/water heat exchanger exhaust gas inlet pipe back in its housing complete with gaskets (1b), then fasten it using the collar (1c) and the bolts (1d) tightening them to the recommended torque.
| Component | Fastening | dia | Value (daNm) | Validity |
|---|---|---|---|---|
| Exhaust gas/water heat exchanger for E.G.R. system | Bolt | M8 | (exhaust manifold side) 2.3 - 2.8 | 1.9 JTD 8V 1.9 JTD 16V 2.4 JTD 20V |
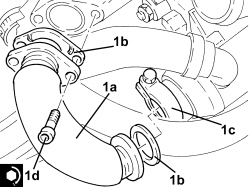
- Place the exhaust manifold heat shield back in its housing and secure it using the upper bolts.
- Tighten the nuts fixing the intermediate exhaust pipe mounting bracket.
1. Tighten the bolts (1a) securing the engine oil return pipe from the turbocharger (1b), crankcase sump side to the recommended torque.
| Component | Fastening | dia | Value (daNm) | Validity |
|---|---|---|---|---|
| Engine oil supply pipe from turbocharger | Bolt | M8 | (engine block side) 2.2 - 2.7 | 1.9 JTD 8V 1.9 JTD 16V |
2. Place the catalytic conveter mounting bracket (2a) in its housing and secure it using the bolts (2b).
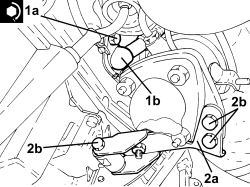
- Tighten the lower nuts fixing the exhaust manifold heat shield.
1. Place the water pump rigid inlet pipe (1a), complete with gasket, in position and secure it tightening the bolts (1b) and (1c) to the recommended torque.
| Component | Fastening | dia | Value (daNm) | Validity |
|---|---|---|---|---|
| Water pump rigid inlet pipe | Bolt | M6 | (cylinder head side) 0.8 - 1.0 | 1.9 JTD 8V 1.9 JTD 16V |
2. Connect the pipes to the water pump rigid inlet pipe and tighten the bands.
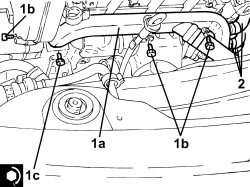
Op. 1088D14 UPPER RADIATOR COOLANT OUTLET HOSE - R.R.
- Place the fuel return manifold complete with pipes in its housing and secure it using the bolts.
- Connect the fuel return pipe from the pressure pump to the fuel return manifold, pressure pump side and tighten the band.
1. Refit the injectors (1a) complete with brackets and tighten nuts (1b) to the specified torque.
Start the refitting beginning with the injector for cylinder no. 4 and continue with the injectors for cylinders 3, 2, and 1.
| Component | Fastening | dia | Value (daNm) | Validity |
|---|---|---|---|---|
| Injector brackets | Nut | M8 | (cylinder head extension side) 2.3 - 2.8 | 1.9 JTD 16V 2.4 JTD 20V |
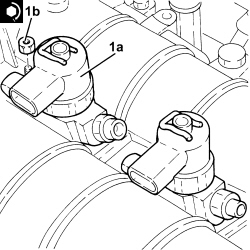
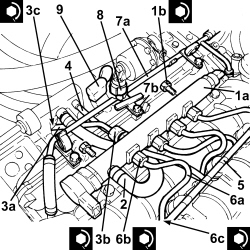
1. Place the single fuel manifold pipe (1a) in its housing and secure it tightening the bolts (1b) to the recommended torque.
| Component | Fastening | dia | Value (daNm) | Validity |
|---|---|---|---|---|
| Single fuel manifold pipe (rail) | Bolt | M8 | (cylinder head extension side) 2.3 - 2.8 | 1.9 JTD 16V 2.4 JTD 20V |
2. Place the fuel return pipe from the fuel manifold to the fuel return manifold in its housing and tighten the bands.
3. Place the pipe from the pressure pump to the fuel manifold pipe (3a) back in its housing and secure it tightening the connectors (3b) and (3c) to the recommended torque.
| Component | Fastening | dia | Value (daNm) | Validity |
|---|---|---|---|---|
| Pipe from pressure pump to fuel manifold | Connector | M14 | (fuel manifold side) 2.2 - 2.4 | 1.9 JTD 8V 1.9 JTD 16V 2.4 JTD 20V |
| Component | Fastening | dia | Value (daNm) | Validity |
|---|---|---|---|---|
| Pipe from pressure pump to fuel manifold | Connector | M12 | (pressure pump side) 2.2 - 2.4 | 1.9 JTD 8V 1.9 JTD 16V 2.4 JTD 20V |
4. Fit the pipe from the injectors to the fuel recovery manifold and connect to the fuel recovery manifold.
5. Connect the pipe from the injectors to the fuel recovery manifold to the injectors and push home until the clips click into place.
6. Place the pipes from the fuel manifold to the injectors (6a) in their housings and secure them tightening the connectors (6b) and (6c) to the recommended torque.
| Component | Fastening | dia | Value (daNm) | Validity |
|---|---|---|---|---|
| Pipes from fuel manifold to injectors | Connector | M14 | (fuel manifold side) 2.2 - 2.4 | 1.9 JTD 16V 2.4 JTD 20V |
| Component | Fastening | dia | Value (daNm) | Validity |
|---|---|---|---|---|
| Pipes from fuel manifold to injectors | Connector | M12 | (injector side) 2.4 - 2.6 | 1.9 JTD 16V 2.4 JTD 20V |
7. Place the coolant return pipe to the engine coolant reservoir (7a) in position and secure it using the bolts (7b) and tighten the bands.
8. Connect the electrical connection to the E.G.R. system solenoid valve.
9. Connect the electrical connection for the pressure relief sensor.
- Connect the electrical connections to the heater plugs.
- Connect the electrical connection to the fuel pressure sensor.
- Connect the electrical connection to the fuel pressure regulator on the injector single manifold.
- Connect the electrical connections to the injectors.
- Connect the air conditioning compressor electrical connection.
- Connect the electrical connection to the cam angle sensor.
- Connect the electrical connection to the engine coolant temperature sensor.
- Connect the electrical connection to the throttle casing.
- Connect the electrical connection to the fuel pressure regulator.
- Connect the electrical connection to the air flow meter.
- Place the air supply pipe from the heat exchanger to the intake manifold back in its housing and secure it using the bolt.
- Connect the air supply hose from the heat exchanger to the intake manifold, throttle body side and secure it using the bolts.
- Connect the rapid connector for the vacuum intake pipe from the vacuum pump.
- Connect the engine oil vapour recovery pipe, engine oil filler side and tighten the band.
- Place the vacuum pipes in their housings and secure them using the bolts.
- Connect the flexible pipe to the rigid vacuum intake pipe for the turbocharger vane position actuator control solenoid.
- Connect the flexible pipe to the rigid vacuum intake pipe from the vacuum pump.
- Place the oil vaopur recovery pipe between the separator and the turbo in its housing and secure it using the bolts.
- Connect the engine oil vapour recovery pipes, engine oil vapour separator side and tighten the bands.
- Connect the vacuum intake pipes to the vacuum reservoir.
- Connect the rapid connector for the fuel return pipe to the tank, fuel return manifold side.
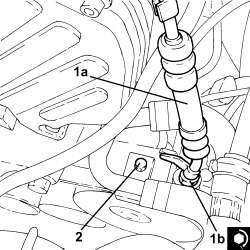
1. Connect the supply pipe from the pump to the power assisted steering box (1a), power assisted steering pump side and tighten the connector (1b) to the recommended torque.
| Component | Fastening | dia | Value (daNm) | Validity |
|---|---|---|---|---|
| Supply pipe from pump to power assisted steering box | Connector | M16 | (power assisted steering pump side) 3.6 - 4.4 |
2. Tighten the power assisted steering inlet pipe fixing bolt.
- Tighten the coolant drain plug to the radiator.
Op. 7055B91 RIGHT FRONT WHEEL ARCH LINER - R.R.
Op. 7055B66 ENGINE COMPARTMENT DUST COVER IN RIGHT FRONT WHEEL ARCH - R.R.
Op. 4450B12 FRONT WHEELS (TWO) - R+R
Op. 1048A28 VACUUM AIR CIRCUIT RESONATOR PIPE - R+R
Op. 1048A50 TURBOCHARGER AIR INTAKE PIPE - R.R.
Op. 1084A16 OIL DIPSTICK PIPE - R.R
Op. 5530B52 BATTERY SUPPORT/DRIP TRAY - R.R
Op. 0010T20 ENGINE COOLANT - CHANGE
Op. 0010T71 POWER STEERING FLUID CHECK LEVEL AND TOP UP IF NECESSARY
Op. 0010T75 HYDRAULIC POWER STEERING SYSTEM BLEED AIR
Op. 7055B54 UNDER ENGINE PROTECTION/GUARD - R.R.
Op. 1016A10 SOUND-PROOFING COVER - R.R
- Remove the vehicle from the lift.
- On this car, it is not possible to remove/refit the cylinder head on the car.
To perform this operation, remove/refit the power unit
Op. 1004B10 POWER UNIT WITH MANUAL GEARBOX - R.R
and then work at the bench, customising the engine service procedures for this operation.
Removing
- Position the vehicle on a lift.
Op. 1016A10 SOUND-PROOFING COVER - R.R
Op. 5530B52 BATTERY SUPPORT/DRIP TRAY - R.R
Op. 1048A10 AIR FILTER ASSEMBLY - R.R.
Op. 7055B54 UNDER ENGINE PROTECTION/GUARD - R.R.
Op. 4450B04 RIGHT FRONT WHEEL - R.R
Op. 7055B66 ENGINE COMPARTMENT DUST COVER IN RIGHT FRONT WHEEL ARCH - R.R.
Op. 7055B91 RIGHT FRONT WHEEL ARCH LINER - R.R.
Op. 1092G10 SINGLE ENGINE BELT - R.R
Op. 1092A10 CRANKSHAFT PULLEY - R + R
Collect the coolant in a suitable container.
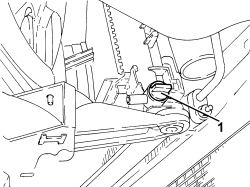
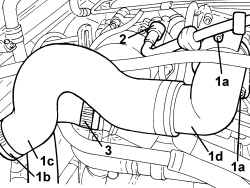
1. Unscrew bolts (1a), loosen collar (1b) and remove the sleeve (1c) and rigid air intake pipe (1d) to the throttle body.
2. Disconnect the rapid connector for the vacuum intake pipe from the vacuum pump.
3.Loosen the band and disconnect the radiator upper coolant inlet hose, thermostat side.
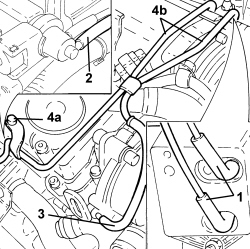
1. Disconnect the vacuum pipes from the vacuum reservoir.
2. Disconnect the vacuum pipe from the turbocharger vane position actuator control solenoid valve.
3. Disconnect the vacuum pipe from the vacuum pump.
4. Undo the fastenings (4a) and remove the vacuum pipes (4b).
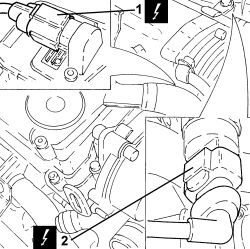
1. Disconnect the electrical connection from the throttle casing.
| Description | Connector | |
|---|---|---|
| 1 | Integrated throttle casing actuator | See N075 THROTTLE BODY ACTUATOR |
2. Disconnect the electrical connection from the fuel pressure sensor on the fuel manifold.
| Description | Connector | |
|---|---|---|
| 2 | Fuel pressure sensor | See K083 FUEL PRESSURE SENSOR |
1. Disconnect the electrical connection from the engine coolant temperature sensor.
| Description | Connector | |
|---|---|---|
| 1 | Engine coolant temperature sensor/sender unit | See K036 ENGINE COOLANT TEMPERATURE SENSOR/SENDER UNIT |
2. Loosen the band and disconnect the coolant return pipe to the engine coolant reservoir, thermostat side.
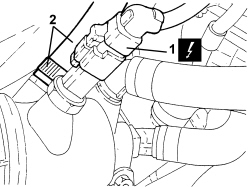
1. Loosen the bands (1a), undo the bolts (1b) and remove the coolant return pipe to the engine coolant supply reservoir (1c).
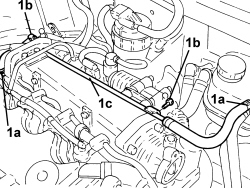
1. Disconnect the electrical connection from the EGR system solenoid valve
| Description | Connector | |
|---|---|---|
| 1 | E.G.R. solenoid | See L030 EGR SOLENOID VALVE |
2. Disconnect the electrical connection from the pressure relief sensor.
| Description | Connector | |
|---|---|---|
| 2 | Supercharging sensor | See K082 SUPERCHARGING SENSOR |
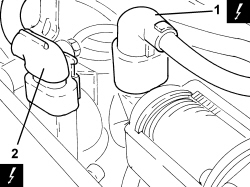
1. Disconnect the electrical connections from the injectors.
| Description | Connector | |
|---|---|---|
| 1 | Injector | See N070 INJECTOR |
2. Undo the bolts (2a) and rmove the electrical wiring (2b) aside.
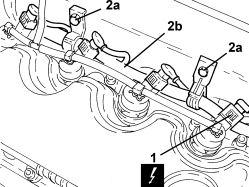
1. Disconnect the pipes (1a), undo the bolts (1b) and remove the fuel return manifold (1c).
2. Disconnect the electrical connection from the fuel pressure regulator on the pressure pump.
| Description | Connector | |
|---|---|---|
| 2 | Pressure regulator on pressure pump | See N077 FUEL PRESSURE REGULATOR |
3. Disconnect the electrical connection from the fuel pressure regulator on the injector single manifold.
| Description | Connector | |
|---|---|---|
| 3 | Fuel pressure regulator on rail | See N087 FUEL PRESSURE REGULATOR ON RAIL |
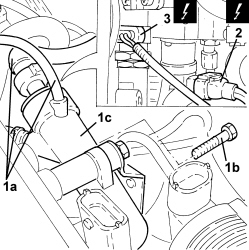
1. Manually push the clips (1a) and disconnect the pipe from the injectors to the fuel recovery manifold (1b), injector side and remove it.
2. Undo the connectors securing the pipes from the fuel manifold to the injectors, injector side.
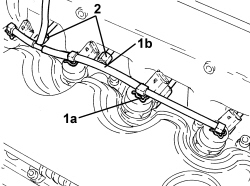
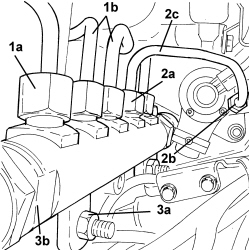
1. Unscrew the connectors (1a) and remove the pipes from the fuel manifold to the injectors (1b).
2. undo the connectors (2a), (2b) and remove the pipe from the pressure pump to the fuel manifold (2c).
3. Undo the nuts (3a) and remove the single fuel manifold pipe assembly (3b).
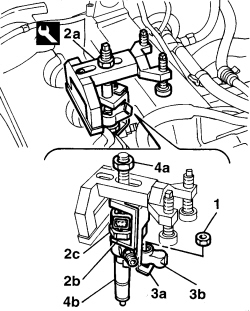
1. Undo the nuts fixing the injector mounting brackets.
2. Position the tool (2a) for extracting the injectors, taking care to position the lifting bracket (2b) under the polygonal area (2c) of the injector.
| Tool | Description | Function | Validity |
|---|---|---|---|
| 1870739000 | Extractor | Removing injectors | 1.9 JTD 8V 1.9 JTD 16V |
3. Position the second lifting bracket for the tool (3a) under the injector securing bracket (3b).
4. Tighten the nut for the tool (4a) and remove the injector assembly (4b).
- Repeat the operation for the remaining injectors.
1. Loosen the bands (1a), undo the fastenings (1b) and remove the engine cooling system supply pipe (1c).
2. Loosen the band and disconnect the coolant outlet pipe from the coolant/exhaust gas heat exchanger for the EGR system.
3. Loosen the band and disconnect the coolant return pipe from the engine oil heat exchanger on the water pump rigid inlet pipe side.
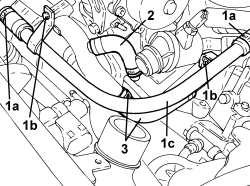
1.Loosen the band and disconnect the lower coolant inlet hose from the radiator, water pump rigid coolant inlet pipe side.
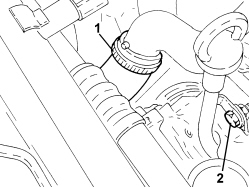
2. Undo the upper bolt securing the engine oil dipstick tube.
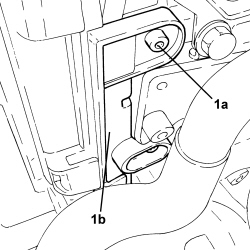
1. Undo the bolts (1a) and remove the side guard (1b) for the timing belt.
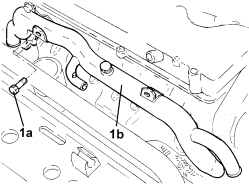
1. Undo the bolts (1a) and remove the water pump inlet pipe (1b).
- Remove the gasket.
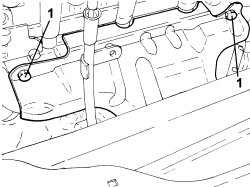
1. Undo the two upper bolts fixing the exhaust manifold heat shield.
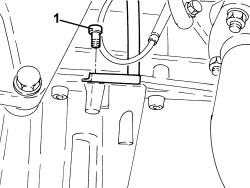
1. Undo the lower bolt securing the engine oil dipstick tube.
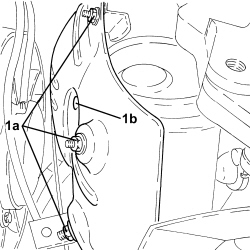
1. Undo the nuts (1a) and the bolt (1b) securing the exhaust manifold heat shield.
- Working via the engine compartment, remove the pipe for the engine oil dipstick and the exhaust manifold heat shield.
1. Undo the bolts securing the engine oil return pipe from the turbocharger, engine block side.
2. Undo the connector fastening the engine oil supply pipe to the turbocharger, engine block side.
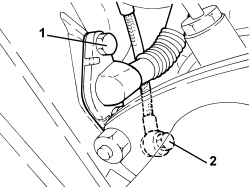
1. Undo the nuts fixing the intermediate exhaust pipe mounting bracket.
2. Undo the nuts (2a) and disconnect the intermediate exhaust pipe (2b) from the catalytic converter.
- Remove the gasket.
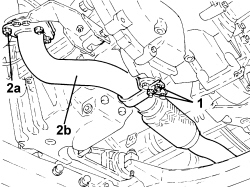
1. Undo the bolts (1a), loosen the collar (1b) and remove the exhaust gas intake pipe from the exhaust manifold to the E.G.R. heat exchanger (1c).
2. Remove the relative seals.
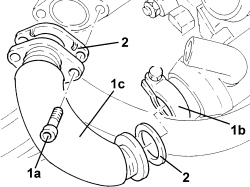
1. Undo the nuts (1a) and move the turbocharger and exhaust manifold assembly (1b) away from the cylinder head.
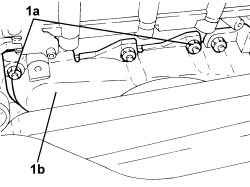
1. Undo the bolts fixing the exhaust gas outlet hose from the E.G.R. solenoid valve, E.G.R. solenoid valve side.
2. Undo the bolts (2a) and remove the throttle body (2b).
- Remove the gasket.
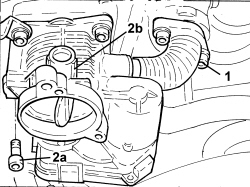
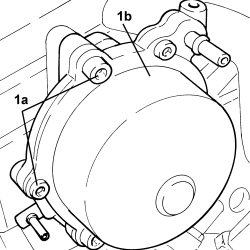
1. Undo the bolts (1a) and remove the vacuum unit (1b).
- Remove the gasket.
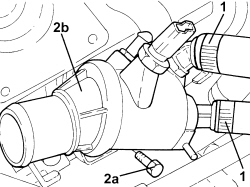
1. Loosen the bands and disconnect the pipes from the thermostat.
2. Undo the bolts (2a) and remove the thermostat (2b).
- Remove the gasket.
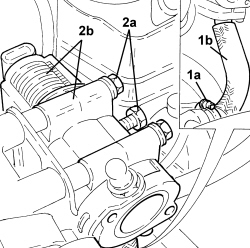
1. Loosen the collar (1a) and disconnect the exhaust gas outlet hose from the exhaust gas/water heat exchanger for the E.G.R. system (1b), heat exchanger side.
2. Undo the fixing bolts (2a) and remove the E.G.R. system solenoid valve (2b) complete with hose.
- Remove the gasket.
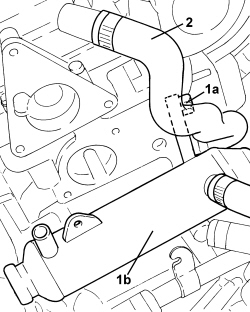
1. Undo the fastenings (1a) and remove the water/exhaust gas heat exchanger for the E.G.R. system (1b).
2. Loosen the band and disconnect the oil vapour pipe from the tappet cover to the crankcase, tappet cover side.
1. Undo the nuts (1a) and remove the vacuum reservoir for the engine air intake management (1b).
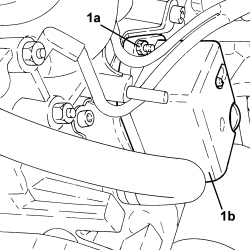
1. Undo the fastenings (1a) and remove the vacuum reservoir mounting (1b).
2. Disconnect the electrical connections from the heater plugs.
| Description | Connector | |
|---|---|---|
| 2 | Heater plugs | See A040 HEATER PLUGS |
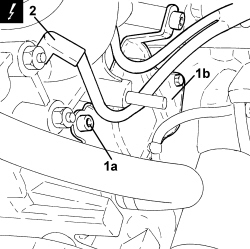
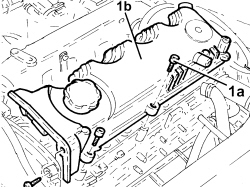
1. Undo the bolts (1a) and remove the cam cover (1b) complete with gasket.
Op. 1008B10 POWER UNIT FRONT SUPPORT FLEXIBLE MOUNTING (TIMING SIDE) - REPLACE
Op. 1032D12 TIMING SYSTEM PROTECTIVE COVER(S) - R + R
Op. 1092G20 ENGINE COMPONENT SINGLE BELT FIXED TENSIONER - ONE - R + R
Op. 1008A46 POWER UNIT RIGID SUPPORT - TIMING SIDE - R.R.
Op. 1032B10 TOOTHED TIMING BELT - R + R FOR TIMING ADJUSTMENT OR REPLACEMENT
1. Fit the timing side power unit rigid support (1a) temporarily in its housing and secure it using the bolts (1b).
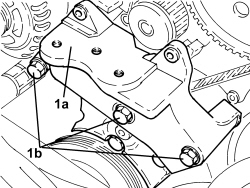
1. Place the flexible mounting for the timing side power unit front support (1a) in its housing temporarily and secure it using the bolts (1b), (1c).
- Remove the hydraulic jack from underneath the engine.
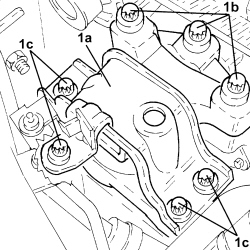
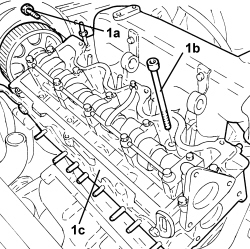
1. Undo the bolts (1a), (1b) and remove the cylinder head (1c).
2. Remove the cylinder head gasket.
Refitting
- Fit a new cylinder head gasket on the cylinder block taking care to ensure that it is the same size as the one removed.
- Position the cylinder head on the cylinder block/crankcase.
1. Tighten the bolts securing the cylinder head to the cylinder block to the recommended torque following the order illustrated and using the angular tightening tool.
| Component | Fastening | dia | Value (daNm) | Validity |
|---|---|---|---|---|
| Cylinder head | Bolt | M12 | (engine crankcase side) 6.2 - 6.8 + 90° + 90° + 90° | 1.9 JTD 8v |
| Tool | Description | Function | Validity |
|---|---|---|---|
| 1860942000 | Torque wrench | Tighten bolts to torque plus angle |
- Tighten the bolt fixing the pressure pump mounting to the cylinder head to the recommended torque.
| Component | Fastening | dia | Value (daNm) | Validity |
|---|---|---|---|---|
| Pressure pump mounting | Bolt | M10 | (cylinder head side) 4.5 - 5.5 | 1.9 JTD 8v |
- Position a hydraulic jack underneath the engine.
- Remove the flexible mounting for the timing side power unit front support fitted provisionally.
- Remove the timing side rigid power unit support fitted provisionally.
Op. 1032B10 TOOTHED TIMING BELT - R + R FOR TIMING ADJUSTMENT OR REPLACEMENT
Op. 1008A46 POWER UNIT RIGID SUPPORT - TIMING SIDE - R.R.
Op. 1092G20 ENGINE COMPONENT SINGLE BELT FIXED TENSIONER - ONE - R + R
Op. 1032D12 TIMING SYSTEM PROTECTIVE COVER(S) - R + R
Op. 1008B10 POWER UNIT FRONT SUPPORT FLEXIBLE MOUNTING (TIMING SIDE) - REPLACE
- Place the tappet cover in position and secure it tightening the bolts to the recommended torque.
| Component | Fastening | dia | Value (daNm) | Validity |
|---|---|---|---|---|
| Tappet cover | Bolt | M6 | (cylinder head side) 0.8 - 1.0 | 1.9 JTD 8v |
- Connect the electrical connections to the heater plugs.
-- Place the vacuum reservoir mounting back in its housing and secure it.
- Place the vacuum reservoir for the engine air intake management back in its housing and secure it using the nuts.
- Connect the oil vapour pipe from the tappet cover to the crankcase, tappet cover side and tighten the band.
- Place the exhaust gas/water heat exchanger for the E.G.R. system back in its housing and secure it.
- Place the gasket for the E.G.R. system solenoid valve in its housing.
1. Place the E.G.R. system solenoid valve (1a) complete with hose in its housing and fasten it tightening the bolts (1b) to the recommended torque.
| Component | Fastening | dia | Value (daNm) | Validity |
|---|---|---|---|---|
| E.G.R. system solenoid valve | Bolt | M8 | (intake manifold side) 2.3 - 2.8 | 1.9 JTD 8v |
2. Connect the exhaust gas outlet hose from the exhaust gas/water heat exchanger for the E.G.R. system (2a), heat exchanger side and tighten the collar (2b).
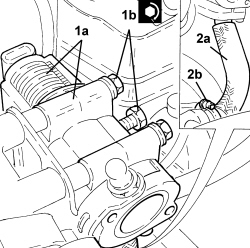
- Place the gasket for the thermostat back in its housing.
1. Place the thermostat (1a) in its housing and fasten it tightening the bolts (1b) to the recommended torque.
| Component | Fastening | dia | Value (daNm) | Validity |
|---|---|---|---|---|
| Thermostat | Bolt | M8 | (cylinder head side) 2.3 - 2.8 | 1.9 JTD 8v |
2. Connect the pipes to the thermostat and tighten the bands.
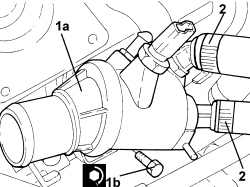
- Place the gasket for the vacuum unit back in its housing.
1. Place the vacuum unit (1a) in its housing and fasten it tightening the bolts (1b) to the recommended torque.
| Component | Fastening | dia | Value (daNm) | Validity |
|---|---|---|---|---|
| Vacuum unit | Bolt | M8 | (cylinder head side) 2.7 - 3.3 | 1.9 JTD 8v |
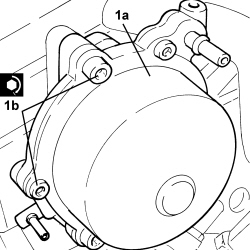
- Place the gasket for the throttle body back in its housing.
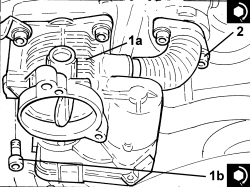
1. Place the throttle body (1a) in its housing and secure it tightening the bolts (1b) to the recommended torque.
| Component | Fastening | dia | Value (daNm) | Validity |
|---|---|---|---|---|
| Throttle body | Bolt | (intake manifold side) | 1.9 JTD 8v |
2. Tighten the bolts fixing the exhaust gas outlet hose from the E.G.R. solenoid valve, E.G.R. solenoid valve side.
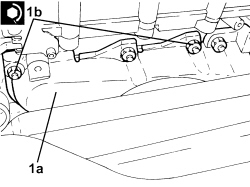
1. Place the turbocharger and exhaust manifold assembly (1a) in its housing and tighten the nuts (1b) to the recommended torque.
| Component | Fastening | dia | Value (daNm) | Validity |
|---|---|---|---|---|
| Turbocharger and exhaust manifold assembly | Nut | M8 | (cylinder head side) 2.2 - 2.7 | 1.9 JTD 8v |
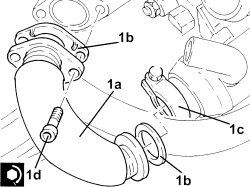
1. Place the exhaust gas intake pipe from the exhaust manifold to the E.G.R. heat exchanger (1a) back in its housing complete with gaskets (1b), then secure it tightening the collar (1c) and the bolts (1d) to the recommended torque.
| Component | Fastening | dia | Value (daNm) | Validity |
|---|---|---|---|---|
| Exhaust gas/water heat exchanger for E.G.R. system | Bolt | M8 | (exhaust manifold side) 2.3 - 2.8 | 1.9 JTD 8v |
- Place the exhaust pipe gasket in its housing.
1. Connect the intermediate exhaust pipe (1a) to the catalytic converter and tighten the nuts (1b) to the recommended torque.
| Component | Fastening | dia | Value (daNm) | Validity |
|---|---|---|---|---|
| Intermediate exhaust pipe with flexible section | Nut | M8 | (catalytic converter side) 2.2 - 2.6 | 1.9 JTD 16v 1.9 JTD 8v 2.4 JTD 20v |
2. Tighten the nuts securing the intermediate exhaust pipe mounting bracket.
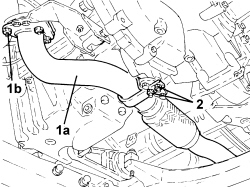
1. Tighten the connector securing the engine oil delivery pipe to the turbocharger, crankcase side to the recommended torque.
| Component | Fastening | dia | Value (daNm) | Validity |
|---|---|---|---|---|
| Engine oil supply pipe to turbocharger | Connector | M12 | (engine crankcase side) 2.2 - 2.7 | 1.9 JTD 16v 1.9 JTD 8v |
2. Tighten the bolts securing the engine oil return pipe from the turbocharger, crankcase side, to the specified torque.
| Component | Fastening | dia | Value (daNm) | Validity |
|---|---|---|---|---|
| Engine oil supply pipe from turbocharger | Bolt | M8 | (engine crankcase side) 2.2 - 2.7 | 1.9 JTD 16v 1.9 JTD 8v |
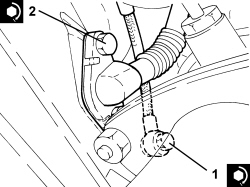
- Working via the engine compartment, place the pipe for the engine oil dipstick and the exhaust manifold heat shield in their housings.
- Tighten the lower nuts and the bolt securing the exhaust manifold heat shield.
- Tighten the lower bolt securing the engine oil dipstick tube.
- Tighten the two upper bolts fixing the exhaust manifold heat shield.
- Place the water pump rigid inlet pipe gasket in its housing.
1. Place the water pump rigid inlet pipe (1a) in position and secure it tightening the bolts (1b) to the recommended torque.
| Component | Fastening | dia | Value (daNm) | Validity |
|---|---|---|---|---|
| Water pump rigid inlet pipe | Bolt | M6 | (cylinder head side) 0.8 - 1.0 | 1.9 JTD 16v 1.9 JTD 8v |
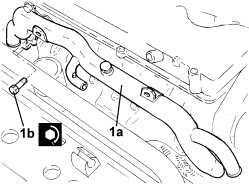
- Fit the timing belt side protective cover and secure it using the bolts.
- Tighten the upper bolt securing the engine oil dipstick tube.
- Connect the lower coolant inlet hose from the radiator, water pump rigid coolant inlet pipe side and tighten the band.
- Connect the return pipe from the engine oil heat exchanger, water pump rigid inlet pipe and tighten the band.
- Connect the coolant oulet pipe from the coolant/exhaust gas heat exchanger for the EGR system and tighten the band.
- Place the engine cooling system supply pipe in its housing, secure it and tighten the bands.
- Place the injectors in their seats complete with brackets and fasten them tightening the nuts to the recommended torque.
| Component | Fastening | dia | Value (daNm) | Validity |
|---|---|---|---|---|
| Injector brackets | Nut | M8 | (cylinder head side) 2.7 - 3.3 | 1.9 JTD 8v |
1. Place the single fuel manifold pipe (1a) in its housing and secure it tightening the nuts (1b) to the recommended torque.
| Component | Fastening | dia | Value (daNm) | Validity |
|---|---|---|---|---|
| Single fuel manifold pipe (rail) | Nut | M8 | (intake manifold side) 2.3 - 2.8 | 1.9 JTD 8v |
2. Place the pipe from the pressure pump to the fuel manifold pipe (2a) back in its housing and secure it tightening the connectors (2b) and (2c) to the recommended torque.
| Component | Fastening | dia | Value (daNm) | Validity |
|---|---|---|---|---|
| Pipe from pressure pump to fuel manifold | Connector | M12 | (pressure pump side) 2.2 - 2.4 | 1.9 JTD 8v |
| Component | Fastening | dia | Value (daNm) | Validity |
|---|---|---|---|---|
| Pipe from pressure pump to fuel manifold | Connector | M14 | (fuel manifold side) 2.2 - 2.4 | 1.9 JTD 8v |
3. Place the pipes from the fuel manifold to the injectors (3a) in their housings and secure them tightening the connectors (3b) and (3c) to the recommended torque.
| Component | Fastening | dia | Value (daNm) | Validity |
|---|---|---|---|---|
| Pipes from fuel manifold to injectors | Connector | M14 | (fuel manifold side) 2.2 - 2.4 | 1.9 JTD 8v |
| Component | Fastening | dia | Value (daNm) | Validity |
|---|---|---|---|---|
| Pipes from fuel manifold to injectors | Connector | M12 | (injector side) 2.2 - 2.4 | 1.9 JTD 8v |
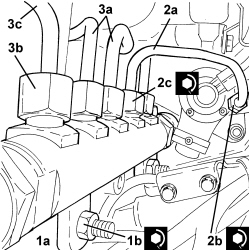
- Place the pipe from the injectors to the fuel recovery manifold in its housing and connect it to the injectors and push home until the clips click into place.
- Connect the electrical connection to the fuel pressure regulator on the injector single manifold.
- Connect the electrical connection to the fuel pressure regulator on the pressure pump.
- Place the fuel return manifold in its housing, secure it using the bolts and connect the pipes.
- Place the electrical wiring in position and fasten it using the bolts.
- Connect the electrical connections to the injectors.
- Connect the electrical connection for the pressure relief sensor.
- Connect the electrical connection to the EGR system solenoid valve
- Place the coolant return pipe to the engine coolant reservoir in position and secure it using the bolts and tighten the bands.
- Connect the electrical connection to the engine coolant temperature sensor.
- Connect the electrical connection to the fuel pressure sensor on the fuel manifold.
- Connect the electrical connection to the throttle casing.
- Place the vacuum pipes in their housings and secure them.
- Connect the vacuum pipe to the vacuum unit.
- Connect the vacuum pipe to the turbocharger vane position actuator control solenoid valve.
- Connect the vacuum pipes to the vacuum reservoir.
- Connect the radiator upper coolant inlet hose, thermostat side, and tighten the band.
- Connect the vacuum pipe rapid connector to the vacuum pump.
- Place the hose and the throttle body rigid air inlet pipe in their housings, then fasten them using the band and the bolts.
- Tighten the coolant drain plug to the radiator.
Op. 1092A10 CRANKSHAFT PULLEY - R + R
Op. 1092G10 SINGLE ENGINE BELT - R.R
Op. 7055B91 RIGHT FRONT WHEEL ARCH LINER - R.R.
Op. 7055B66 ENGINE COMPARTMENT DUST COVER IN RIGHT FRONT WHEEL ARCH - R.R.
Op. 4450B04 RIGHT FRONT WHEEL - R.R
Op. 1048A10 AIR FILTER ASSEMBLY - R.R.
Op. 5530B52 BATTERY SUPPORT/DRIP TRAY - R.R
Op. 1016A10 SOUND-PROOFING COVER - R.R
Op. 0010T20 ENGINE COOLANT - CHANGE
Op. 7055B54 UNDER ENGINE PROTECTION/GUARD - R.R.
- Remove the vehicle from the lift.
Parts & tools for this job Staging For 2005 Alfa Romeo 159
- PARTEngine gasket setSearch: Alfa Romeo 159 2005 engine gasket set
- TOOLTorque wrenchSearch: 3/8 inch torque wrench
- TOOLFeeler gauge setSearch: feeler gauge set
Links open Amazon search results in a new tab. As an Amazon Associate I earn from qualifying purchases.