
Power unit with manual gearbox - r.r
- Make
- Alfa Romeo
- Model
- 159 Factory Service Manual
- Year
- 2005–2011
- Section
- Engine and power unit › Power unit with manual gearbox - r.r
POWER UNIT WITH MANUAL GEARBOX - R.R
Removing
- Position the vehicle on a lift.
- Make sure that the ignition key is in the OFF position, then disconnect the battery terminal (-).
| Description | Connector | |
|---|---|---|
| Battery | See A001 BATTERY |
Op. 0010T84 COOLANT FOR AIR CONDITIONING SYSTEM - DEHYDRATE AND REPRESSURIZE
Op. 7210A18 R.R FRONT CROSSMEMBER
- Using a suitable syringe, draw off the power assisted steering fluid from the reservoir.
Op. 4130B40 SUPPLY PIPE FROM PUMP TO POWER STEERING BOX - R.R.
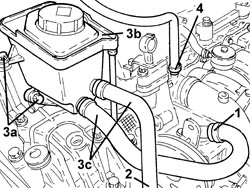
1. Loosen the band and disconnect the supply pipe from the power assisted steering fluid reservoir to the pump, power assisted steering pump side.
2. Disconnect the rapid connector for the return pipe from the heat exchanger pipe to the power assisted steering fluid reservoir, heat exchanger side.
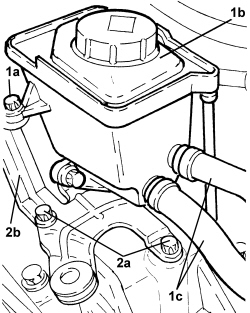
3. Undo the bolts (3a) and remove the power assisted steering fluid reservoir (3b) complete with pipes (3c).
4. Loosen the band and disconnect the coolant return pipe, cylinder head side.
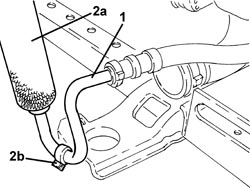
1. Disconnect the rapid connector for the power assisted steering system heat exchanger inlet pipe, heat exchanger side.
2. Remove the heat exchanger pipe (2a) after having released it from the securing band (2b).
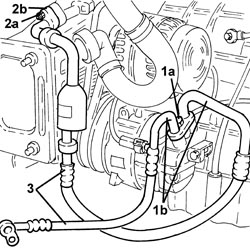
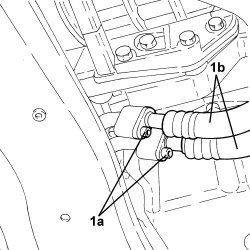
1. Undo the bolt (1a) and disconnect the inlet/outlet pipes from the air conditioning compressor (1b).
Seal the connectors that have been disconnected using suitable plugs to prevent dampness and impurities from entering the system.
2. Undo the nut (2a) and disconnect the air conditioning pipes intermediate flange (2b).
Seal the connectors that have been disconnected using suitable plugs to prevent dampness and impurities from entering the system.
3. Remove the air condtioning system pipes.
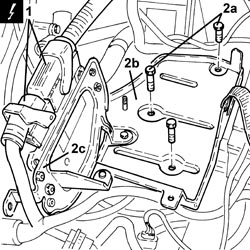
1. Disconnect the electrical connections from the injection/ignition system control unit.
| Description | Connector | |
|---|---|---|
| 1 | Engine management control unit | See M010 ENGINE MANAGEMENT ECU |
2. Undo the bolts (2a) and remove the battery drip tray (2b) complete with injection/ignition system control unit (2c).
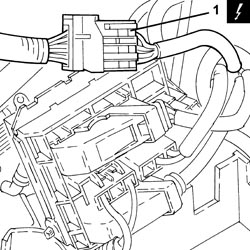
1. Open the junction unit cover, rotate the junction unit and disconnect the electrical connection (connector A).
| Description | Connector | |
|---|---|---|
| 1 | Front/engine coupling | See D004 FRONT/ENGINE COUPLING |
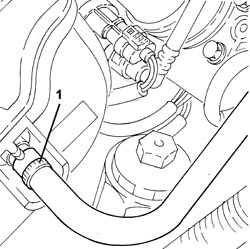
1. Loosen the band and disconnect the brake servo vacuum intake pipe, air chamber side.
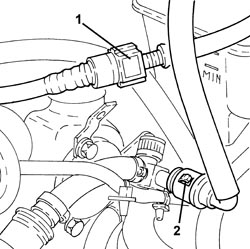
1. Disconnect the rapid connector for the fuel vapour pipe intermediate coupling.
2. Disconnect the rapid connector for the fuel supply pipe, multiple connector side.
- Discharge the fuel supply system pressure.
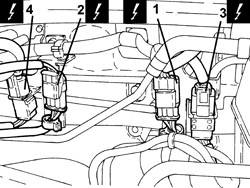
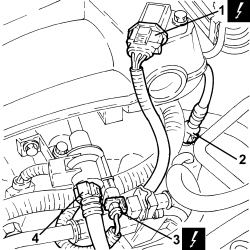
1. Disconnect the electrical connection for the left upper Lambda sensor.
| Description | Connector | |
|---|---|---|
| 1 | Lambda sensor on pre-catalyzer | See K015 LAMBDA SENSOR ON PRE-CATALYZER |
2. Disconnect the electrical connection for the right upper Lambda sensor.
| Description | Connector | |
|---|---|---|
| 2 | Lambda sensor on pre-catalyzer -2 | See K016 LAMBDA SENSOR ON PRE-CATALYZER -2 |
3. Disconnect the electrical connection for the left rear Lambda sensor to the catalytic converter.
| Description | Connector | |
|---|---|---|
| 3 | Lambda sensor on catalyzer | See K017 LAMBDA SENSOR ON CATALYZER |
4. Disconnect the electrical connection for the right rear Lambda sensor to the catalytic converter.
| Description | Connector | |
|---|---|---|
| 4 | Lambda sensor on catalyzer 2 | See K018 LAMBDA SENSOR ON CATALYZER - 2 |
Mark the electrical connections for disconnect them so that they can be correctly refitted.
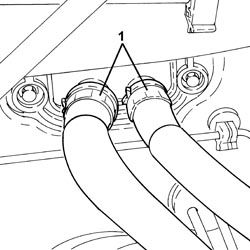
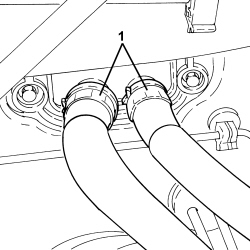
1. Disconnect the rapid connectors for the air conditioning system heater coolant inlet and outlet pipes.
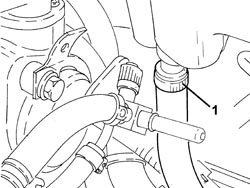
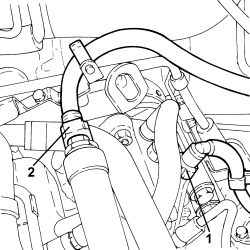
1. Loosen the collar and disconnect the supply pipe from the engine coolant reservoir.
- Replace the brake-clutch fluid reservoir plug using the tool.
| Tool | Description | Function | Validity |
|---|---|---|---|
| 2000001400 | Plug | Brake-clutch fluid reservoir cap |
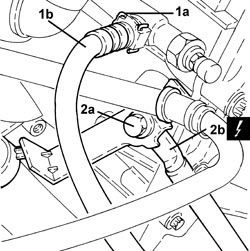
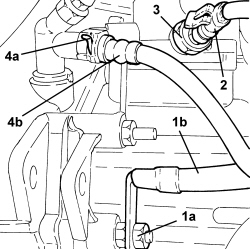
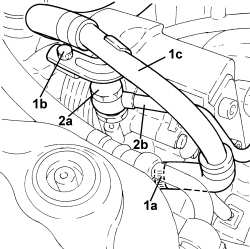
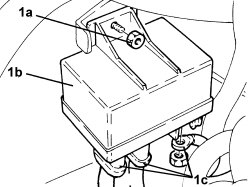
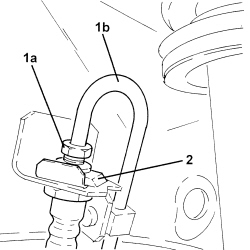
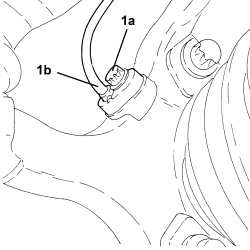
1. Release the retaining clip (1a) and disconnect the pipe (1b) between the damper and the clutch operating cylinder (1b), operating cylinder side.
2. Undo the bolt (2a) and disconnect the earth lead (2b) (connector B) from the gearbox.
| Description | Connector | |
|---|---|---|
| 2b | Battery earth on engine | See C002 BATTERY EARTH ON ENGINE |
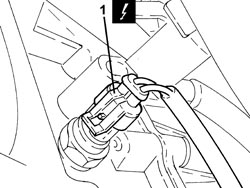
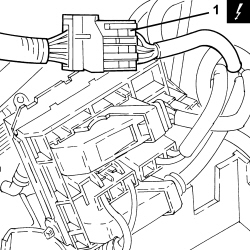
1. Disconnect the electrical connection from the reversing light switch.
| Description | Connector | |
|---|---|---|
| 1 | Reversing lights switch | See I020 REVERSING LIGHTS SWITCH |
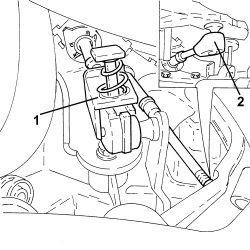
1. Disconnect the gear selector cable.
2. Disconnect the gear engagement cable.
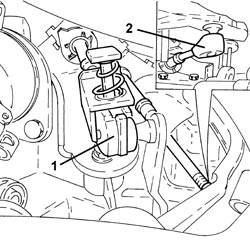
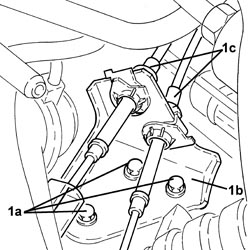
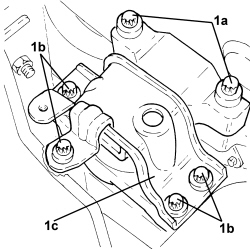
1. Unscrew the bolts (1a) and move aside the bracket (1b) complete with gear selection and engagement cables (1c).
Op. 4450B12 FRONT WHEELS (TWO) - R+R
Op. 1076B72 INTERMEDIATE EXHAUST PIPE WITH HOSE SECTION - R+R
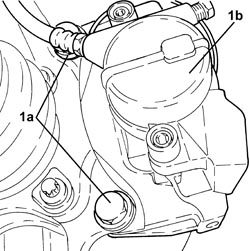
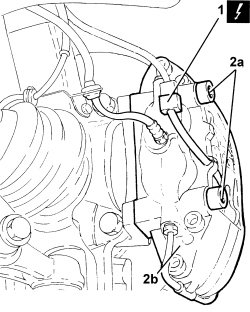
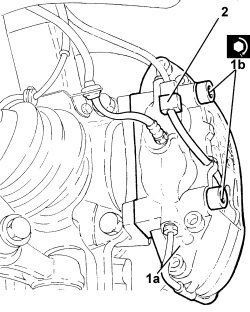
1. Undo the bolts (1a) and move the brake caliper assemblies (1b) to the side and secure them appropriately.
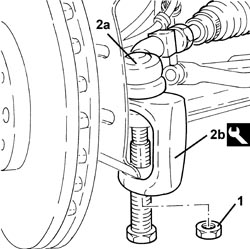
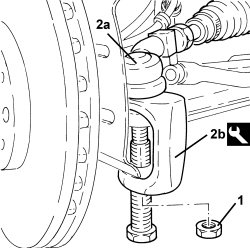
1. Undo the nuts fixing the steering rods to the front steering knuckles.
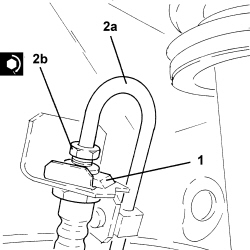
2. Disconnect the steering rods (2a) from the front steering knuckle using the tool (2b).
| Tool | Description | Function | Validity |
|---|---|---|---|
| 1871000700 | Extractor | Extracting steering rod from steering knuckle |
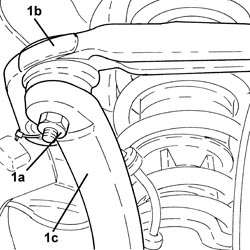
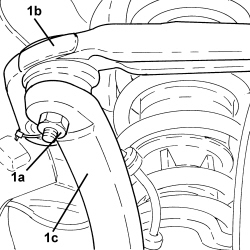
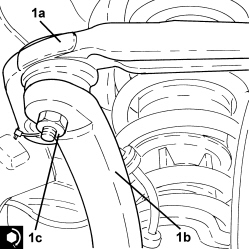
1. Undo the nuts (1a) and disconnect the front suspension upper track control arms (1b) from the steering knuckles (1c).
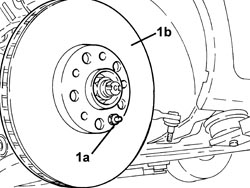
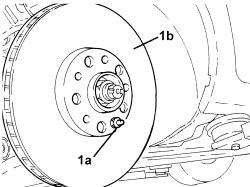
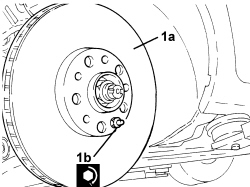
1. Undo the pins (1a) and remove the front brake discs (1b).
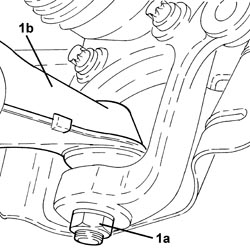
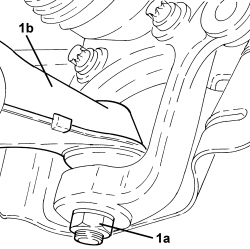
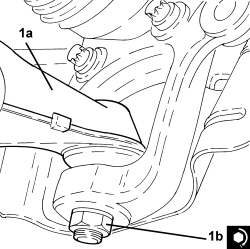
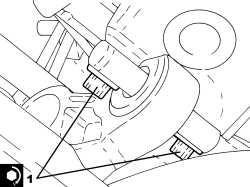
1. Undo the nuts (1a) and disconnect the lower track control arms (1b) from the steering knuckles.
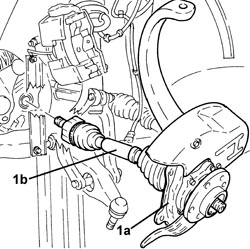
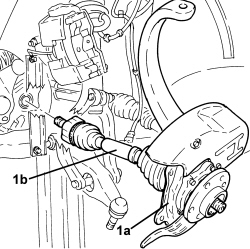
1. Remove the left front wheel steering knuckle (1a) complete with driveshaft (1b).
Collect the gearbox oil that comes out in a suitable container.
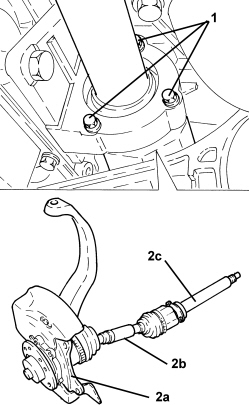
1. Loosen the bolts fixing the intermediate driveshaft to the mounting.
2. Remove the right front wheel steering knuckle (2a) complete with driveshaft (2b) and intermediate driveshaft (2c).
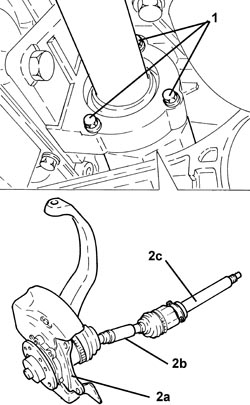
- Position a hydraulic jack under the engine crankcase sump.
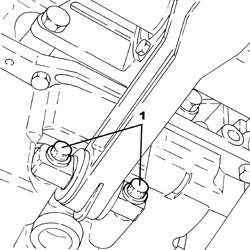
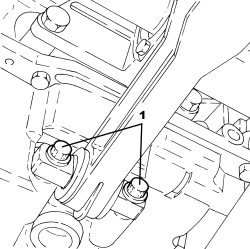
1. Undo the bolts fixing the power unit lower reaction rod, engine crankcase sump side.
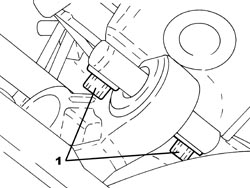
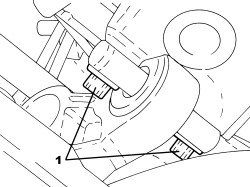
1. Undo the bolts fixing the power unit rear support flexible mounting, rigid support side.
- Remove the hydraulic jack under the engine crankcase sump.
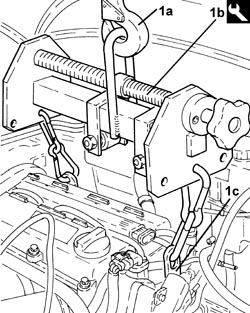
1. Support the power unit using a hydraulic hoist (1a) and the tool (1b) connected to the mounting brackets (1c).
| Tool | Description | Function | Validity |
|---|---|---|---|
| 1871001700 | Balance | Removing/ refitting power unit |
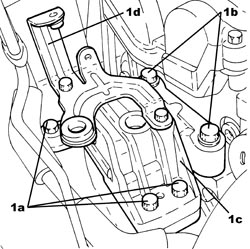
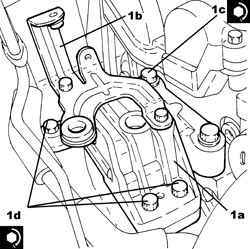
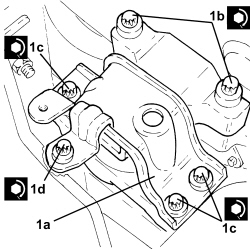
1. Undo the bolts (1a), (1b) and remove the flexible mounting for the power unit timing side front support (1c) complete with power assisted steering fluid reservoir mounting bracket (1d).
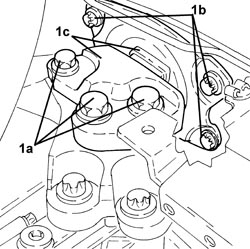
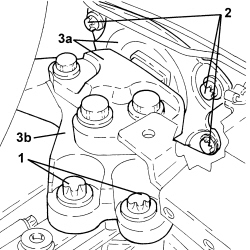
1. Undo the bolts (1a), (1b), then remove the gearbox side support flexible mounting (1c).
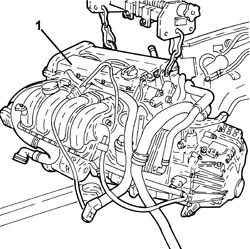
1. Using the hydraulic hoist, remove the power unit from the engine compartment and place it on a suitable support.
- Release the power unit from the support tools.
Refitting
- Secure the power unit using the support tools.
- Place the power unit in its housing using the hydraulic hoist.
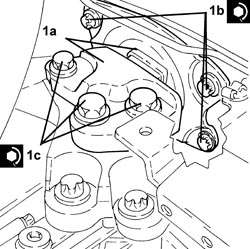
1. Place the gearbox side support flexible mounting (1a) in its housing and secure it tightening the bolts (1b) and the new bolts (1c) to the recommended torque.
| Component | Fastening | dia | Value (daNm) | Validity |
|---|---|---|---|---|
| Gearbox side support flexible mounting | Bolt | M10 | (bodyshell side) 5.4 - 6.6 |
| Component | Fastening | dia | Value (daNm) | Validity |
|---|---|---|---|---|
| Gearbox side power unit rigid support | Bolt (to be replaced) | M12 | (gearbox side) 6.3 - 7.7 + 45° |
1. Place the timing side power unit front support flexible mounting (1a) in its housing complete with power assisted steering fluid reservoir mounting bracket (1b) and secure it tightening the bolts (1c) and (1d) to the recommended torque.
| Component | Fastening | dia | Value (daNm) | Validity |
|---|---|---|---|---|
| Timing side power unit rigid support flexible mounting | Bolt (to be replaced) | M12 | (rigid support side) 6.3 - 7.7 + 90° |
| Component | Fastening | dia | Value (daNm) | Validity |
|---|---|---|---|---|
| Timing side power unit rigid support flexible mounting | Bolt (to be replaced) | M12 | (bodyshell side) 6.3 - 7.7 + 90° |
- Remove the hydraulic hoist and tool used for supporting the power unit safely.
| Tool | Description | Function | Validity |
|---|---|---|---|
| 1871001700 | Balance | Removing/ refitting power unit |
- Position a hydraulic jack under the engine crankcase sump.
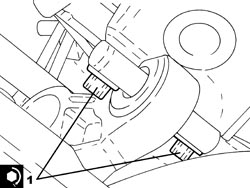
1. Tighten the bolts fixing the power unit rear support flexible mounting, rigid support side to the recommended torque.
| Component | Fastening | dia | Value (daNm) | Validity |
|---|---|---|---|---|
| Power unit rigid rear support flexible mounting | Bolt | M10 | (rigid support side) 5.4 - 6.6 |
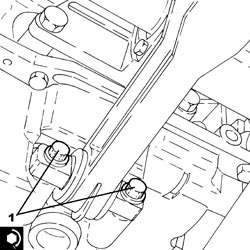
1. Tighten the bolts fixing the power unit lower reaction rod, engine crankcase sump side to the recommended torque.
| Component | Fastening | dia | Value (daNm) | Validity |
|---|---|---|---|---|
| Power unit lower reaction rod | Bolt | M10 | (engine crankcase sump side) 5.4 - 6.6 |
- Remove the hydraulic jack under the engine crankcase sump.
- Place the right front wheel steering knuckle in its housing complete with driveshaft and intermediate driveshaft.
- Tighten the bolts fixing the intermdiate driveshaft to the mounting to the recommended torque.
| Component | Fastening | dia | Value (daNm) | Validity |
|---|---|---|---|---|
| Intermediate driveshaft | Bolt | M6 | (support side) 0.7 - 1.1 |
- Place the left front wheel steering knuckle in its housing complete with driveshaft.
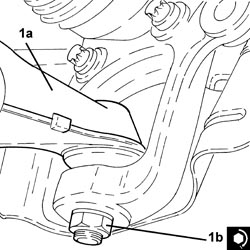
1. Connect the lower track control arms (1a) to the steering knuckles and secure them tightening the nuts (1b) to the recommended torque.
| Component | Fastening | dia | Value (daNm) | Validity |
|---|---|---|---|---|
| Front suspension lower track control arm | Nut | M14 | (strut side) 8.1 - 9.9 |
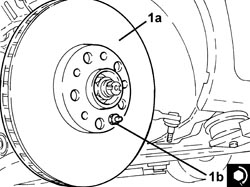
1. Position the front brake discs (1a) in their housings and secure them tightening the pins (1b) to the recommended torque.
| Component | Fastening | dia | Value (daNm) | Validity |
|---|---|---|---|---|
| Front brake discs | Bolt | M10 | (wheel hub side) 0.6 - 0.8 |
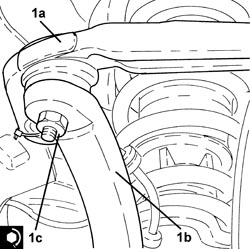
1. Connect the front suspension upper track control arms (1a) to the steering knuckles (1b) and secure them tightening the nuts (1c) to the recommended torque.
| Component | Fastening | dia | Value (daNm) | Validity |
|---|---|---|---|---|
| Front suspension upper track control arms | Nut | M10 | (steering knuckle side) 4.1 - 5.0 |
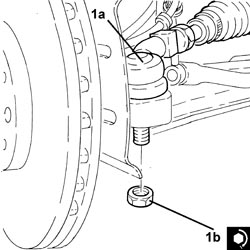
1. Connect the steering links (1a) to the front steering knuckles and secure them tightening the new nuts (1b) to the specified torque.
| Component | Fastening | dia | Value (daNm) | Validity |
|---|---|---|---|---|
| Steering rods | Nut | M12 | (steering knuckle side) 9.0 - 11.0 |
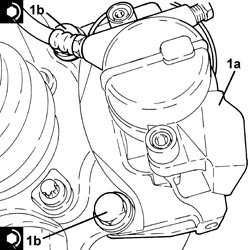
1. Position the brake caliper assemblies (1a) in their housings and secure them tightening the bolts (1b) to the recommended torque.
| Component | Fastening | dia | Value (daNm) | Validity |
|---|---|---|---|---|
| Front brake caliper brackets | Bolt | M14 | (steering knuckle side) 19.0 - 27.0 | 1.8 1.9 JTS 2.2 JTS 3.2 JTS 1.9 JTD 8V 1.9 JTD 16V |
Op. 1076B72 INTERMEDIATE EXHAUST PIPE WITH HOSE SECTION - R+R
Op. 4450B12 FRONT WHEELS (TWO) - R+R
1. Refit the bracket (1a) complete with gear selection and engagement cables (1b) and secure them tightening the bolts (1c) to the recommended torque.
| Component | Fastening | dia | Value (daNm) | Validity |
|---|---|---|---|---|
| Gear selection-engagement cables mounting bracket | Bolt | M8 | (gearbox side) 1.9 - 2.9 |
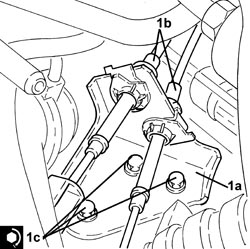
- Connect the gear selector and engagement cables.
- Connect the electrical connection to the reversing light switch.
- Connect the earth lead to the gearbox and secure it using the bolt.
- Connect the pipe between the damper and clutch operating cylinder, operating cylinder side and secure it using the retaining clip.
- Replace the tool with the brake-clutch fluid reservoir plug.
| Tool | Description | Function | Validity |
|---|---|---|---|
| 2000001400 | Plug | Brake-clutch fluid reservoir cap |
- Connect the coolant return pipe to the engine coolant reservoir and tighten the collar.
- Connect the rapid connectors for the air conditioning system heater coolant inlet and outlet pipes.
- Connect the electrical connections for the Lambda sensors.
- Connect the rapid connector for the fuel supply pipe, multiple connector side.
- Connect the rapid connector for the fuel vapour pipe intermediate coupling.
- Connect the brake servo vacuum intake pipe, air chamber side and tighten the band.
- Connect the electrical connection, place the junction unit in its housing and close the cover.
- Place the battery drip tray complete with injection/ignition system control unit in its housing and secure it using the bolts.
- Connect the electrical connections to the injection/ignition system control unit.
- Place the air conditioning system pipes in their housings.
- Connect the air conditioning pipes intermediate flange and tighten the nut to the recommended torque.
Replace any O-Rings for the connectors using green coloured seals only which are resistant to the R134a refrigerant fluid.
Lubricate the connector threads using anti-freeze.
| Component | Fastening | dia | Value (daNm) | Validity |
|---|---|---|---|---|
| EXPANSION VALVE SIDE PIPE CONNECTOR | Nut | M8 | 1.8 ÷ 2.2 |
- Connect the air conditioning compressor inlet/outlet pipes and secure them by tightening the bolt to the recommended torque.
Replace any O-Rings for the connectors using green coloured seals only which are resistant to the R134a refrigerant fluid.
Lubricate the connector threads using anti-freeze.
| Component | Fastening | dia | Value (daNm) | Validity |
|---|---|---|---|---|
| COMPRESSOR SIDE PIPE CONNECTOR | Bolt | M8x90 | 2.2 ÷ 2.6 |
- Place the heat exchanger in position and fasten it with the band.
- Connect the rapid connector for the power assisted steering system heat exchanger inlet pipe, heat exchanger side.
- Connect the coolant return pipe, cylinder head side, and tighten the band.
- Place the power assisted steering fluid reservoir complete with pipes in its housing and secure it using the bolts.
- Connect the rapid connector for the return pipe from the heat exchanger pipe to the power assisted steering fluid reservoir, heat exchanger side.
- Connect the supply pipe from the fluid reservoir to the power assisted steering pump, power assisted steering pump side, and tighten the band.
Op. 4130B40 SUPPLY PIPE FROM PUMP TO POWER STEERING BOX - R.R.
Op. 7210A18 R.R FRONT CROSSMEMBER
- Connect the negative battery terminal.
Op. 0010T20 ENGINE COOLANT - CHANGE
Op. 0010T41 MANUAL GEARBOX OIL CHECK LEVEL AND TOP UP IF NECESSARY
Op. 0010T64 BRAKE AND/OR CLUTCH FLUID CHECK LEVEL AND TOP UP AS NECESSARY
Op. 0010T67 HYDRAULIC CLUTCH SYSTEM - BLEED AIR
Op. 0010T71 POWER STEERING FLUID CHECK LEVEL AND TOP UP IF NECESSARY
Op. 0010T75 HYDRAULIC POWER STEERING SYSTEM BLEED AIR
Op. 0010T84 COOLANT FOR AIR CONDITIONING SYSTEM - DEHYDRATE AND REPRESSURIZE
- Remove the vehicle from the lift.
Removing
- Position the vehicle on a lift.
Op. 5530B52 BATTERY SUPPORT/DRIP TRAY - R.R
Op. 1016A10 SOUND-PROOFING COVER - R.R
Op. 7055B54 UNDER ENGINE PROTECTION/GUARD - R.R.
Op. 0010T84 COOLANT FOR AIR CONDITIONING SYSTEM - DEHYDRATE AND REPRESSURIZE
Op. 1048A28 VACUUM AIR CIRCUIT RESONATOR PIPE - R+R
Op. 1048A50 TURBOCHARGER AIR INTAKE PIPE - R.R.
Op. 1088D14 UPPER RADIATOR COOLANT OUTLET HOSE - R.R.
Op. 1088D10 LOWER RADIATOR COOLANT OUTLET HOSE - R.R.
Op. 4450B12 FRONT WHEELS (TWO) - R+R
Op. 7055B66 ENGINE COMPARTMENT DUST COVER IN RIGHT FRONT WHEEL ARCH - R.R.
Op. 7055B91 RIGHT FRONT WHEEL ARCH LINER - R.R.
Op. 7055B90 LEFT FRONT WHEEL ARCH LINER - R.R.
Op. 5540B70 LEFT FRONT LIGHT CLUSTER WITH DIRECTION INDICATOR - R.R.
Op. 5540B71 RIGHT FRONT LIGHT CLUSTER WITH DIRECTION INDICATOR - R.R.
Op. 7025A34 BONNET LID LOCK (ONE) - R+R OR REPAIR
Op. 7210A15 R.R. FRONT WING/HEADLAMP HOUSING CROSSMEMBER
Op. 7210A18 R.R FRONT CROSSMEMBER
Op. 1076B72 INTERMEDIATE EXHAUST PIPE WITH HOSE SECTION - R+R
1. Undo the gearbox drain plug and collect the fluid in a suitable container.
Collect the transmission fluid in a suitable container.
Do not let the oil disperse into the environment as indiscriminate dispersion of this product causes pollution.
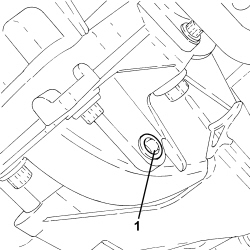
1. Disconnect the fuel supply pipe rapid connector, pressure pump side.
2. Disconnect the rapid connector for the fuel return pipe, fuel return manifold side.
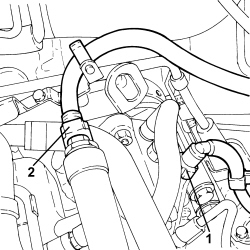
- Draw off the power assisted steering fluid from the reservoir using a suitable syringe.
1. Disconnect the rapid connector for the power assisted steering system heat exchanger inlet pipe.
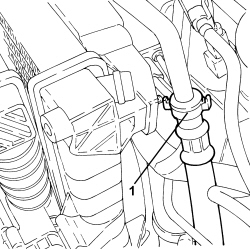
1. Disconnect the rapid connector for the power assisted steering system heat exchanger outlet pipe.
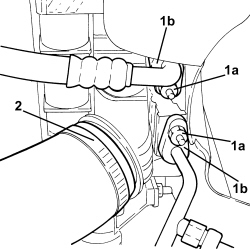
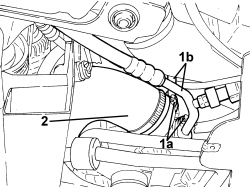
1. Undo the nuts (1a) and disconnect the inlet/outlet pipes from the air conditioning condenser (1b).
Seal the connectors that have been disconnected using suitable plugs to prevent dampness and impurities from entering the system.
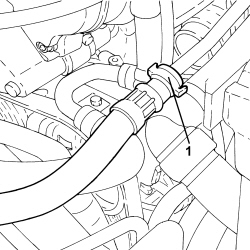
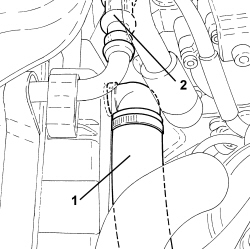
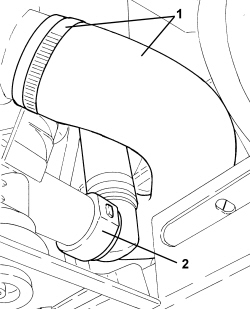
2. Loosen the band and disconnect the air supply hose between the turbocharger and the heat exchanger, heat exchanger side.
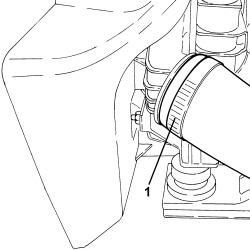
1. Loosen the band and disconnect the air supply hose from the heat exchanger to the rigid pipe, heat exchanger side.
- Position a hydraulic jack underneath the engine cooling radiator.
- Undo the bolts fixing the engine cooling radiator mounting brackets to the front suspension crossmember.
- Remove the engine cooling radiator mounting brackets.
- Remove the engine cooling radiator complete with heat exchanger and air conditioning condenser.
- Open the junction unit cover.
- Release the clips and rotate the junction unit.
1. Disconnect the electrical connection (connector E) for the radiator cooling fan wiring.
| Description | Connector | |
|---|---|---|
| 1 | Engine compartment junction unit | See B001 JUNCTION UNIT |
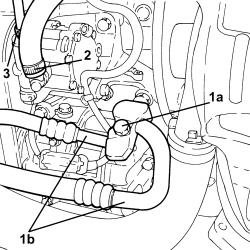
1. Undo the bolt (1a) and disconnect the inlet/outlet pipes from the air conditioning compressor (1b).
Seal the connectors that have been disconnected using suitable plugs to prevent dampness and impurities from entering the system.
2. Loosen the band and disconnect the power assisted steering pump inlet pipe, power assisted steering pump side.
3. Undo the connector and disconnect the supply pipe from the pump to the power assisted steering box, power assisted steering pump side.
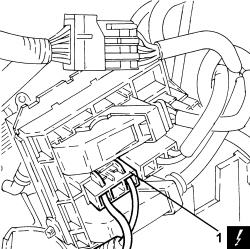
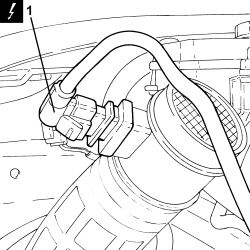
1. Disconnect the electrical connection from the air flow meter.
| Description | Connector | |
|---|---|---|
| 1 | Air flow meter | See K041 AIR FLOW METER |
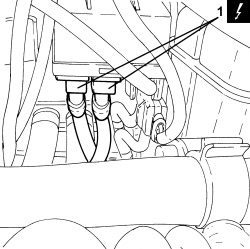
1. Disconnect the electrical connections from the glow plug control unit.
| Description | Connector | |
|---|---|---|
| 1 | Heater plugs control unit | See M015 PLUG PREHEATING CONTROL UNIT |
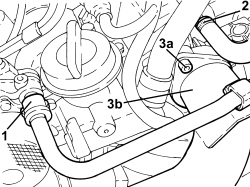
1. Disconnect the rapid connector for the vacuum intake pipe from the vacuum pump and move the latter to the side.
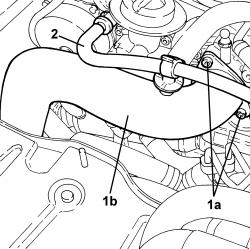
2. Loosen the band and disconnect the flexible hose from the rigid coolant return pipe to the engine coolant reservoir.
3. Undo the bolts (3a) and disconnect the air supply hose from the heat exchanger to the intake manifold (3b).
1. Undo the bolt (1a) and remove the air supply hose from the heat exchanger to the intake manifold (1b).
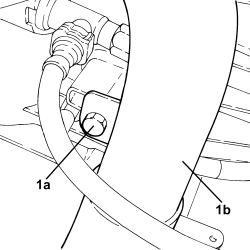
1. Disconnect the rapid connectors for the climate control system heater coolant inlet and outlet pipes.
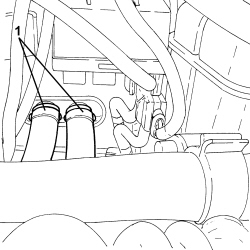
1. Undo the nut (1a) and disconnect the starter motor supply lead (1b) from the contact board.
| Description | Connector | |
|---|---|---|
| 1b | Maxifuse box on battery | See B099 MAXIFUSE BOX ON BATTERY |
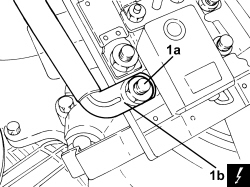
1. Disconnect the electrical connection from the reversing light switch.
| Description | Connector | |
|---|---|---|
| 1 | Reversing lights switch | See I020 REVERSING LIGHTS SWITCH |
2. Release the retaining clip (2a) and disconnect the pipe between the damper and the clutch operating cylinder (2b), operating cylinder side.
Collect the bake/clutch fluid that comes out in a suitable container.
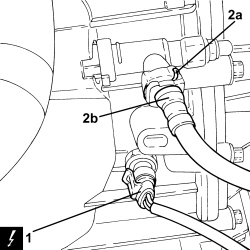
1. Disconnect the gear selector cable.
2. Disconnect the gear engagement cable.
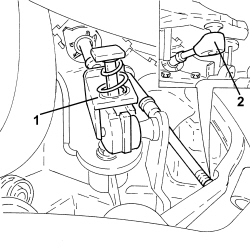
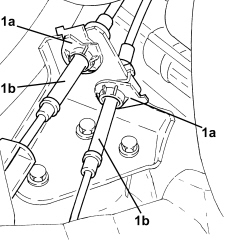
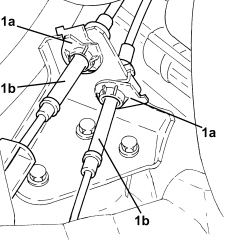
1. Open the clips (1a) and release the gear selector and engagement cables (1b) from the mounting bracket.
Op. 4410A80 DAMPER LOWER FORK - R R
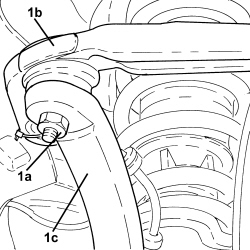
(left side).
1. Undo the nut (1a) and disconnect the upper left track control arm for the front suspension (1b) from the steering knuckle (1c).
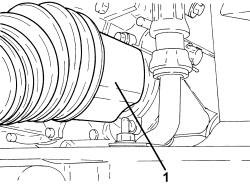
1. Disconnect the left driveshaft from the differential.
Op. 4410A80 DAMPER LOWER FORK - R R
(right side).
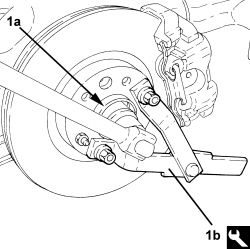
1. Remove the two stakings and undo the nut (1a) securing the right front hub to the driveshaft using the tool (1b) for counter-torque.
| Tool | Description | Function | Validity |
|---|---|---|---|
| 1870815000 | Counter-torque | Loosen/ tighten nut securing front driveshaft to wheel hub Loosen/ tighten bolt securing exhaust side camshaft drive toothed drive pulley |
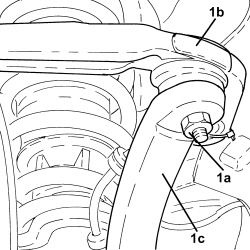
1. Undo the nut (1a) and disconnect the upper right track control arm for the front suspension (1b) from the steering knuckle (1c).
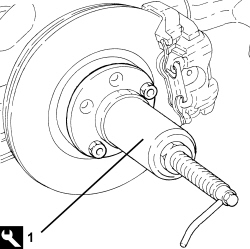
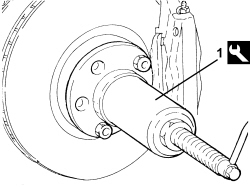
1. Use the tool to move the right driveshaft back from the wheel hub.
| Tool | Description | Function | Validity |
|---|---|---|---|
| 2000001600 | Extractor | Retract driveshaft from front wheel hub |
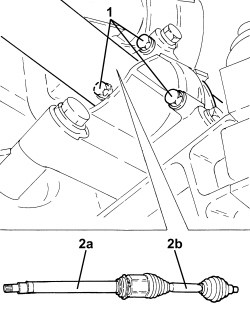
1. Loosen the bolts fixing the intermediate driveshaft to the mounting.
2. Disconnect the intermediate driveshaft (2a) from the differential and remove it together with the right driveshaft (2b).
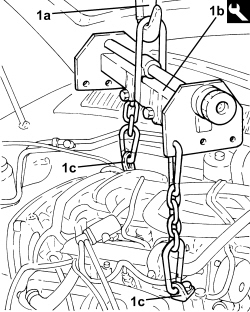
1. Support the power unit using a hydraulic hoist (1a) and the tool (1b) connected to the mounting brackets (1c).
| Tool | Description | Function | Validity |
|---|---|---|---|
| 1871001700 | Balance | Removing/ refitting power unit |
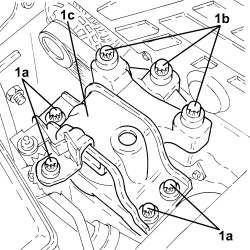
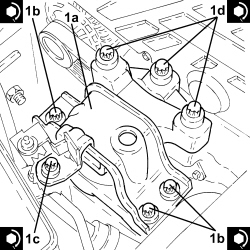
1. Undo the bolts (1a), (1b), then remove the power unit timing side front support flexible mounting (1c).
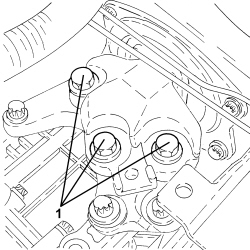
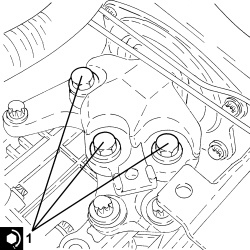
1. Undo the bolts fixing the gearbox side power unit flexible mounting to the rigid support.
- Using the hydraulic hoist, remove the power unit from the engine compartment and place it on a suitable support.
- Release the power unit from the support tools.
Refitting
- Secure the power unit using the support tools.
- Place the power unit in its housing using the hydraulic hoist.
1. Tighten the new bolts fixing the gearbox side flexible mounting to the rigid support to the specified torque.
| Component | Fastening | dia | Value (daNm) | Validity |
|---|---|---|---|---|
| Gearbox side support flexible mounting | Bolt (to be replaced) | M12 | (support side) 6.3 - 7.7 + 45° |
1. Place the timing power unit front support flexible mounting (1a) in its housing and secure it tightening the new bolts (1b), bolts (1c) and the new bolts (1d) to the recommended torque.
| Component | Fastening | dia | Value (daNm) | Validity |
|---|---|---|---|---|
| Timing side power unit rigid support flexible mounting | Bolt (to be replaced) | M12 | (bodyshell side) 6.3 - 7.7 + 90° |
| Component | Fastening | dia | Value (daNm) | Validity |
|---|---|---|---|---|
| Timing side power unit rigid support flexible mounting | Bolt | M10 | (bodyshell side) 5.4 - 6.6 |
| Component | Fastening | dia | Value (daNm) | Validity |
|---|---|---|---|---|
| Timing side power unit rigid support flexible mounting | Bolt (to be replaced) | M12 | (rigid support side) 6.3 - 7.7 + 90° |
- Remove the hydraulic hoist and tool used for supporting the power unit safely.
| Tool | Description | Function | Validity |
|---|---|---|---|
| 1871001700 | Balance | Removing/ refitting power unit |
- Connect the intermediate driveshaft complete with right driveshaft to the differential.
- Tighten the bolts fixing the intermdiate driveshaft to the mounting to the recommended torque.
| Component | Fastening | dia | Value (daNm) | Validity |
|---|---|---|---|---|
| Intermediate driveshaft | Bolt | M6 | (support side) 0.7 - 1.1 |
- Place the right driveshaft in its housing on the hub and tighten a new nut to the recommended torque using the tool for counter-torque.
| Component | Fastening | dia | Value (daNm) | Validity |
|---|---|---|---|---|
| Front wheel hub | Nut | M24 | (driveshaft side) see operation 4450C28 |
| Tool | Description | Function | Validity |
|---|---|---|---|
| 1870815000 | Counter-torque | Loosen/ tighten nut securing front driveshaft to wheel hub Loosen/ tighten bolt securing exhaust side camshaft drive toothed drive pulley |
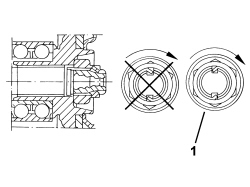
1. Make two stakings on the nut collar as illustrated in the diagram.
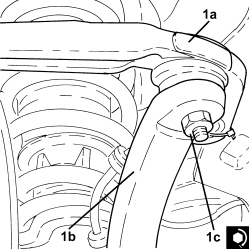
1. Connect the upper right track control arm for the front suspension (1a) to the steering knuckle (1b) and tighten the nut (1c) to the recommended torque.
| Component | Fastening | dia | Value (daNm) | Validity |
|---|---|---|---|---|
| Front suspension upper track control arms | Nut | M10 | (steering knuckle side) 4.1 - 5.0 |
Op. 4410A80 DAMPER LOWER FORK - R R
(right side).
- Connect the left driveshaft to the differential.
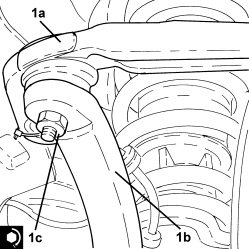
1. Connect the upper left track control arm for the front suspension (1a) to the steering knuckle (1b) and tighten the nut (1c) to the recommended torque.
| Component | Fastening | dia | Value (daNm) | Validity |
|---|---|---|---|---|
| Front suspension upper track control arms | Nut | M10 | (steering knuckle side) 4.1 - 5.0 |
Op. 4410A80 DAMPER LOWER FORK - R R
(left side).
- Fasten the gear selection and engagement cables to the mounting bracket securing them using the clips.
- Connect the gear engagement cable.
- Connect the gear selector cable.
- Connect the pipe between the damper and clutch operating cylinder, operating cylinder side and secure it using the retaining clip.
- Connect the electrical connection to the reversing light switch.
- Connect the starter motor earth lead to the contact board and secure it using the nut.
- Connect the rapid connectors for the climate control system heater coolant inlet and outlet pipes.
- Place the air supply pipe from the heat exchanger to the intake manifold back in its housing and secure it using the bolt.
- Connect the air supply hose from the heat exchanger to the intake manifold, throttle body side and secure it using the bolts.
- Connect the flexible hose to the rigid coolant return pipe to the engine coolant reservoir and tighten the band.
- Connect the rapid connector for the vacuum intake pipe to the vacuum pump.
- Connect the electrical connections to the glow plug control unit.
- Connect the electrical connection to the air flow meter.
1. Connect the supply pipe from the pump to the power assisted steering box, power assisted steering pump side and tighten the connector to the recommended torque.
| Component | Fastening | dia | Value (daNm) | Validity |
|---|---|---|---|---|
| Supply pipe from pump to power assisted steering box | Connector | M16 | (power assisted steering pump side) 3.6 - 4.4 |
2. Connect the power assisted steering pump inlet pipe, power assisted steering pump side and tighten the band.
3. Connect the air conditioning compressor inlet/outlet pipes (3a) and secure them by tightening the bolt (3b) to the recommended torque.
| Component | Fastening | dia | Value (daNm) | Validity |
|---|---|---|---|---|
| COMPRESSOR SIDE PIPE CONNECTOR | Bolt | M8x90 | 2.2 ÷ 2.6 |
Replace any O-Rings for the connectors using green coloured seals only which are resistant to the R134a refrigerant fluid.
Lubricate the connector threads using anti-freeze.
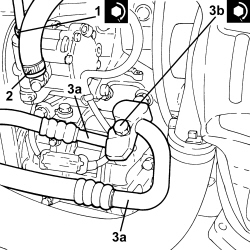
- Connect the electrical connection for the radiator cooling fan wiring.
- Place the junction unit in its housing and secure it using the clips.
- Close the junction unit cover.
- Place the engine cooling radiator in its housing complete with heat exchanger and air conditioning condenser using the hydraulic jack.
- Place the engine cooling radiator mounting brackets in their housings and secure them using the bolts.
- Remove the hydraulic jack from underneath the engine coolant radiator.
- Connect the air supply hose from the heat exchanger to the rigid pipe, heat exchanger side and tighten the band.
- Connect the air supply hose between the turbocharger and the heat exchanger, heat exchanger side, and tighten the band.
- Connect the air conditioning condenser inlet/outlet pipes and secure them by tightening the nuts to the recommended torque.
Replace any O-Rings for the connectors using green coloured seals only which are resistant to the R134a refrigerant fluid.
Lubricate the connector threads using anti-freeze.
| Component | Fastening | dia | Value (daNm) | Validity |
|---|---|---|---|---|
| PIPE CONNECTOR ON CONDENSER | Nut | M8 | 1.8 ÷ 2.2 |
- Connect the rapid connectors for the inlet and outlet pipes to the power assisted steering system heat exchanger pipe.
- Connect the rapid connector for the fuel return pipe, fuel return manifold side.
- Connect the fuel supply pipe rapid connector, pressure pump side.
- Tighten the gearbox oil drain plug to the recommended torque.
| Component | Fastening | dia | Value (daNm) | Validity |
|---|---|---|---|---|
| Gearbox oil drain plug | 1.7 (gearbox side) |
Op. 1076B72 INTERMEDIATE EXHAUST PIPE WITH HOSE SECTION - R+R
Op. 7210A18 R.R FRONT CROSSMEMBER
Op. 7210A15 R.R. FRONT WING/HEADLAMP HOUSING CROSSMEMBER
Op. 7025A34 BONNET LID LOCK (ONE) - R+R OR REPAIR
Op. 5540B71 RIGHT FRONT LIGHT CLUSTER WITH DIRECTION INDICATOR - R.R.
Op. 5540B70 LEFT FRONT LIGHT CLUSTER WITH DIRECTION INDICATOR - R.R.
Op. 7055B90 LEFT FRONT WHEEL ARCH LINER - R.R.
Op. 7055B91 RIGHT FRONT WHEEL ARCH LINER - R.R.
Op. 7055B66 ENGINE COMPARTMENT DUST COVER IN RIGHT FRONT WHEEL ARCH - R.R.
Op. 4450B12 FRONT WHEELS (TWO) - R+R
Op. 1088D10 LOWER RADIATOR COOLANT OUTLET HOSE - R.R.
Op. 1088D14 UPPER RADIATOR COOLANT OUTLET HOSE - R.R.
Op. 1048A50 TURBOCHARGER AIR INTAKE PIPE - R.R.
Op. 1048A28 VACUUM AIR CIRCUIT RESONATOR PIPE - R+R
Op. 0010T84 COOLANT FOR AIR CONDITIONING SYSTEM - DEHYDRATE AND REPRESSURIZE
Op. 7055B54 UNDER ENGINE PROTECTION/GUARD - R.R.
Op. 1016A10 SOUND-PROOFING COVER - R.R
Op. 0010T64 BRAKE AND/OR CLUTCH FLUID CHECK LEVEL AND TOP UP AS NECESSARY
Op. 0010T67 HYDRAULIC CLUTCH SYSTEM - BLEED AIR
Op. 5530B52 BATTERY SUPPORT/DRIP TRAY - R.R
Op. 0010T20 ENGINE COOLANT - CHANGE
Op. 0010T71 POWER STEERING FLUID CHECK LEVEL AND TOP UP IF NECESSARY
Op. 0010T75 HYDRAULIC POWER STEERING SYSTEM BLEED AIR
- Remove the vehicle from the lift.
Removing
Refitting
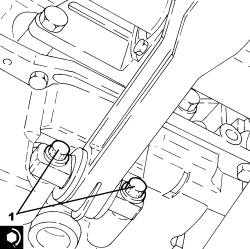
Removing
Op. 0010T84 COOLANT FOR AIR CONDITIONING SYSTEM - DEHYDRATE AND REPRESSURIZE
Op. 0010T20 ENGINE COOLANT - CHANGE
Op. 0010T40 CHANGE MANUAL GEARBOX OIL
Op. 4450B12 FRONT WHEELS (TWO) - R+R
Op. 7055B90 LEFT FRONT WHEEL ARCH LINER - R.R.
Op. 7055B91 RIGHT FRONT WHEEL ARCH LINER - R.R.
Op. 7055B65 ENGINE COMPARTMENT DUST COVER IN LEFT FRONT WHEEL ARCH - R.R.
Op. 7055B66 ENGINE COMPARTMENT DUST COVER IN RIGHT FRONT WHEEL ARCH - R.R.
Op. 5530B52 BATTERY SUPPORT/DRIP TRAY - R.R
Op. 5540B81 LEFT GAS DISCHARGE LIGHT CLUSTER - R.R.
Op. 5540B82 RIGHT GAS DISCHARGE LIGHT CLUSTER - R.R.
Op. 7210A15 R.R. FRONT WING/HEADLAMP HOUSING CROSSMEMBER
Op. 7210A18 R.R FRONT CROSSMEMBER
- Open the clips securing the wiring to the engine cooling radiator assembly.
- Draw off the power assisted steering fluid from the reservoir using a suitable syringe.
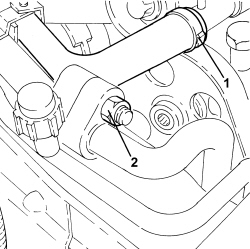
1. Loosen the band and disconnect the flexible power assisted steering fluid pipe from the pump intake connector and collect the remaining fluid in a suitable container.
2. Undo the nut securing the air conditioning refrigerant fluid return pipe intermediate flange.
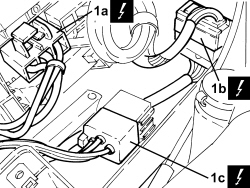
1. Aprire il coperchio della scatola “centralina fusibili e teleruttori” e scollegare la connessione (1a), la connessione (1b) e sfilare dalla sua sede il teleruttore (1c).
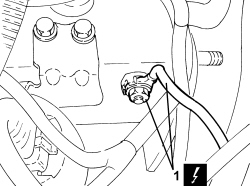
1. Undo the nut and disconnect the earth lead.
| Description | Connector | |
|---|---|---|
| 1 | Earth on engine | See C040 ENGINE EARTH |
1. Disconnect the electrical connection for the left head Lambda sensor on the precatalyzer.
| Description | Connector | |
|---|---|---|
| 1 | Sonda lambda su precatalizzatore-2 | See K016 LAMBDA SENSOR ON PRE-CATALYZER -2 |
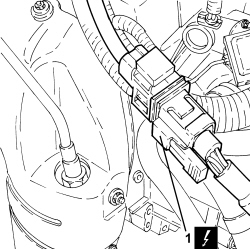
1. Disconnect the engine coolant hose from the radiator upper connector.
2. Undo the nuts and disconnect the air conditioning system refrigerant pipes from the condenser.
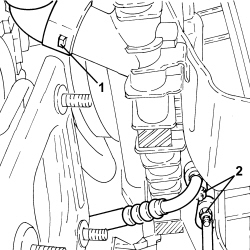
1. Disconnect the engine coolant hose from the radiator lower connector.
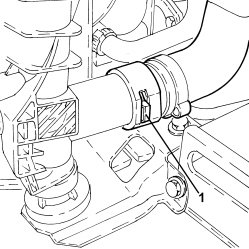
- Remove the engine cooling radiator assembly.
1. Undo the fixing bolts and remove the two engine coolant radiator assembly supports.
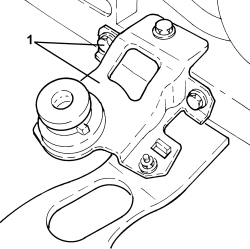
1. Undo the bolt and disconnect the supply and return pipes from the air conditioning compressor and remove them.
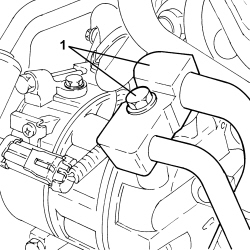
1. Undo the bolt for the connector and disconnect the power assisted steering fluid supply pipe from the pump.
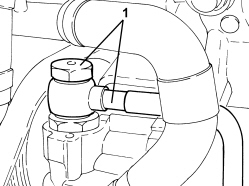
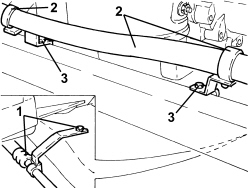
1. Undo the bolt fixing the power assisted steering fluid rigid supply pipe to the suspension crossmember.
2. Open the clips securing the engine coolant pipe.
3. Undo the bolts fixing the power assisted steering fluid rigid supply pipe to the suspension crossmember and move it to one side.
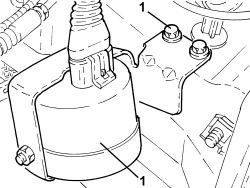
1. Unscrew the anti-theft siren fixing bolts and move it to one side.
- Undo the brake/clutch fluid reservoir plug and tighten the cap.
| Tool | Description | Function | Validity |
|---|---|---|---|
| 2000001400 | Plug | Brake/ clutch system vacuum |
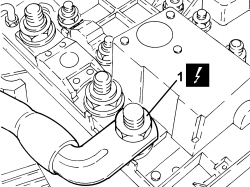
1. Undo the nut fixing the starter motor and alternator supply leads to the battery positive.
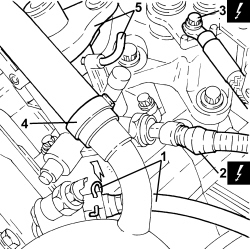
1. Lift up the fastening clip and disconnect the clutch fluid pipe from the three-way connector.
2. Disconnect the electrical connection for the reversing switch.
| Description | Connector | |
|---|---|---|
| 2 | Reversing lights switch | See I020 REVERSING LIGHTS SWITCH |
3. Undo the bolt and release the earth lead from the gearbox.
4. Loosen the band and disconnect the engine cooling system supply pipe from the pump rigid intake pipe.
5. Lift up the gear selector lever and lock it in the position illustrated using a suitable peg.
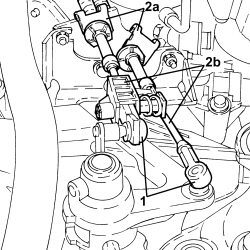
1. Disconnect the terminals of the cables from the levers for the gear selection-engagement assembly.
2. Agire sulle mollette (2a) e rimuovere i flessibili di selezione-innesto marce (2b) dalla staffa di reazione.
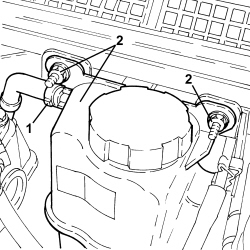
1. Loosen the band and disconnect the degassing pipe from the engine coolant reservoir.
2. Undo the nuts securing the engine coolant reservoir and remove it.
1. Loosen the band and disconnect the brake servo vacuum pipe from the intake chamber.
2. Disconnect the electrical connection for the Lambda sensor upstream of the catalytic converter, right head.
| Description | Connector | |
|---|---|---|
| 2 | Lambda sensor on pre-catalyzer | See K015 LAMBDA SENSOR ON PRE-CATALYZER |
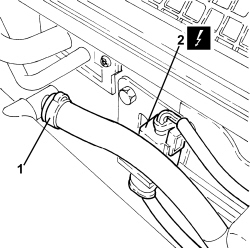
1. Disconnect the water supply and return pipes from the heater.
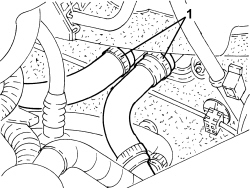
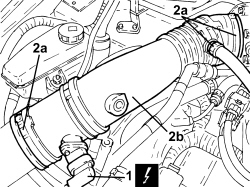
1. Disconnect the electrical connection for the flow meter.
| Description | Connector | |
|---|---|---|
| 1 | Air flow meter | See K041 AIR FLOW METER |
2. Allentare le fascette (2a) e rimuovere il manicotto corrugato aria al cassoncino (2b) completo di debimetro.
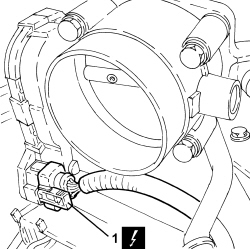
1. Disconnect the electrical connection for the throttle casing.
| Description | Connector | |
|---|---|---|
| 1 | Integrated throttle casing actuator | See N075 THROTTLE BODY ACTUATOR |
1. Disconnect the electrical connection for the air pressure sensor on the intake chamber.
| Description | Connector | |
|---|---|---|
| 1 | Absolute pressure sensor | See K048 ABSOLUTE PRESSURE SENSOR |
2. Disconnect the rapid connector for the engine oil vapour recovery pipe from the right cylinder head.
3. Disconnect the electrical connection for the intake chamber fuel vapour flow enablement solenoid valve.
| Description | Connector | |
|---|---|---|
| 3 | Fuel vapour recovery solenoid valve | See L010 FUEL VAPOUR RECOVERY SOLENOID VALVE |
4. Disconnect the rapid connector for the fuel vapour pipe from the intake chamber fuel vapour flow enablement solenoid valve.
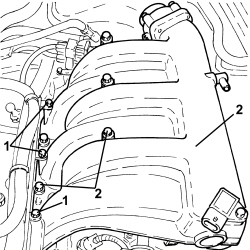
1. Undo the bolts fixing the wiring bracket to the intake chamber.
2. Undo the bolts fixing the intake chamber and remove it.
- Undo the nut fixing the power assisted steering fluid return pipe.
1. Disconnect the rapid connector for the fuel return pipe from the three-way connector.
2. Disconnect the rapid connector for the fuel supply pipe from the spherical connector.
3. Undo the bolts fixing the right head catalytic preconverter to the front exhaust pipe.
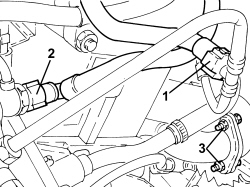
1. Undo the bolts fixing the left head catalytic preconverter to the front exhaust pipe.
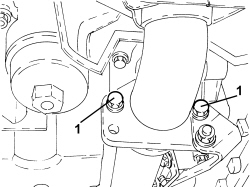
1. Undo the fastenings securing the catalyzer assembly to the mounting bracket.
2. Undo the bolts securing the catalyzer assembly mounting bracket to the bodyshell and remove it.
- Remove the gaskets.
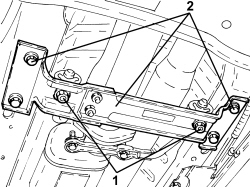
1. Undo the nuts fixing the front exhaust pipes to the catalytic converter flange and then remove them.
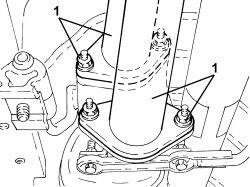
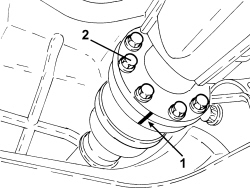
1. Mark the position of the two flanges connecting the rear drive idler casing to the propeller shaft.
2. Undo the bolts fixing the two flanges connecting the rear drive idler casing to the propeller shaft.
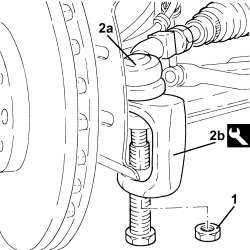
1. Undo the nut fixing the left steering rod to the steering knuckle.
2. Scollegare il tirante sterzo sinistro (2a) dal montante ruota con l’attrezzo (2b).
| Tool | Description | Function | Validity |
|---|---|---|---|
| 1871000700 | Extractor | Extracting steering rod from steering knuckle |
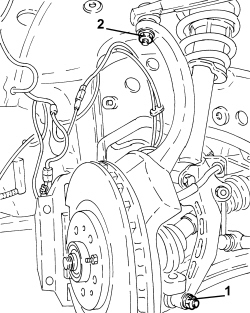
1. Undo the lower bolt securing the forkv to the lower track control arm.
2. Undo the nut and disconnect the left front steering knuckle from the upper track control arm.
- Retract the left front driveshaft to release it from the differential. Secure the steering knuckle to the upper track control arm.
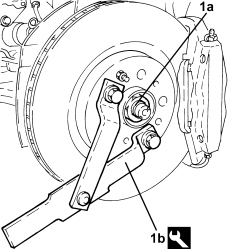
1. Rimuovere le due acciaccature e svitare il dado (1a) di fissaggio mozzo ruota anteriore destro al semialbero utilizzando l’attrezzo (1b) come anticoppia.
| Tool | Description | Function | Validity |
|---|---|---|---|
| 1870815000 | Counter-torque | Loosen/ tighten the nut fixing the right front wheel hub to the driveshaft Loosen/ tighten bolts securing the water pump |
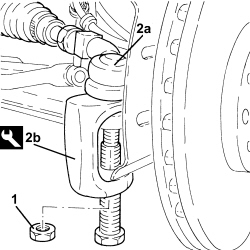
1. Undo the nut fixing the right steering rod to the steering knuckle.
2. Scollegare il tirante sterzo destro (2a) dal montante ruota con l’attrezzo (2b).
| Tool | Description | Function | Validity |
|---|---|---|---|
| 1871000700 | Extractor | Extracting steering rod from steering knuckle |
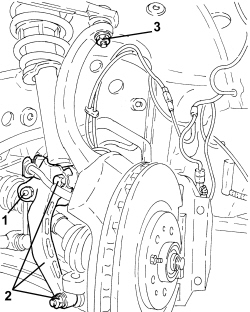
1. Undo the nut fixing the joint for the anti-roll bar to the right front shock absorber fork.
2. Undo the two bolts fixing the fork to the shock absorber and to the lower track control arm and remove it.
3. Undo the nut fixing the right front steering knuckle to the upper track control arm.
- Undo the bolt fixing the brake disc to the wheel hub.
1. Use the tool to move the driveshaft back from the right front wheel hub.
| Tool | Description | Function | Validity |
|---|---|---|---|
| 2000001600 | Extractor | Retract driveshaft from front wheel hub |
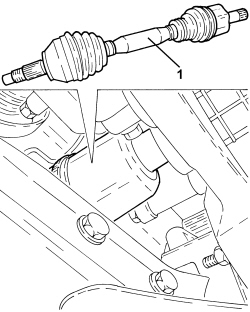
1. Disconnect the right front driveshaft from the differential and remove it.
- Position a hydraulic jack underneath the gearbox to remove the two lower reaction rods as described below.
1. Undo the fastenings securing the engine side lower reaction rod to the front suspension frame and to the oil sump and remove it.
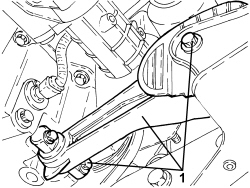
1. Undo the fastenings securing the gearbox side lower reaction rod to the front suspension frame and to the gearbox and remove it.
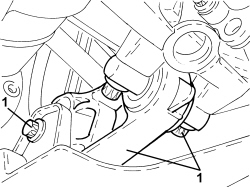
- Remove the hydraulic jack positioned previously underneath the gearbox
1. Utilizzando una gru idraulica (1a) e l’attrezzo (1b) collegato alle staffe (1c), sostenere il gruppo motopropulsore.
| Tool | Description | Function | Validity |
|---|---|---|---|
| 1871001700 | Balance | Removing/ refitting power unit |
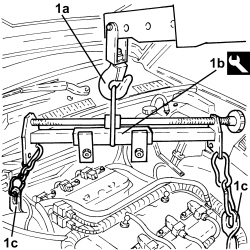
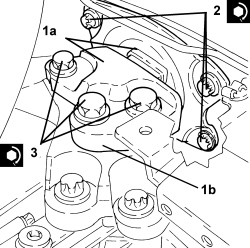
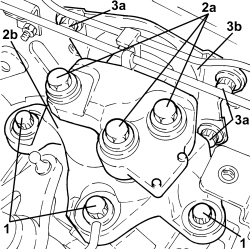
1. Undo the bolts fixing the rigid power unit support to the gearbox.
2. Svitare le viti (2a) di fissaggio tassello elastico al supporto rigido; rimuovere il supporto rigido (2b) dal cambio.
3. Svitare le viti (3a) di fissaggio tassello elastico (3b) alla scocca e rimuoverlo.
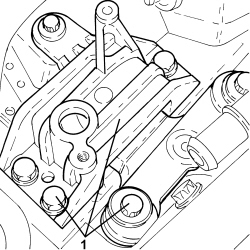
1. Undo the bolts fixing the power unit flexible mounting, timing side and remove it.
1. Using the hydraulic hoist, remove the power unit from the engine compartment and place it on a suitable bench.
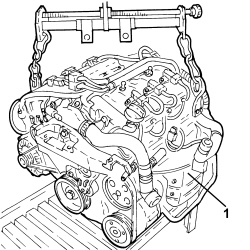
- Release the power unit from the support tools.
Refitting
- Replace the power unit in the engine compartment using a hydraulic hoist.
- Place the timing side power unit flexible mounting in its housing and secure it tightening the bolts to the recommended torque.
| Component | Fastening | dia | Value (daNm) | Validity |
|---|---|---|---|---|
| Timing side flexible mounting to rigid support | Bolt (to be replaced) | M12 | 6.3 ÷ 7.7 + 90° |
| Component | Fastening | dia | Value (daNm) | Validity |
|---|---|---|---|---|
| Timing side flexible mounting to bodyshell | Bolt (to be replaced) | M12 | 6.3 ÷ 7.7 + 90° |
| Component | Fastening | dia | Value (daNm) | Validity |
|---|---|---|---|---|
| Timing side flexible mounting to bodyshell | Bolt | M10 | 5.4 ÷ 6.6 |
- Place the flexible mounting in its housing and secure it to the bodyshell and to the gearbox side power unit rigid support tightening the bolts to the recommended torque.
| Component | Fastening | dia | Value (daNm) | Validity |
|---|---|---|---|---|
| Gearbox side flexible mounting to bodyshell | Bolt | M10 | 5.4 ÷ 6.6 |
| Component | Fastening | dia | Value (daNm) | Validity |
|---|---|---|---|---|
| Gearbox side flexible mounting to support | Bolt (to be replaced) | M12 | 6.3 ÷ 7.7 + 45° |
- Remove the hydraulid hoist using the engine lifting tool.
- Place the gearbox side lower reaction rod in its housing and secure it to the suspension frame and to the gearbox tightening the bolts to the recommended torque.
| Component | Fastening | dia | Value (daNm) | Validity |
|---|---|---|---|---|
| Gearbox side lower reaction rod to front suspension frame | Bolt (to be replaced) | M12 | 6.3 ÷ 7.7 + 60° |
| Component | Fastening | dia | Value (daNm) | Validity |
|---|---|---|---|---|
| Gearbox side lower reaction rod to gearbox | Bolt | M10 | 5.4 ÷ 6.6 |
- Place the engine side lower reaction rod in its housing and secure it to the suspension frame and to the oil sump tightening the bolts to the recommended torque.
| Component | Fastening | dia | Value (daNm) | Validity |
|---|---|---|---|---|
| Engine side lower reaction rod to front suspension frame | Bolt (to be replaced) | M12 | 6.3 ÷ 7.7 + 60° |
| Component | Fastening | dia | Value (daNm) | Validity |
|---|---|---|---|---|
| Engine side lower reaction rod to engine | Bolt | M10 | 5.4 ÷ 6.6 |
- Tighten the bolt fixing the front brake disc to the wheel hub.
- Place the right front driveshaft back in its housing.
- Tighten the nut fixing the right front steering knuckle to the upper track control arm to the recommended torque.
| Component | Fastening | dia | Value (daNm) | Validity |
|---|---|---|---|---|
| Front wheel steering knuckle to upper track control arm | Nut | M10 | 4.1 ÷ 4.9 |
- Place the right front shock absorber fork in position and secure it to the lower track control arm and to the shock absorber tightening the bolts to the recommended torque.
| Component | Fastening | dia | Value (daNm) | Validity |
|---|---|---|---|---|
| Lower fork connecting front suspension shock absorber to lower track control arm - lower track control arm side | Bolt (to be replaced) | M14 | 4.5 ÷ 5.5 + 90° |
| Component | Fastening | dia | Value (daNm) | Validity |
|---|---|---|---|---|
| Lower fork connecting front suspension shock absorber to lower track control arm - shock absorber side | Bolt | M12 | 6.3 ÷ 7.7 |
- Connect the anti-roll bar to the right shock absorber fork and secure it tightening the nut to the recommended torque.
| Component | Fastening | dia | Value (daNm) | Validity |
|---|---|---|---|---|
| Front suspension anti-roll bar | Rear bolt (to be replaced) | M12 | 7.2 ÷ 8.8 + 90° |
- Connect the right steering link to the steering knuckle and secure by tightening the nut to the specified torque.
| Component | Fastening | dia | Value (daNm) | Validity |
|---|---|---|---|---|
| Steering rod to steering knuckle | Nut | M12 | 9.0 ÷ 11.0 |
- Using the counter-torque tool used for the removal, tighten a new nut securing the right front hub to the driveshaft to the recommended torque.
| Component | Fastening | dia | Value (daNm) | Validity |
|---|---|---|---|---|
| Front wheel hub | Nut | M24 | see operation 4450C28 |
- Stake the nut collar twice.
- Place the left front driveshaft back in its housing.
- Connect and tighten the nut fixing the left front steering knuckle to the upper track control arm to torque.
| Component | Fastening | dia | Value (daNm) | Validity |
|---|---|---|---|---|
| Front wheel steering knuckle to upper track control arm | Nut | M10 | 4.1 ÷ 4.9 |
- Connect and tighten the bolt fixing the left front shock absorber fork to the lower track control arm to torque.
| Component | Fastening | dia | Value (daNm) | Validity |
|---|---|---|---|---|
| Lower fork connecting front suspension shock absorber to lower track control arm - lower track control arm side | Bolt (to be replaced) | M14 | 4.5 ÷ 5.5 + 90° |
- Connect the left steering link to the steering knuckle and tighten the nut to the specified torque.
| Component | Fastening | dia | Value (daNm) | Validity |
|---|---|---|---|---|
| Steering rod to steering knuckle | Nut | M12 | 9.0 ÷ 11.0 |
- Refit the propeller shaft in its seat, aligning the reference marks made on removal.
- Tighten the front constant velocity joint bolts to the PTU to the specified torque in a cross sequence.
| Component | Fastening | dia | Value (daNm) | Validity |
|---|---|---|---|---|
| Propeller shaft - rear drive idler casing side | Bolt | M8 | 3.1 ÷ 3.7 | 3.2 JTS |
- Place the front drainage pipes complete with seals in their housings and connect them to the catalytic converters tightening the nuts to the recommended torque.
| Component | Fastening | dia | Value (daNm) | Validity |
|---|---|---|---|---|
| Front exhaust pipe to catalyzer assembly | Nut | M8 | 2.2 ÷ 2.6 | 3.2 JTS |
- Place the catalyzer mounting bracket in its housing and secure it using the bolts.
- Connect the catalyzers to the mounting bracket using the nuts.
- Tighten the bolts fixing the left head catalytic preconverter to the front exhaust pipe to the recommended torque.
| Component | Fastening | dia | Value (daNm) | Validity |
|---|---|---|---|---|
| Front exhaust pipe to precatalyzer | Bolt | M8 | 2.2 ÷ 2.6 | 3.2 JTS |
- Tighten the bolts fixing the right head catalytic preconverter to the front exhaust pipe to the recommended torque.
| Component | Fastening | dia | Value (daNm) | Validity |
|---|---|---|---|---|
| Front exhaust pipe to precatalyzer | Bolt | M8 | 2.2 ÷ 2.6 | 3.2 JTS |
- Connect the fuel supply pipe rapid connector.
- Connect the fuel return pipe rapid connector.
- Tighten the nut fixing the power assisted steering fluid return pipe to the bracket.
- Fit the intake chamber and secure it using the bolts.
| Component | Fastening | dia | Value (daNm) | Validity |
|---|---|---|---|---|
| Air chamber | Bolt | 2.3 | 3.2 JTS |
- Connect the rapid connector for the fuel vapour pipe to the solenoid valve.
- Connect the electrical connection for the fuel vapour solenoid valve.
- Connect the rapid connector for the oil vapour recovery pipe to the right cylinder head.
- Connect the electrical connection for the air pressure sensor on the intake chamber.
- Connect the electrical connection for the throttle casing.
- Place the corrugated hose complete with flow meter back in its housing and tighten the bands.
- Connect the electrical connection for the flow meter.
- Connect the heater supply and return pipes.
- Connect the electrical connections for the Lambda sensors upstream of the catalytic preconverters.
- Connect and fasten the brake servo vacuum pipe using the band, intake chamber side.
- Place the engine coolant reservoir back in its housing and secure it using the nuts.
- Connect the degassing pipe to the engine coolant reservoir and fasten it using the band.
- Connect the ends of the gear selection-engagement cables to the gear selection-engagement levers.
- Fasten the gear selection-engagement cables to the reaction bracket using the retaining clips.
- Remove the peg locking the gear selector lever.
- Connect the system supply pipe using the band, pump rigid inlet pipe side.
- Connect the earth lead to the gearbox and secure it using the bolt.
- Connect the electrical connection for the reversing switch.
- Connect the clutch fluid pipe and fasten it using the clip, three-way connector side.
- Connect the starter motor supply lead and secure it using the nut.
- Place the anti-theft siren in its housing and secure it using the bolts.
- Place the power assisted steering box rigid fluid pipe in its housing and secure it to the suspension crossmember using the bolts.
- Connect the connector for the fluid supply pipe to the power steering pump.
- Connect the supply and return pipes to the air conditioning compressor and secure them using the bolt.
- Place the engine cooling radiator assembly supports in their housings and secure them using the bolts.
- Connect the lower engine coolant hose to the radiator.
- Connect the air conditioning system refrigerant pipes to the condenser using the nuts.
- Connect the upper engine coolant hose to the radiator.
- Connect the earth lead to the bodyshell and secure it using the nut.
- Place the wiring in its housing in the fuse and relay box and connect the connections.
- Connect the air conditioning coolant return pipe intermediate flanges and secure them using the nut.
- Connect the flexible pipe to the power assisted steering pump intake and secure it using the band.
Op. 7210A18 R.R FRONT CROSSMEMBER
Op. 7210A15 R.R. FRONT WING/HEADLAMP HOUSING CROSSMEMBER
Op. 5540B82 RIGHT GAS DISCHARGE LIGHT CLUSTER - R.R.
Op. 5540B81 LEFT GAS DISCHARGE LIGHT CLUSTER - R.R.
Op. 5530B52 BATTERY SUPPORT/DRIP TRAY - R.R
Op. 7055B91 RIGHT FRONT WHEEL ARCH LINER - R.R.
Op. 7055B90 LEFT FRONT WHEEL ARCH LINER - R.R.
Op. 7055B66 ENGINE COMPARTMENT DUST COVER IN RIGHT FRONT WHEEL ARCH - R.R.
Op. 7055B65 ENGINE COMPARTMENT DUST COVER IN LEFT FRONT WHEEL ARCH - R.R.
Op. 4450B12 FRONT WHEELS (TWO) - R+R
Op. 0010T84 COOLANT FOR AIR CONDITIONING SYSTEM - DEHYDRATE AND REPRESSURIZE
Op. 0010T20 ENGINE COOLANT - CHANGE
Parts & tools for this job Staging For 2005 Alfa Romeo 159
- PARTClutch kitSearch: Alfa Romeo 159 2005 clutch kit
- TOOLClutch alignment toolSearch: clutch alignment tool
- FLUIDGear oilSearch: Alfa Romeo 159 manual gearbox oil
Links open Amazon search results in a new tab. As an Amazon Associate I earn from qualifying purchases.