
REAR SIDE DOOR ACTUATOR UNITS
- Make
- Land Rover
- Model
- Discovery 300Tdi Discovery
- Section
- REPAIR › REAR SIDE DOOR ACTUATOR UNITS
86
ELECTRICAL
14
REPAIR
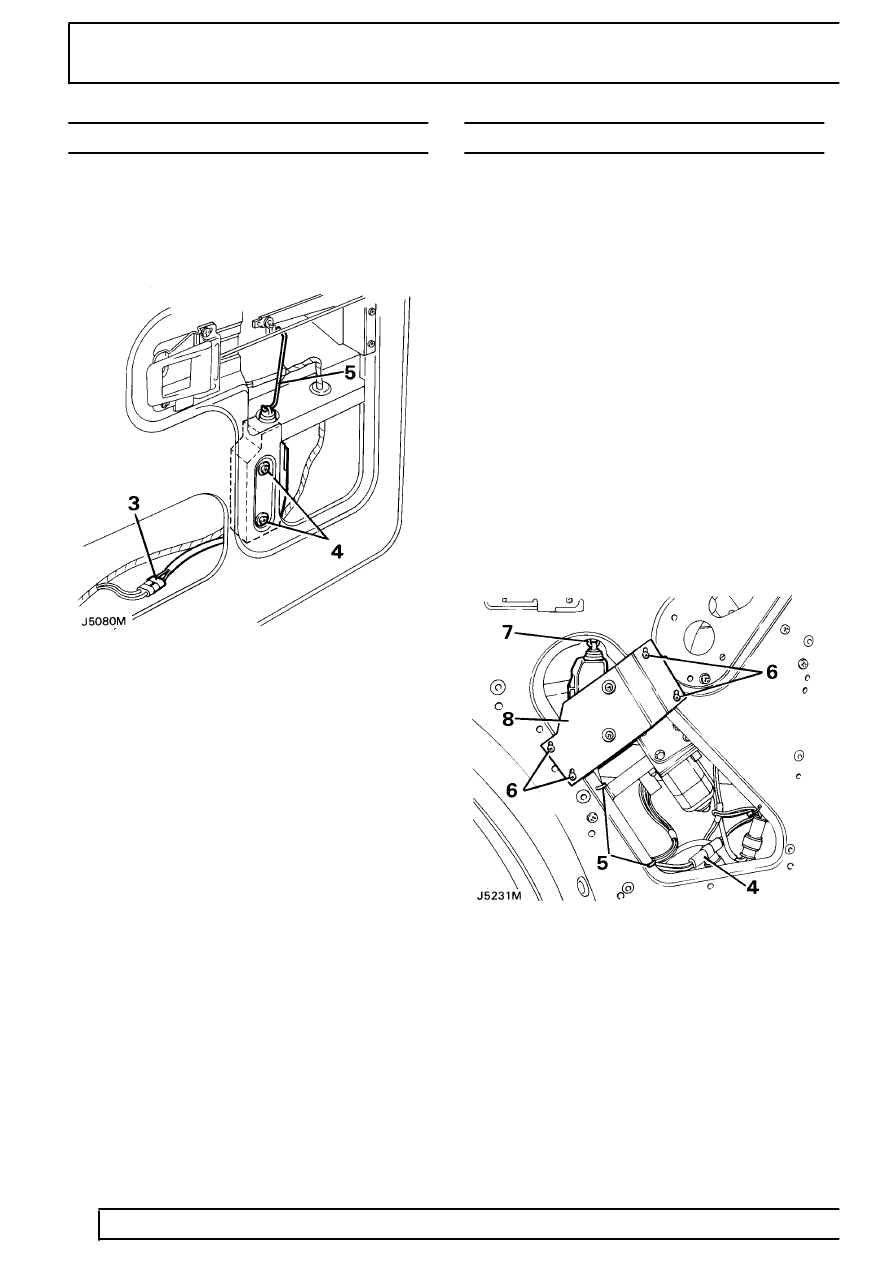
REAR DOOR ACTUATOR
Service repair no - 86.26.09
Remove
1. Disconnect battery negative lead.
2. Remove the door pull, trim panel and vapour
protective sheet from the inner door panel.
See
CHASSIS AND BODY, Repair, Rear Door
Trim Panel
3. Disconnect the actuator leads from the door
electrical harness.
4. Remove the two screws securing the actuator
door panel.
5. Manoeuvre the actuator, disconnect the rod from
the link and withdraw the actuator from the door.
Refit
6. Reverse removal procedure.
REAR SIDE DOOR ACTUATOR UNITS
Service repair no - 86.26.09
Remove
1. Ensure that the window glass is in the fully
closed position.
2. Disconnect battery negative lead.
3. Remove the door pull, trim panel and plastic
vapour proof barrier.
See CHASSIS AND
BODY, Repair, Rear Side Door - Trim Panel
4. Disconnect the actuator lead from the door
harness at the connector.
5. Note the locations and release the straps
securing the actuator lead to the door casing.
6. Remove the four screws securing the actuator
mounting plate to the door casing.
7. Unhook the operating rod from the actuator link
and withdraw the actuator and mounting plate
from the door.
8. If a new actuator is being fitted remove the
mounting plate from the existing actuator.
Parts & tools for this job Staging For Land Rover Discovery
- TOOLTrim removal tool kitSearch: trim removal tool kit
- PARTTouch-up paintSearch: Land Rover touch up paint
- PARTPanel clip assortmentSearch: Land Rover panel clips assortment
Links open Amazon search results in a new tab. As an Amazon Associate I earn from qualifying purchases.