
HEADLIGHT
- Make
- Land Rover
- Model
- Discovery 300Tdi Discovery
- Section
- REPAIR › HEADLIGHT
ELECTRICAL
15
REPAIR
Refit
9. If removed fit the mounting plate to the actuator.
10. Engage the actuator operating rod with hooked
end of the actuator link.
11. Fit the actuator and mounting plate to the door
and loosely secure with the four screws.
12. Set the mounting plate with the screws in the
centre of the slotted holes, then tighten the
screws.
13. Connect the actuator lead to the door harness.
14. Reconnect battery negative lead.
15. With the sill locking button held in position, set
the bellcrank to approximately the position it
would be in if the sill button was depressed to
half of its total movement.
16. At this setting check the electrical operation of
the door lock. Adjust the mounting plate as
necessary to achieve the correct setting. Fully
tighten the securing screws on completion.
17. Refit the vapour barrier.
18. Connect the sill button operating rod to the
bellcrank, hold in position, fit the door trim panel
and the door pull.
BULB REPLACEMENT
For bulb type and rating refer to rating shown on the
bulb or bulb replacement list.
See GENERAL
SPECIFICATION DATA, Information, Bulbs
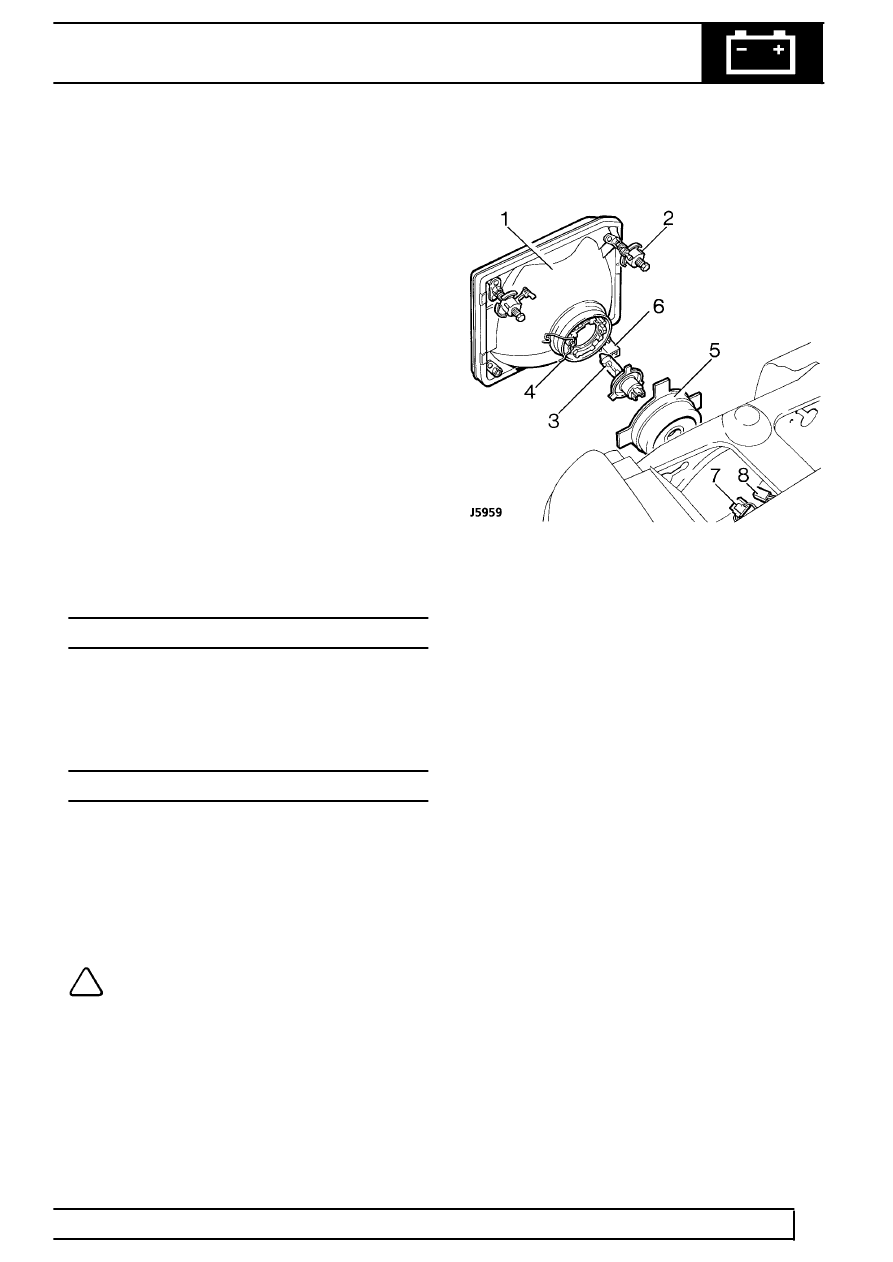
HEADLIGHT
Service repair no - 86.40.02/13
Remove
1. Rotate three retaining clips 10 degrees, to align
with slots in headlight mounting plate.
2. Withdraw light unit
NOTE: Detach adjustment operating rod
on vehicles fitted with headlight levelling.
3. Disconnect electrical multiplugs and remove
headlight unit.
4. Release spring clips and withdraw headlight
bulb.
Key
1. Headlight
2. Retaining clips
3. Bulb
4. Spring clip
5. Cover
6. Bulb sidelight
7. Plug
8. Plug sidelight
Refit
5. Reverse removal procedure.
Parts & tools for this job Staging For Land Rover Discovery
- PARTReplacement bulbsSearch: Land Rover Discovery bulbs
- TOOLDigital multimeterSearch: automotive digital multimeter
Links open Amazon search results in a new tab. As an Amazon Associate I earn from qualifying purchases.