
FUEL TANK
- Make
- Land Rover
- Model
- Discovery 300Tdi Discovery
- Section
- REPAIR › FUEL TANK
19
FUEL SYSTEM
22
REPAIR
FUEL TANK
Service repair no - 19.55.01
WARNING: Ensure that fuel handling
precautions given in Section 01 -
introduction are strictly adhered to when
carrying out following instructions.
CAUTION: Before disconnecting any part
of fuel system, it is imperative that all dust,
dirt and debris is removed from around
components to prevent ingress of foreign matter
into fuel system.
Remove
1. Depressurise fuel system. Disconnect battery
negative lead.
2. Syphon fuel tank into a suitable container that
can be sealed afterwards.
ENSURE TANK IS DRAINED COMPLETELY.
(refer to Warning concerning fuel vapour and
spillage at start of procedure).
3. Remove carpet loadspace floor and tailgate.
4. Fold back sound insulation to reveal access
panel.
5. Remove access panel.
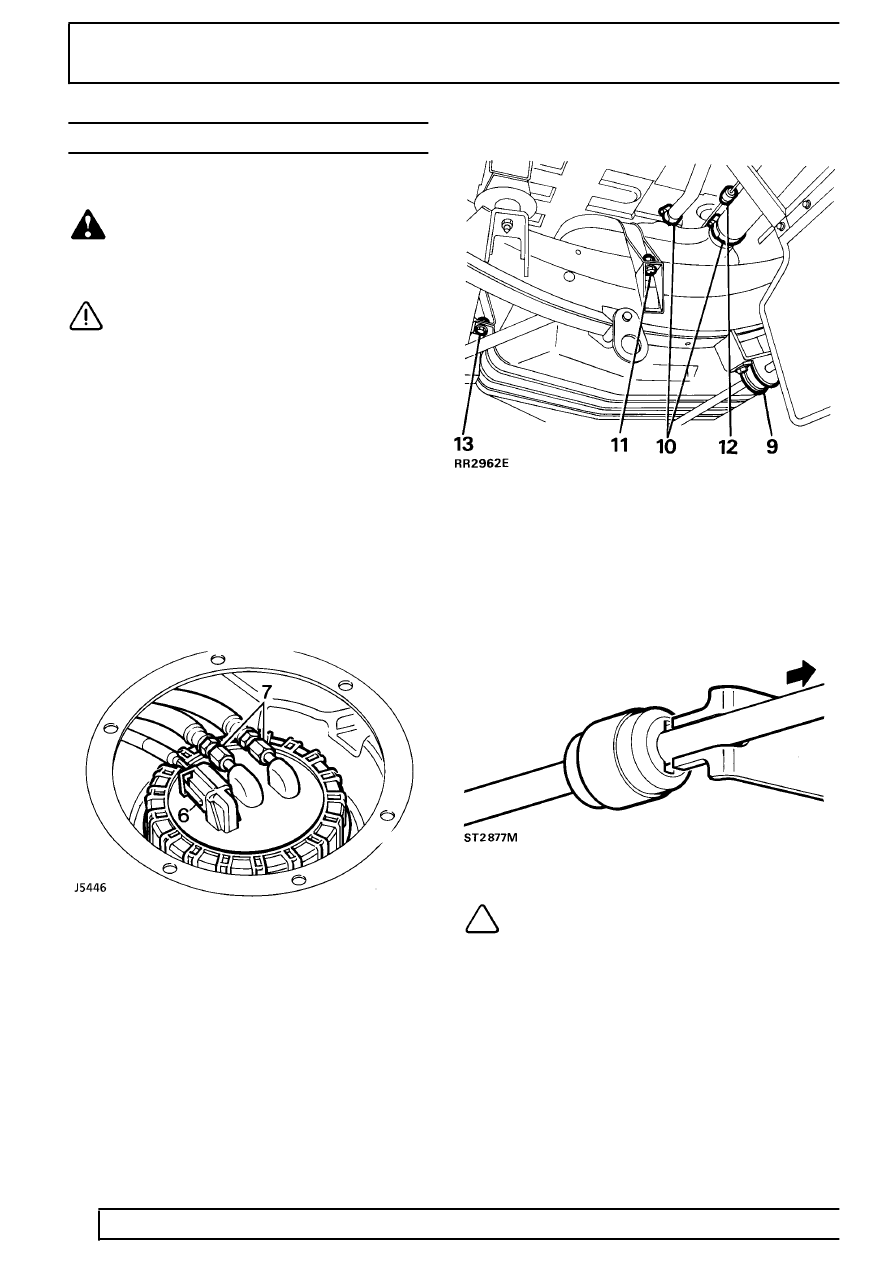
6. Disconnect electrical multi-plug.
7. Disconnect two fuel line unions from fuel pump.
8. Working underneath vehicle mark location of
anti-roll [sway] bar straps.
9. Remove rear anti-roll [sway] bar straps, and
allow bar to swing down clear of tank.
10. Remove tank filler and vent hoses at fuel tank.
11. Remove nut and bolt securing right hand side
fuel tank strap.
12. Disconnect evaporative control pipe at green
end of ’speedfit’ connector.
NOTE: To disconnect ’speedfit’ connector,
insert forked end of LRT-19-002 into slots
of connector see illustration. Press down
on collet and simultaneously pull pipe from
connector.
Parts & tools for this job Staging For Land Rover Discovery
- PARTFuel filterSearch: Land Rover Discovery fuel filter
- TOOLFuel pressure test kitSearch: fuel pressure test kit
- TOOLFuel line disconnect toolSearch: fuel line disconnect tool
Links open Amazon search results in a new tab. As an Amazon Associate I earn from qualifying purchases.