
CYLINDER HEAD GASKET (page 3 of 3)
- Make
- Land Rover
- Model
- Discovery 300Tdi Discovery
- Section
- REPAIR
12
ENGINE
22
REPAIR
NOTE: Cylinder head retaining bolts can
be used up to a maximum of five times.
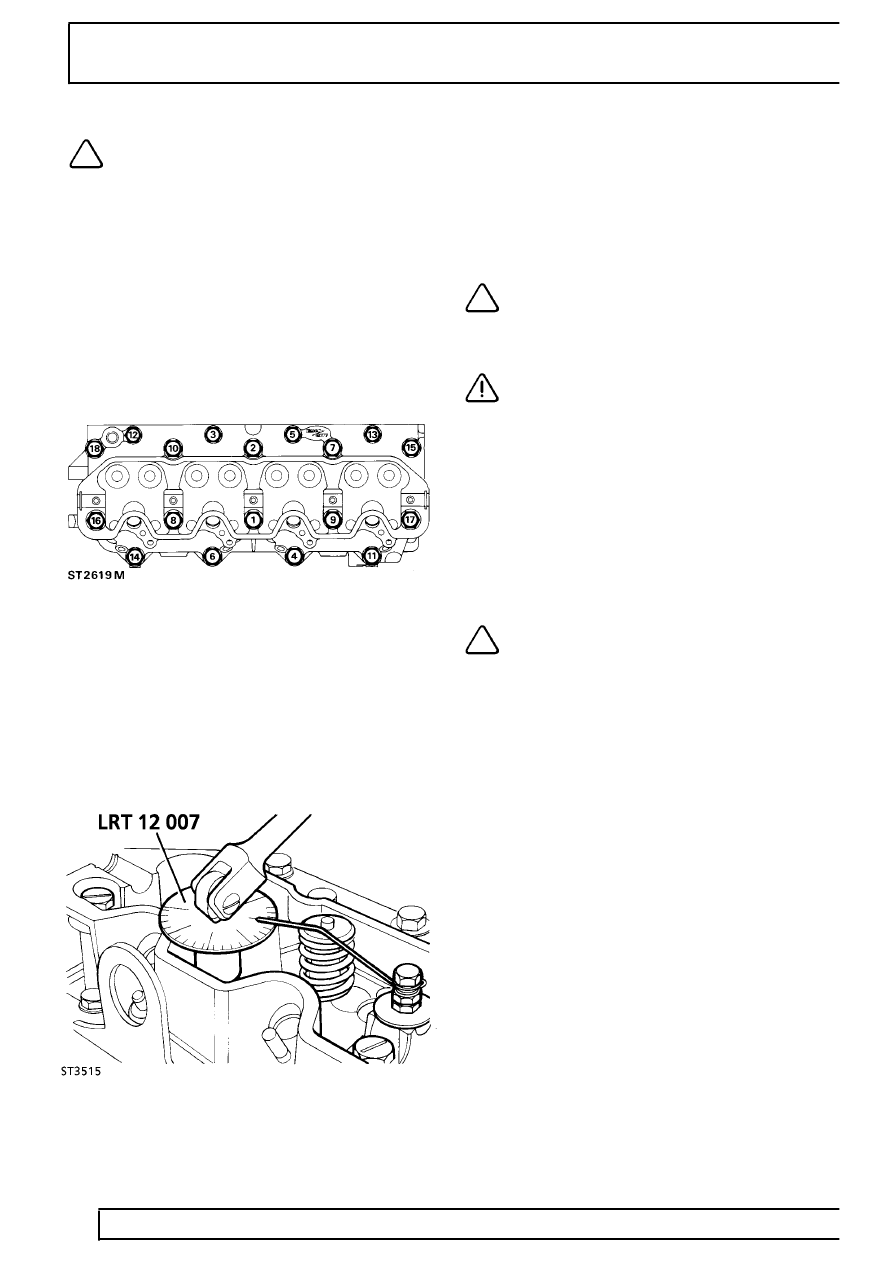
34. Lubricate threads of bolts with light oil and fit to
positions illustrated.
Bolt sizes:
M10 x 117mm locations 3, 5, 12, and 13.
M12 x 140mm locations 1, 2, 7, 8, 9, 10, 15, 16, 17,
and 18.
M12 x 100mm locations 4, 6, 11, 14.
35. Tighten bolts so that underside of heads just
make contact with cylinder head.
36. Following the sequence illustrated tighten all
bolts to
40 Nm.
37. Attach degree disc special tool LRT-12-007 to a
power bar.
38. Make a suitable pointer from welding rod and
attach to a bolt screwed into a rocker shaft
securing bolt hole.
39. Tighten all bolts through 60
°
strictly in sequence
illustrated.
40. Repeat 60
°
tightening procedure, again strictly in
sequence illustrated.
41. Tighten the ten longer bolts (M12 x 140mm) a
further 20
°
, again following the sequence
illustrated.
NOTE: Repositioning of the pointer will be
necessary to reach all bolts, the pointer
can be fitted to the rocker shaft securing
studs using two nuts.
CAUTION: The double tightening
procedure must be carried out, on no
account should tightening be performed in
one operation, otherwise damage to the cylinder
head may occur.
42. Fit valve stem caps.
43. Fit push rods to locations from which they were
removed.
44. Fit rocker shaft assembly evenly tightening
securing nuts and bolts to correct torque.
45. Fit rocker cover ensuring oil seal is satisfactory
for continued use.
NOTE: Rocker cover seals can be re-used
up to a maximum of five times.
46. Secure rocker cover with special seal washers
and nuts tightened to correct torque.
47. Refit remainder of items by reversing operations
1 to 22 tightening securing bolts to correct torque
where applicable.
Parts & tools for this job Staging For Land Rover Discovery
- PARTEngine gasket setSearch: Land Rover Discovery engine gasket set
- TOOLTorque wrenchSearch: 3/8 inch torque wrench
- TOOLFeeler gauge setSearch: feeler gauge set
Links open Amazon search results in a new tab. As an Amazon Associate I earn from qualifying purchases.