
R r facia support beam
- Make
- Alfa Romeo
- Model
- Brera and Spider Factory Service Manual
- Year
- 2005–2010
- Section
- Removing-refitting › R r facia support beam
R R FACIA SUPPORT BEAM
Removing
- Drain the coolant.
Op. 0010T84 COOLANT FOR AIR CONDITIONING SYSTEM - DEHYDRATE AND REPRESSURIZE
- Remove both front doors.
Op. 7210E36 R.R. FRONT SIDE DOOR
Work on the left and right sides.
Op. 7040A04 FACIA LOWER TRIM-R R
Op. 7040A65 CONSOLE SIDE CLOSING (ONE) - R.R.
Op. 7040G20 BULB HOLDER FOR COMPARTMENT LIGHTING IN DASHBOARD - R.R.
Op. 7040A31 DASHBOARD COMPARTMENT ASSEMBLY - R.R.
Op. 7040A26 STEERING COLUMN TRIM - R+R
Op. 5580C18 AIR BAG MODULE - R+R
Op. 4110A10 STEERING WHEEL - R+R FOR REPLACEMENT OR CHECKS
Op. 5550A10 STALK UNIT ASSEMBLY - R+R
Remove the three vents.
Op. 5010C34 AIR OUTLET ON CONSOLE - R+R
Remove the radio or, alternatively, the navigator.
Op. 5570T80 CAR RADIO EQUIPMENT - R+R
Op. 7040A17 AIR CONDITIONER CONTROLS
Op. 5010D56 SOLAR SENSOR - R.R FOLLOWING ELECTRICAL SYSTEM CHECK
Work on the left and right sides.
Op. 5570T92 FRONT TWEETER (ONE), LEFT OR RIGHT - R.R
Op. 7040A44 LEFT DASHBOARD SIDE TRIM - R.R.
Op. 5580C26 PASSENGER AIR BAG DISABLING KEY LOCK BARREL/SWITCH - R.R.
Op. 7040A45 RIGHT DASHBOARD SIDE TRIM - R.R.
Work on the left and right sides.
Op. 7040H30 FRONT PILLAR TRIM (ONE), LEFT OR RIGHT - R.R.
Op. 5560B10 CONTROL PANEL - R+R
Op. 7040A37 FUSE BOX COVER IN INSTRUMENT PANEL - R.R
Op. 5505A35 MAIN BODY COMPUTER/JUNCTION UNIT - R.R.
Op. 5580C23 DRIVE SIDE KNEE PROTECTION AIR BAG MODULE R. R.
Work on the left and right sides.
Op. 7045A10 FRONT SEAT (ONE), LEFT OR RIGHT - R.R.
Op. 7040L37 GEAR LEVER TRIM - R.R
Op. 3380A44 HANDBRAKE/LINKAGE PROTECTION - R+R
Op. 7040L20 TUNNEL COVER - R.R
op. 7040L23
Op. 7040L74 TUNNEL TRIM SUPPORT BRACKET/MOUNT R R
Work on the left and right sides.
Op. 7040L40 FRONT DOOR RUNNING BOARD (ONE), LEFT OR RIGHT - R.R.
Op. 7040A10 DASHBOARD TRIM - R+R
Op. 5050B34 WINDSCREEN WIPER ARM/S COMPLETE WITH BLADE - R+R
Op. 7025A64 ENGINE COMPARTMENT GASKET - R.R.
Op. 7210E22 R.R. WINDSCREEN BASE TRIM
Op. 5050B38 WINDSCREEN WIPER ASSEMBLY - R+R OR REPAIR
Op. 7040A89 REINFORCEMENT BRACKET BETWEEN DASHBOARD SUPPORTING CROSSMEMER AND BODYSHELL - R.R.
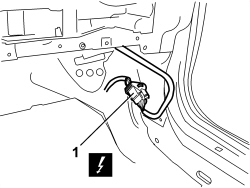
1. Working under the right side of the dashboard, disconnect the electrical connection.
| Description | Component |
|---|---|
| FRONT/DASHBOARD COUPLING | See D001 FRONT/DASHBOARD COUPLING |
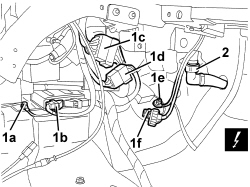
1. Disconnect the electrical connections (1a, 1b, 1c, 1d, 1e, 1f).
| Description | Component |
|---|---|
| AIR BAG SYSTEM EARTH | See C050 AIR BAG SYSTEM EARTH |
| AIR BAG CONTROL UNIT | See M060 AIR BAG CONTROL UNIT |
| DASHBOARD/REAR COUPLING | See D020 DASHBOARD/REAR COUPLING |
| AIR CONDITIONING UNIT EARTH | See C016 AIR CONDITIONING UNIT EARTH |
| PASSENGER SIDE DASHBOARD EARTH | See C020 PASSENGER SIDE DASHBOARD EARTH |
2. Disconnect the condensation drainage pipe retaining band.
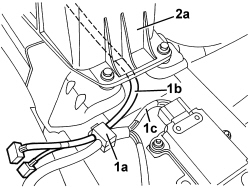
1. Working in the area of the gear lever, disconnect the band (1a) and separate the dashboard wiring branch (1b) from the passenger compartment wiring branch (1c).
2. Extract the dashboard wiring branch (1b) from under the gear lever support (2a).
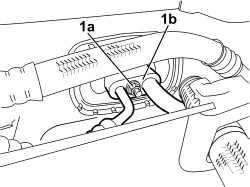
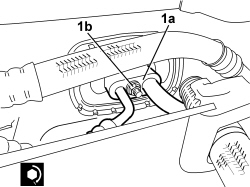
1. Working in front of the windscreen, undo the nut (1a) and disconnect the connector (1b) for the climate control system pipes from the expansion valve.
Seal the connectors that have been disconnected using suitable plugs to prevent dampness and impurities from entering the system.
- Depending on the engine type, remove any parts that are hindering the removal described below.
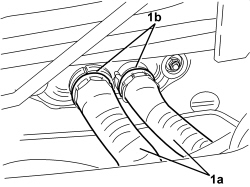
1. Detach the engine fluid pipes (1a) connected to the climate control casing heater, releasing the rapid connectors (1b).
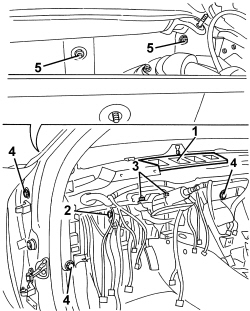
1. Remove the connecting duct between the climate control casing and the ducts under the dashboard.
2. Undo the bolt fixing the steering column.
3. Undo the bolts fixing the steering column collar, then lower the actual steering column.
4. Undo the crossmember fixing bolts, driver''s side.
5. Undo the front crossmember fixing nuts, driver''s side.
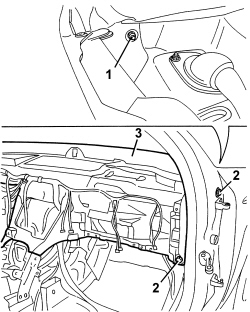
1. Undo the front crossmember fixing nut, passenger side.
2. Undo the crossmember fixing bolts, passenger side.
3. Remove the dashboard supporting crossmember complete with climate control casing and dashboard wiring.
- If necessary, remove the air duct.
Op. 5010C55 LOWER AIR DIFFUSER (ONE) LH OR RH - R.R
- If necessary, separate the crossmember from the air conditioning unit working as follows.
1. Undo the bolts.
2. Remove the air conditioning casing.
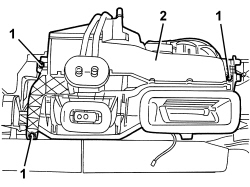
1. Disconnect the retaining bands.
2. Remove the dashboard wiring.
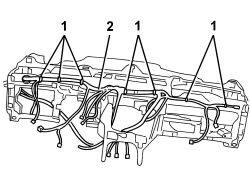
Refitting
- Check that the dashboard supporting crossmember is not damaged.
- If removed, reposition the dashboard wiring and secure it correctly.
- If removed, reposition the air conditioning casing and secure it using the bolts.
| Component | Fastening | dia | Value (daNm) | Validity |
|---|---|---|---|---|
| AIR CONDITIONING CASING | Bolt | M6 | 0.65 ÷ 0.95 |
Op. 5010C55 LOWER AIR DIFFUSER (ONE) LH OR RH - R.R
- Place the dashboard supporting crossmember complete with climate control casing and dashboard wiring in position.
1. Tighten the front nuts securing the dashboard crossmember on both the passenger and driver sides.
| Component | Fastening | dia | Value (daNm) | Validity |
|---|---|---|---|---|
| TRAVERSA PLANCIA | Dado | M8 | 1.8 ÷ 2.4 |
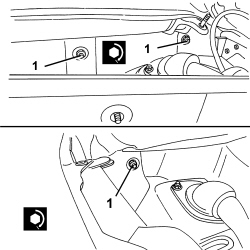
1. Tighten the bolts fixing the dashboard crossmember to the passenger compartment interior, passenger side.
| Component | Fastening | dia | Value (daNm) | Validity |
|---|---|---|---|---|
| TRAVERSA PLANCIA | Vite | M8 | 1.9 ÷ 2.9 |
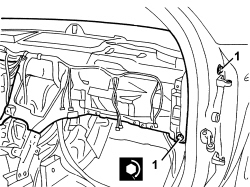
1. Tighten the bolts fixing the dashboard crossmember to the passenger compartment interior, driver''s side.
| Component | Fastening | dia | Value (daNm) | Validity |
|---|---|---|---|---|
| TRAVERSA PLANCIA | Vite | M8 | 1.9 ÷ 2.9 |
2. Raise the steering column and tighten the bolts (2a) fixing the actual steering column collar.
| Component | Fastening | dia | Value (daNm) | Validity |
|---|---|---|---|---|
| Support with steering control shafts. | Bolt | M8 | (dashboard crossmember side) 2.2 - 2.6 |
3. Tighten the bolt fixing the steering column.
| Component | Fastening | dia | Value (daNm) | Validity |
|---|---|---|---|---|
| Support with steering control shafts. | Bolt | M8 | (dashboard crossmember side) 2.2 - 2.6 |
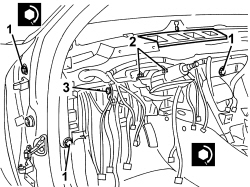
- Place the connecting duct between the climate control casing and the ducts under the dashboard in position.
- Connect the engine fluid pipes to the climate control casing heater, attaching the rapid connectors.
- Refit any parts removed to gain access to the engine fluid pipes connected to the climate control casing heater.
Replace the O rings for the climate control system connectors. Only use green coloured seals that are resistant to R134a coolant. Lubricate the connector threads using anti-freeze.
1. Working in front of the windscreen, connect the connector (1a) for the climate control system pipes to the expansion valve and tighten the nut (1b) to the recommended torque.
| Component | Fastening | dia | Value (daNm) | Validity |
|---|---|---|---|---|
| EXPANSION VALVE SIDE PIPE CONNECTOR | Nut | M8 | 1.8 ÷ 2.2 |
- Refit the dashboard wiring branch under the gear lever support.
- Working in the area of the gear lever, connect the dashboard wiring branch with the passenger compartment wiring branch using the band.
- Connect the rapid connector for condensation drainage pipe.
- Connect the electrical connections.
Op. 7040A89 REINFORCEMENT BRACKET BETWEEN DASHBOARD SUPPORTING CROSSMEMER AND BODYSHELL - R.R.
Op. 5050B38 WINDSCREEN WIPER ASSEMBLY - R+R OR REPAIR
Op. 7210E22 R.R. WINDSCREEN BASE TRIM
Op. 7025A64 ENGINE COMPARTMENT GASKET - R.R.
Op. 5050B34 WINDSCREEN WIPER ARM/S COMPLETE WITH BLADE - R+R
Op. 7040A10 DASHBOARD TRIM - R+R
Op. 7040L40 FRONT DOOR RUNNING BOARD (ONE), LEFT OR RIGHT - R.R.
Op. 7040L74 TUNNEL TRIM SUPPORT BRACKET/MOUNT R R
Op. 7040L23 TRIM ON TUNNEL COVER - R.R.
Op. 7040L20 TUNNEL COVER - R.R
Op. 3380A44 HANDBRAKE/LINKAGE PROTECTION - R+R
Op. 7040L37 GEAR LEVER TRIM - R.R
Op. 7045A10 FRONT SEAT (ONE), LEFT OR RIGHT - R.R.
Op. 5580C23 DRIVE SIDE KNEE PROTECTION AIR BAG MODULE R. R.
Op. 5505A35 MAIN BODY COMPUTER/JUNCTION UNIT - R.R.
Op. 7040A37 FUSE BOX COVER IN INSTRUMENT PANEL - R.R
Op. 5560B10 CONTROL PANEL - R+R
Op. 7040H30 FRONT PILLAR TRIM (ONE), LEFT OR RIGHT - R.R.
Op. 7040A45 RIGHT DASHBOARD SIDE TRIM - R.R.
Op. 5580C26 PASSENGER AIR BAG DISABLING KEY LOCK BARREL/SWITCH - R.R.
Op. 7040A44 LEFT DASHBOARD SIDE TRIM - R.R.
Op. 5570T92 FRONT TWEETER (ONE), LEFT OR RIGHT - R.R
Op. 5010D56 SOLAR SENSOR - R.R FOLLOWING ELECTRICAL SYSTEM CHECK
Op. 7040A17 AIR CONDITIONER CONTROLS
Op. 5570T80 CAR RADIO EQUIPMENT - R+R
Op. 5010C34 AIR OUTLET ON CONSOLE - R+R
Op. 5550A10 STALK UNIT ASSEMBLY - R+R
Op. 4110A10 STEERING WHEEL - R+R FOR REPLACEMENT OR CHECKS
Op. 5580C18 AIR BAG MODULE - R+R
Op. 7040A26 STEERING COLUMN TRIM - R+R
Op. 7040A31 DASHBOARD COMPARTMENT ASSEMBLY - R.R.
Op. 7040G20 BULB HOLDER FOR COMPARTMENT LIGHTING IN DASHBOARD - R.R.
Op. 7040A65 CONSOLE SIDE CLOSING (ONE) - R.R.
Op. 7040A04 FACIA LOWER TRIM-R R
Op. 7210E36 R.R. FRONT SIDE DOOR
Op. 0010T84 COOLANT FOR AIR CONDITIONING SYSTEM - DEHYDRATE AND REPRESSURIZE
Parts & tools for this job Staging For 2005 Alfa Romeo Brera
- TOOLTrim removal tool kitSearch: trim removal tool kit
- PARTTouch-up paintSearch: Alfa Romeo touch up paint
- PARTPanel clip assortmentSearch: Alfa Romeo panel clips assortment
Links open Amazon search results in a new tab. As an Amazon Associate I earn from qualifying purchases.