
Radiator cooling fan - r + r
- Make
- Alfa Romeo
- Model
- 159 Factory Service Manual
- Year
- 2005–2011
- Section
- Engine cooling › Radiator cooling fan - r + r
RADIATOR COOLING FAN - R + R
Removing
- Make sure that the ignition key is in the OFF position, then disconnect the battery terminal (-).
| Description | Connector | |
|---|---|---|
| Battery | See A001 BATTERY |
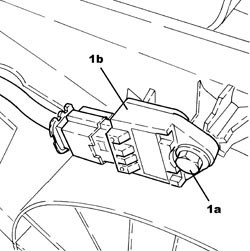
1. Undo the bolt (1a) and move the impact sensor (1b) to the side.
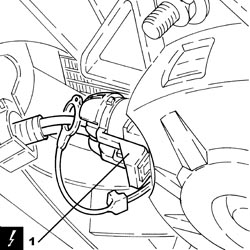
1. Disconnect the electrical connection from the radiator cooling fan.
| Description | Connector | |
|---|---|---|
| 1 | Engine fan motor | See N011 FAN MOTOR |
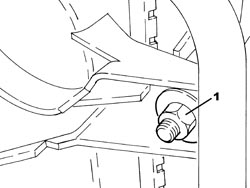
1. Undo the right nut securing the radiator cooling fan.
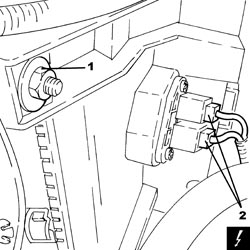
1. Undo the left nut securing the radiator cooling fan.
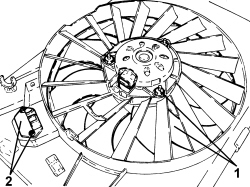
2. Disconnect the electrical connections for the engine cooling fan resistor.
| Description | Connector | |
|---|---|---|
| 2 | Engine fan adjustment resistance | See O010 ENGINE FAN ADJUSTMENT RESISTANCE - 1 |
1. Remove the radiator cooling fan releasing it upwards.
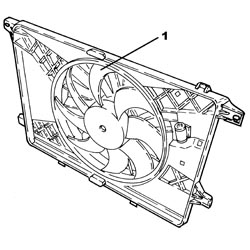
1. At the bench, undo the nuts (1a) and separate the fan motor (1b) from the duct (1c).
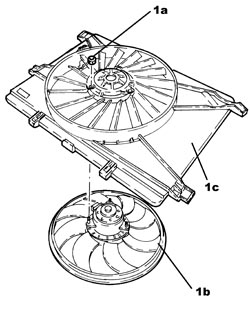
Refitting
- Fit the fan motor on the duct and secure it using the nuts.
- Refit the radiator cooling fan and secure it using the nuts.
- Connect the electrical connections to the engine cooling fan resistor.
- Position the impact sensor in its housing and secure it using the bolt.
- Connect the negative battery terminal.
Removing
Op. 0010T20 ENGINE COOLANT - CHANGE
Op. 1016A10 SOUND-PROOFING COVER - R.R
Op. 1048A50 TURBOCHARGER AIR INTAKE PIPE - R.R.
Op. 5530B52 BATTERY SUPPORT/DRIP TRAY - R.R
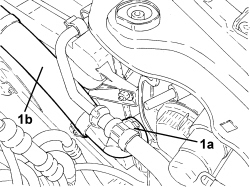
1. Disconnect rapid connector (1a) and move radiator coolant inlet pipe (1b) sideways.
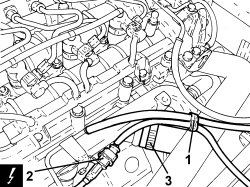
1. Disconnect the intermediate coupling for the vacuum pipes for the turbocharger vane postioning actuator control solenoid.
2. Detach the electrical connection for the exhaust gas temperature sensor.
| Description | Connector | |
|---|---|---|
| 2 | Upstream particle filter (DPF) temperature sensor | See K189 UPSTREAM PARTICULATE FILTER TEMPERATURE SENSOR (DPF) |
3. Loosen the band and disconnect the flexible supply pipe from the water pump fluid rigid return pipe.
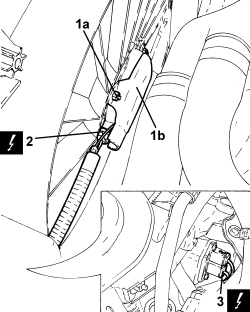
1. Undo nuts (1a) and remove heat shield (1b) from the fan motor.
2. Detach the electrical connection for the fan.
| Description | Connector | |
|---|---|---|
| 2 | Fan motor | See N011 FAN MOTOR |
3. Detach the electrical connections for the dimmer.
| Description | Connector | |
|---|---|---|
| 3 | Engine fan adjustment resistance - 1 | See O010 ENGINE FAN ADJUSTMENT RESISTANCE - 1 |
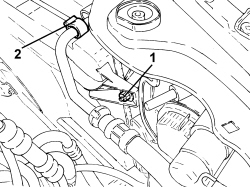
1. Undo the nut securing the fan, right-hand side.
2. Open the retaining clip on the hydraulically assisted steering pipe.
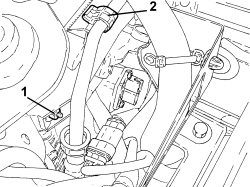
1. Undo the nut securing the fan, left-hand side.
2. Open the retaining clip on the hydraulically assisted steering pipe.
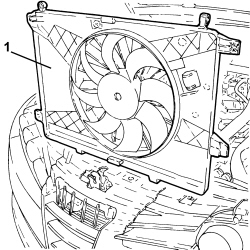
1. Lift and remove the fan complete with lower clips.
1. Undo the nuts and remove the fan from the duct.
2. Undo the bolts and remove the resistor from the duct.
Refitting
- Fit the resistor back into its housing and secure it to the duct using the bolts.
- Place the fan back in its housing and fasten it to the duct using the nuts.
- Place the complete fan back in its housing, secure it with the lower clips and tighten the upper nuts.
- Close the retaining clips on the hydraulically assisted steering pipe, right-hand and left-hand side.
- Secure the electrical connections for the dimmer.
- Secure the fan electrical connection.
- Place the fan motor heat shield in its housing and secure it using the nuts.
- Connect the flexible pipe to the rigid coolant return pipe to the water pump and secure it using the band.
- Secure the electrical connection for the exhaust gas temperature sensor.
- Connect the intermediate coupling for the vacuum pipes for the turbocharger vane positioning actuator control solenoid.
- Place the radiator coolant inlet pipe back in its housing and connect rapid connector.
Op. 5530B52 BATTERY SUPPORT/DRIP TRAY - R.R
Op. 1048A50 TURBOCHARGER AIR INTAKE PIPE - R.R.
Parts & tools for this job Staging For 2005 Alfa Romeo 159
- FLUIDCoolantSearch: Alfa Romeo coolant antifreeze
- PARTThermostatSearch: Alfa Romeo 159 2005 thermostat
- TOOLCooling system pressure testerSearch: cooling system pressure tester
Links open Amazon search results in a new tab. As an Amazon Associate I earn from qualifying purchases.