
Engine cooling radiator - r + r
- Make
- Alfa Romeo
- Model
- 159 Factory Service Manual
- Year
- 2005–2011
- Section
- Engine cooling › Engine cooling radiator - r + r
ENGINE COOLING RADIATOR - R + R
Removing
- Position the vehicle on a lift.
- Make sure that the ignition key is in the OFF position, then disconnect the battery terminal (-).
| Description | Connector | |
|---|---|---|
| Battery | See A001 BATTERY |
Op. 0010T84 COOLANT FOR AIR CONDITIONING SYSTEM - DEHYDRATE AND REPRESSURIZE
Op. 7055B54 UNDER ENGINE PROTECTION/GUARD - R.R.
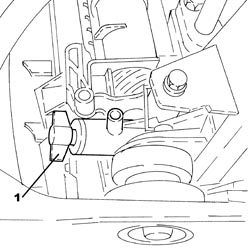
1. Undo the radiator coolant drain plug.
Collect the coolant in a suitable container.
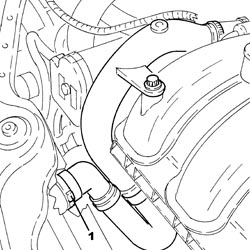
1. Disconnect the rapid connector for the radiator lower coolant outlet hose, radiator side.
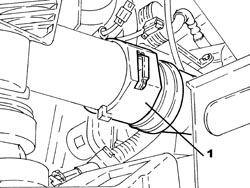
1. Disconnect the rapid connector for the radiator upper coolant inlet hose, radiator side.
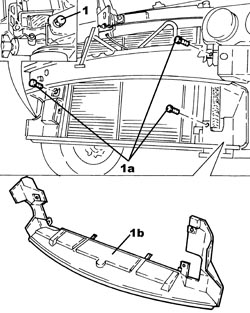
1. Undo the bolts (1a) and remove the air duct (1b).
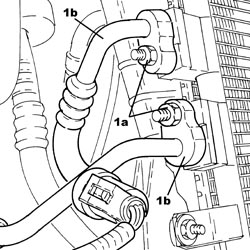
1. Undo the nuts (1a) and disconnect the air conditioning system pipes (1b) from the air conditioning condenser.
Seal the connectors that have been disconnected using suitable plugs to prevent dampness and impurities from entering the system.
Op. 7210A15 R.R. FRONT WING/HEADLAMP HOUSING CROSSMEMBER
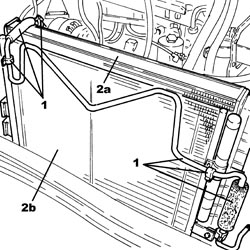
1. Release the power assisted steering system heat exchanger pipe from the bands on the engine cooling radiator.
2. Remove the engine cooling radiator (2a) complete with air conditioning condener and fan (2b).
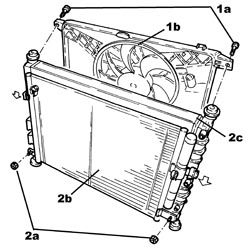
1. Working at the bench, undo the bolts (1a) and separate the fan (1b) from the engine cooling radiator.
2. Undo the nuts (2a) and separate the air conditioning condenser (2b) from the engine cooling radiator (2c) releasing it downwards.
Refitting
- Place the air conditioning condenser back in its housing on the engine cooling radiator and secure it using the nuts.
- Fit the fan in place on the engine cooling radiator and secure it using the bolts.
- Place the engine cooling radiator complete with fan and air conditioning condenser in its housing.
- Fasten the power assisted steering system heat exchanger pipe using the bands to the engine cooling radiator.
Op. 7210A15 R.R. FRONT WING/HEADLAMP HOUSING CROSSMEMBER
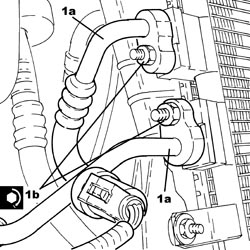
1. Connect the air conditioning system pipes (1a) to the air conditioning condenser and secure them tightening the nuts (1b) to the recommended torque.
Replace any O-Rings for the connectors using green coloured seals only which are resistant to the R134a refrigerant fluid.
Lubricate the connector threads using anti-freeze.
| Component | Fastening | dia | Value (daNm) | Validity |
|---|---|---|---|---|
| CONDENSER SIDE PIPE CONNECTOR | Nut | M8 | 1.8 ÷ 2.2 |
- Fit the air duct in its housing and secure it using the bolts.
- Connect the rapid connector for the radiator upper coolant inlet hose, radiator side.
- Connect the rapid connector for the radiator lower coolant outlet hose, radiator side.
- Tighten the radiator coolant drain plug.
- Connect the negative battery terminal.
Op. 0010T20 ENGINE COOLANT - CHANGE
Op. 0010T84 COOLANT FOR AIR CONDITIONING SYSTEM - DEHYDRATE AND REPRESSURIZE
Op. 7055B54 UNDER ENGINE PROTECTION/GUARD - R.R.
- Remove the vehicle from the lift.
Removing
- Position the vehicle on a lift.
Op. 5530B52 BATTERY SUPPORT/DRIP TRAY - R.R
Op. 1084A16 OIL DIPSTICK PIPE - R.R
Op. 1048A50 TURBOCHARGER AIR INTAKE PIPE - R.R.
Op. 1088D14 UPPER RADIATOR COOLANT OUTLET HOSE - R.R.
Op. 1088D10 LOWER RADIATOR COOLANT OUTLET HOSE - R.R.
Op. 1088E10 RADIATOR COOLING FAN - R + R
Op. 0010T84 COOLANT FOR AIR CONDITIONING SYSTEM - DEHYDRATE AND REPRESSURIZE
1. Loosen the band and disconnect the air supply hose from the heat exchanger to the rigid pipe, heat exchanger side.
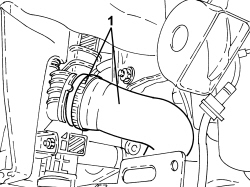
1. Loosen the band and disconnect the air supply hose between the turbocharger and the heat exchanger, heat exchanger side.
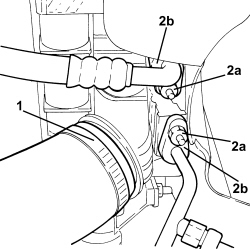
2. Undo nuts (2a) and disconnect air conditioning system pipes (2b) from the air conditioning condenser.
Seal the connectors that have been disconnected using suitable plugs to prevent dampness and impurities from entering the system.
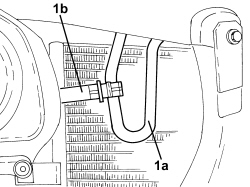
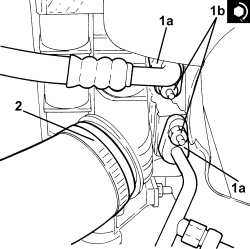
1. Release power assisted steering system heat exchanger pipe (1a) from bands (1b) on engine cooling radiator.
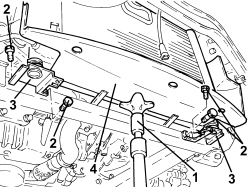
1. Position a hydraulic jack beneath the engine cooling radiator.
2. Undo the bolts fixing the engine cooling radiator mounting brackets to the front suspension crossmember.
3. Remove the engine cooling radiator mounting brackets.
4. Remove the engine cooling radiator complete with heat exchanger and air conditioning condenser.
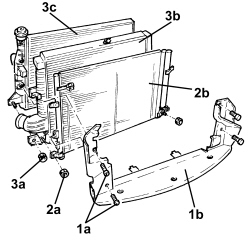
1. Working at the bench, undo bolts (1a) and remove air duct (1b).
2. Undo nuts (2a) and separate air conditioning condenser (2b) from the heat exchanger.
3. Undo nuts (3a) and separate heat exchanger (3b) from engine cooling radiator (3c).
Refitting
- Assemble the heat exchanger and the engine cooling radiator and secure it using the nuts.
- Assemble the air conditioning condenser and the heat exchanger and secure it using the nuts.
- Fit the air duct in its housing and secure it using the bolts.
- Place the engine cooling radiator in its housing, complete with heat exchanger and air conditioning condenser, using the hydraulic jack.
- Place the engine cooling radiator mounting brackets in their housings and secure them using the bolts.
- Remove the hydraulic jack from underneath the engine coolant radiator.
- Fasten the power assisted steering system heat exchanger pipe to the engine cooling radiator, using the bands.
1. Connect air conditioning system pipes (1a) to the air conditioning condenser and secure them, tightening nuts (1b) to the recommended torque.
Replace any O-Rings for the connectors, using green coloured seals only, which are resistant to the R134a refrigerant fluid.
Lubricate the connector threads using anti-freeze.
| Component | Fastening | dia | Value (daNm) | Validity |
|---|---|---|---|---|
| CONDENSER SIDE PIPE CONNECTOR | Nut | M8 | 1.8 ÷ 2.2 |
2. Connect the air supply hose between the turbocharger and the heat exchanger, heat exchanger side, and tighten the band.
- Connect the air supply hose from the heat exchanger to the rigid pipe, heat exchanger side, and tighten the band.
Op. 1088E10 RADIATOR COOLING FAN - R + R
Op. 1088D10 LOWER RADIATOR COOLANT OUTLET HOSE - R.R.
Op. 1088D14 UPPER RADIATOR COOLANT OUTLET HOSE - R.R.
Op. 1048A50 TURBOCHARGER AIR INTAKE PIPE - R.R.
Op. 1084A16 OIL DIPSTICK PIPE - R.R
Op. 5530B52 BATTERY SUPPORT/DRIP TRAY - R.R
Op. 0010T20 ENGINE COOLANT - CHANGE
Op. 0010T84 COOLANT FOR AIR CONDITIONING SYSTEM - DEHYDRATE AND REPRESSURIZE
- Remove the vehicle from the lift.
Removing
Op. 1016A10 SOUND-PROOFING COVER - R.R
Op. 7210A15 R.R. FRONT WING/HEADLAMP HOUSING CROSSMEMBER
Op. 0010T20 ENGINE COOLANT - CHANGE
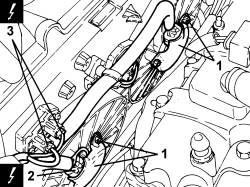
1. Undo the nuts and remove the heat shields for the fan motors.
2. Disconnect the fan electrical connections.
| Description | Connector | |
|---|---|---|
| 2 | Engine fan motor -1 | See N011 FAN MOTOR |
| Description | Connector | |
|---|---|---|
| 2 | Engine fan motor -2 | See N012 ENGINE FAN MOTOR - 2 |
3. Disconnect the electrical connections for the dimmers.
| Description | Connector | |
|---|---|---|
| 3 | Engine fan adjustment resistance - 1 | See O010 ENGINE FAN ADJUSTMENT RESISTANCE - 1 |
| Description | Connector | |
|---|---|---|
| 3 | Engine fan adjustment resistance -2 | See O012 ENGINE FAN 2 ADJUSTMENT RESISTANCE |
1. Disconnect the rapid connector for the radiator coolant outlet hose, radiator side.
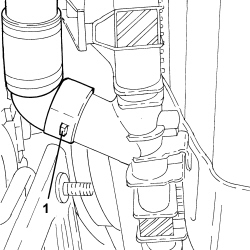
1. Disconnect the rapid connector for the radiator coolant inlet hose, radiator side.
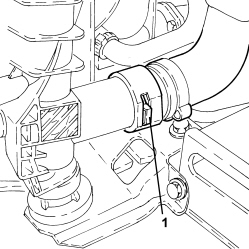
1. Undo the lower bolt (1a) and remove the cold air intake (1b) working on the air filter casing clips.
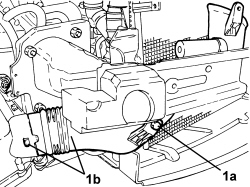
1. Undo the bolts (1a) and remove the air duct (1b).
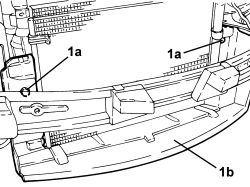
1. Undo the bolts (1a) for the air conditioning system condenser (1b).
- Remove the air conditioning system condenser from its housing without disconnecting the coolant inlet/outlet pipes, secure it to the mounting brackets for the bumper and the crossmember.
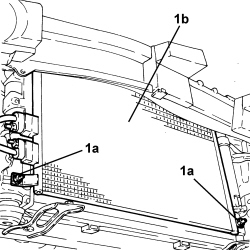
1. Remove the engine cooling radiator complete with fans from the mounting brackets.
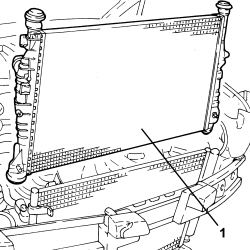
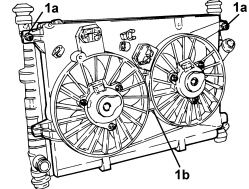
1. Undo the nuts (1a) and remove the fans (1b) from the radiator.
Refitting
- Fit the fans on the radiator and secure them using the nuts.
- Place the engine coolant radiator complete with fans in its housing.
- Place the air conditioning condenser in its housing and secure it using the bolts.
- Fit the air duct in its housing and secure it using the bolts.
- Place the cold air intake back in its housing and tighten the lower bolt.
- Connect the rapid connector for the radiator coolant inlet hose, radiator side.
- Connect the rapid connector for the radiator coolant outlet hose, radiator side.
- Connect the electrical connections for the dimmers.
- Connect the electrical connections for the fans.
- Place the fan motor heat shields in their housings and secure them using the nuts.
Op. 0010T20 ENGINE COOLANT - CHANGE
Op. 7210A15 R.R. FRONT WING/HEADLAMP HOUSING CROSSMEMBER
Op. 1016A10 SOUND-PROOFING COVER - R.R
Removing
- Position the vehicle on a lift.
Op. 5530B52 BATTERY SUPPORT/DRIP TRAY - R.R
Op. 1084A16 OIL DIPSTICK PIPE - R.R
Op. 1048A50 TURBOCHARGER AIR INTAKE PIPE - R.R.
Op. 1088D14 UPPER RADIATOR COOLANT OUTLET HOSE - R.R.
Op. 1088D10 LOWER RADIATOR COOLANT OUTLET HOSE - R.R.
Op. 1088E11 FANS WITH SINGLE ENGINE DUCT - R+R
Op. 0010T84 COOLANT FOR AIR CONDITIONING SYSTEM - DEHYDRATE AND REPRESSURIZE
1. Loosen the band and disconnect the air supply hose from the heat exchanger to the rigid pipe, heat exchanger side.
1. Loosen the band and disconnect the air supply hose between the turbocharger and the heat exchanger, heat exchanger side.
2. Undo nuts (2a) and disconnect air conditioning system pipes (2b) from the air conditioning condenser.
Seal the connectors that have been disconnected using suitable plugs to prevent dampness and impurities from entering the system.
1. Release power assisted steering system heat exchanger pipe (1a) from bands (1b) on the engine cooling radiator.
1. Position a hydraulic jack beneath the engine cooling radiator.
2. Undo the bolts fixing the engine cooling radiator mounting brackets to the front suspension crossmember.
3. Remove the engine cooling radiator mounting brackets.
4. Remove the engine cooling radiator complete with heat exchanger and air conditioning condenser.
1. Working at the bench, undo bolts (1a) and remove air duct (1b).
2. Undo nuts (2a) and separate air conditioning condenser (2b) from heat exchanger.
3. Undo nuts (3a) and separate heat exchanger (3b) from engine cooling radiator (3c).
Refitting
- Assemble the heat exchanger and the engine cooling radiator and secure using the nuts.
- Assemble the air conditioning condenser and the heat exchanger and secure using the nuts.
- Fit the air duct in its housing and secure it using the bolts.
- Place the engine cooling radiator in its housing, complete with heat exchanger and air conditioning condenser, using the hydraulic jack.
- Place the engine cooling radiator mounting brackets in their housings and secure them using the bolts.
- Remove the hydraulic jack from underneath the engine coolant radiator.
- Fasten the power assisted steering system heat exchanger pipe to the engine cooling radiator, using the bands.
1. Connect air conditioning system pipes (1a) to the air conditioning condenser and secure them, tightening nuts (1b) to the recommended torque.
Replace any O-Rings for the connectors using green coloured seals only, which are resistant to the R134a refrigerant fluid.
Lubricate the connector threads using anti-freeze.
| Component | Fastening | dia | Value (daNm) | Validity |
|---|---|---|---|---|
| CONDENSER SIDE PIPE CONNECTOR | Nut | M8 | 1.8 ÷ 2.2 |
2. Connect the air supply hose between the turbocharger and the heat exchanger, heat exchanger side, and tighten the band.
- Connect the air supply hose from the heat exchanger to the rigid pipe, heat exchanger side, and tighten the band.
Op. 1088E11 FANS WITH SINGLE ENGINE DUCT - R+R
Op. 1088D10 LOWER RADIATOR COOLANT OUTLET HOSE - R.R.
Op. 1088D14 UPPER RADIATOR COOLANT OUTLET HOSE - R.R.
Op. 1048A50 TURBOCHARGER AIR INTAKE PIPE - R.R.
Op. 1084A16 OIL DIPSTICK PIPE - R.R
Op. 5530B52 BATTERY SUPPORT/DRIP TRAY - R.R
Op. 0010T20 ENGINE COOLANT - CHANGE
Op. 0010T84 COOLANT FOR AIR CONDITIONING SYSTEM - DEHYDRATE AND REPRESSURIZE
- Remove the vehicle from the lift.
Parts & tools for this job Staging For 2005 Alfa Romeo 159
- PARTEngine gasket setSearch: Alfa Romeo 159 2005 engine gasket set
- TOOLTorque wrenchSearch: 3/8 inch torque wrench
- TOOLFeeler gauge setSearch: feeler gauge set
Links open Amazon search results in a new tab. As an Amazon Associate I earn from qualifying purchases.