
ACTUATOR - Tdi
- Make
- Land Rover
- Model
- Discovery 300Tdi Discovery
- Section
- REPAIR › ACTUATOR - Tdi
19
FUEL SYSTEM
8
REPAIR
ACTUATOR - Tdi
Service repair no - 19.75.05
NOTE: The actuator is non serviceable, fit
a new unit if failure or damage occurs.
Remove
1. Disconnect battery negative lead.
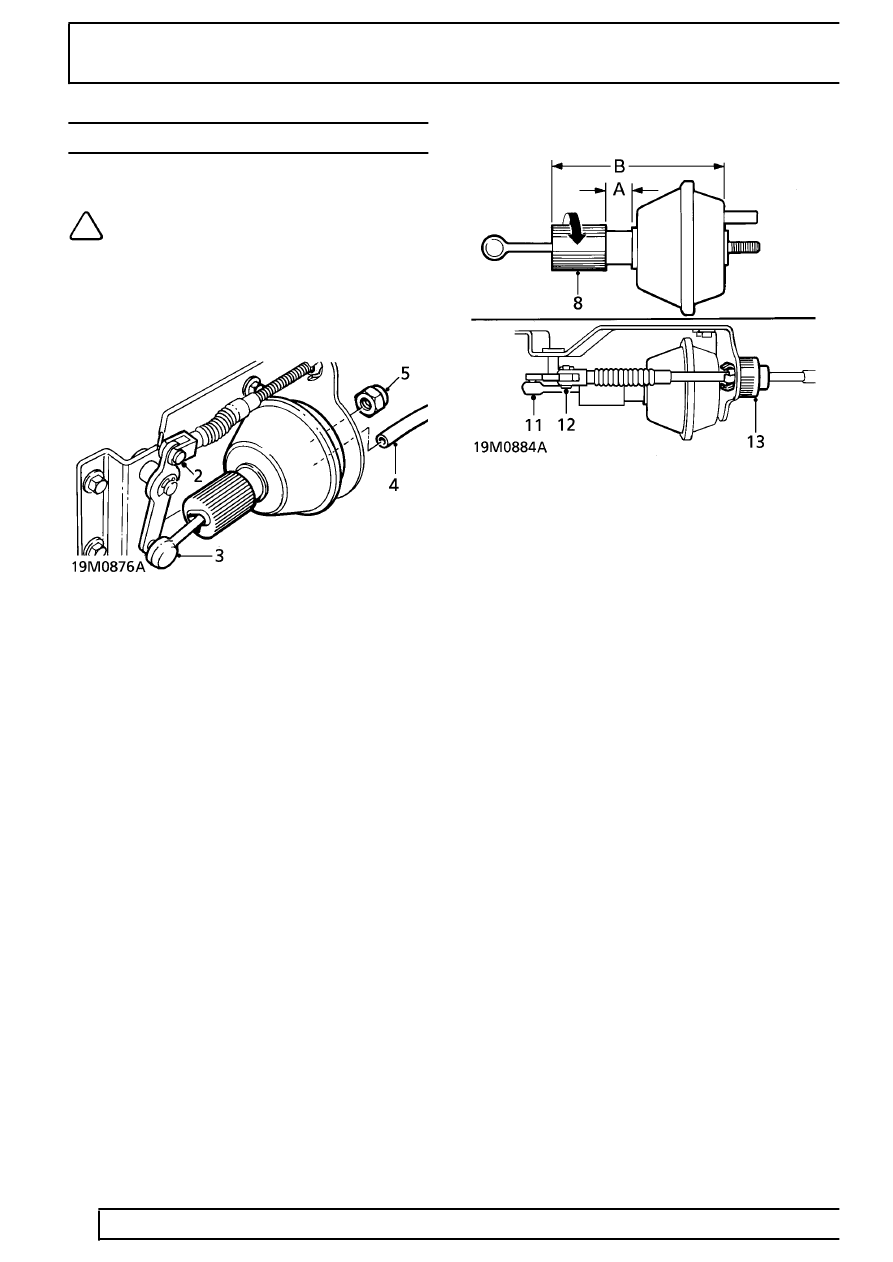
2. Remove split pin, withdraw clevis pin and
disconnect cable from lever.
3. Disconnect link ball end from cable lever.
4. Disconnect vacuum hose from actuator.
5. Remove nut securing actuator to bracket and
remove actuator.
6. Inspect rubber diaphragm. Fit a new actuator
assembly if diaphragm is damaged.
Refit
7. Check that link setting distance (dimension ’A’)
equals 16 mm and that the retainer is locked in
position. If correct, proceed to paragraph 9.
8. If dimension ’A’ is not correct, proceed as
follows:
•
Measure 16 mm from diaphragm collar and
mark the position.
•
Position link and retainer to the mark and
rotate retainer half a turn to secure.
•
Check measurement ’A’ is still 16 mm, then
turn retainer a further quarter turn to lock.
9. Fit actuator and secure to bracket with nut.
10. Connect vacuum hose.
11. Connect link ball end to cable lever.
12. Connect cable to lever and secure with clevis pin
and split pin.
13. Adjust cable position to remove any free play
from link, setting dimension ’B’ should be 103
mm.
Parts & tools for this job Staging For Land Rover Discovery
- PARTGlow plugsSearch: Land Rover Discovery glow plugs
- TOOLGlow plug socketSearch: glow plug socket
- TOOLDiesel compression testerSearch: diesel compression tester
Links open Amazon search results in a new tab. As an Amazon Associate I earn from qualifying purchases.