
WIPER MOTOR AND DRIVE RACK - FROM 02MY
- Make
- Land Rover
- Model
- Defender TD5 Defender
- Section
- WIPER MOTOR AND DRIVE RACK - FROM 02MY
WIPERS AND WASHERS
3
REPAIR
WIPER MOTOR AND DRIVE RACK - FROM 02MY
Service repair no - 84.15.09
Remove
1. Disconnect battery negative lead. See
ELECTRICAL, Repair.
2. Remove wiper arms. See this Section.
3. Remove fascia console. See CHASSIS AND
BODY, Repair.
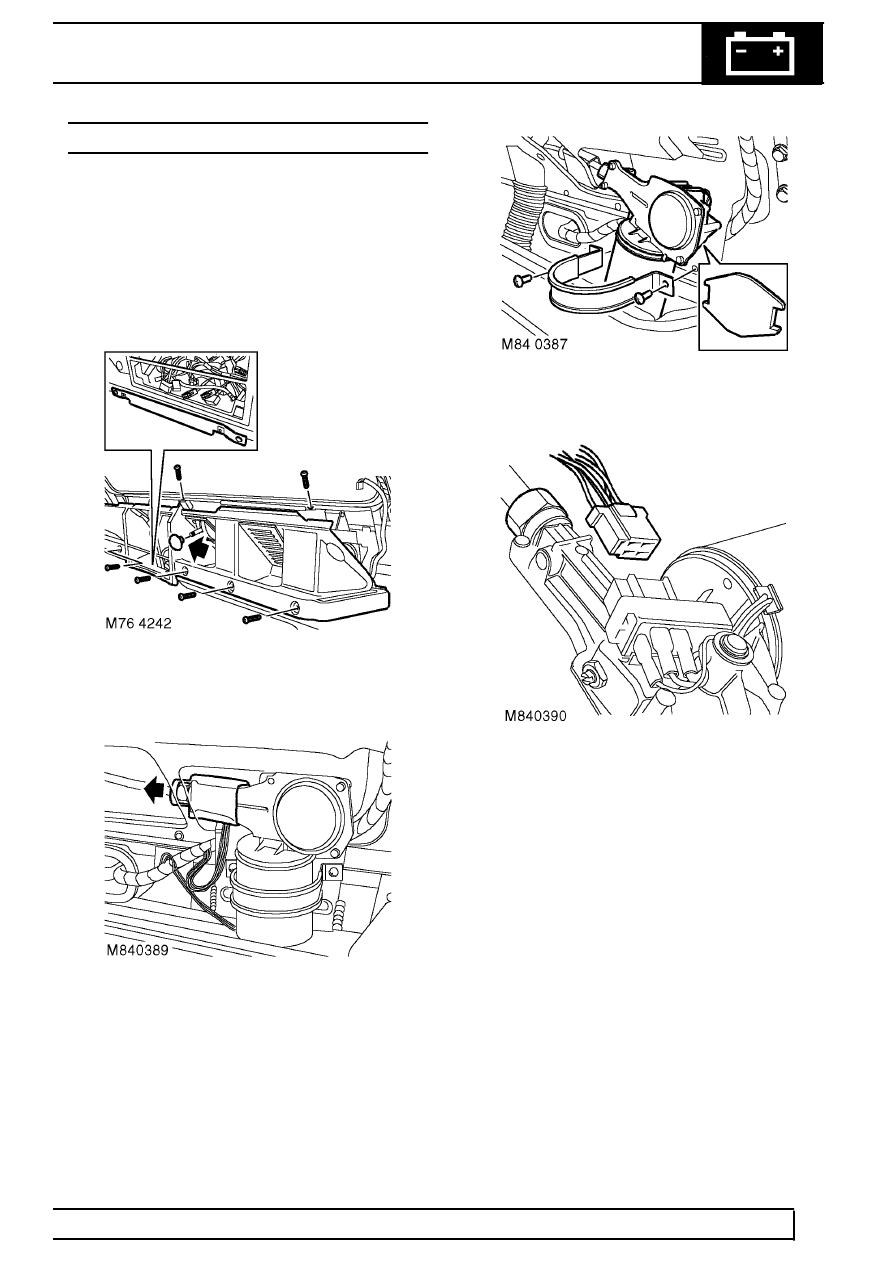
4. Remove air vent control knobs.
5. Remove 6 screws, remove fascia closing panel
and collect nut plate.
6. Move cover aside and loosen wiper motor drive
tube nut.
7. Remove 2 screws securing wiper motor, remove
retaining strap and mounting pad.
8. Disconnect multiplug from wiper motor.
9. Remove tube nut and remove wiper motor with
rack.
Refit
10. Lubricate wiper motor drive rack with grease.
11. Feed wiper motor rack into tube, connect
multiplug and fit but do not tighten tube nut.
12. Fit mounting pad and retaining strap, align wiper
motor and tighten screws.
13. Tighten wiper motor tube nut to 8 Nm (6 lbf.ft)
and reposition nut cover.
14. Fit fascia closing panel.
Parts & tools for this job Staging For Land Rover Defender
- TOOLTie rod end toolSearch: tie rod end puller
- TOOLBall joint separatorSearch: ball joint separator
- FLUIDPower steering fluidSearch: Land Rover power steering fluid
Links open Amazon search results in a new tab. As an Amazon Associate I earn from qualifying purchases.