
Power unit with manual gearbox - r + r
- Make
- Lancia
- Model
- Ypsilon Factory Service Manual
- Year
- 2003–2011
- Section
- Engine and power unit › Power unit with manual gearbox - r + r
Power unit with manual gearbox - r + r
Removing
Place the car on a lift.
Drain the air conditioner coolant circuit - 0010T84 coolant for air conditioning system dehydrate and recharge.
Proceed with removal - 4450B12 front or rear wheels (two) - r+r.
Proceed with removal - 7055B66 Engine compartment DUST SHIELD protection in right front wheel arch - R.R..
Proceed with removal - 7055B91 Right front WHEEL ARCH LINER - R.R..
Proceed with removal - 5530B10 battery - r+r.
Proceed with removal - 5530B52 Battery DRIP TRAY/SUPPORT - R.R..
Proceed with removal - 1048A10 air cleaner filtering element - replace.
Position a suitable container to collect the coolant.
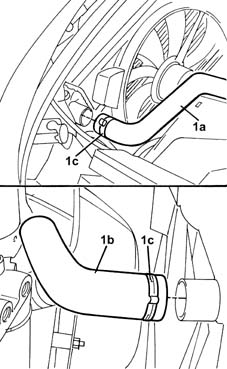
1. Disconnect upper sleeve (1a) and lower sleeve (1b) on the radiator side by removing collars (1c).
Removing
Position the vehicle on the ramp.
Drain the air conditioner coolant circuit - 0010T84 coolant for air conditioning system dehydrate and recharge.
Proceed with removal - 4450B12 front or rear wheels (two) - r+r.
Proceed with removal - 7055B66 Engine compartment DUST SHIELD protection in right front wheel arch - R.R..
Proceed with removal - 7055B91 Right front WHEEL ARCH LINER - R.R..
Proceed with removal - 5530B10 battery - r+r.
Proceed with removal - 5530B52 Battery DRIP TRAY/SUPPORT - R.R..
Proceed with removal - 1048A10 air cleaner filtering element - replace.
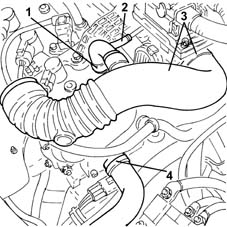
1. Loosen the collar and disconnect the engine oil vapour intake pipe from the tappet cover.
2. Disconnect the engine oil vapour inlet pipe from the intake manifold.
3. Loosen the band, disconnect the hose from the air filter to the intake manifold, intake manifold side and remove it.
4. Loosen band and disconnect the upper coolant inlet hose to the radiator thermostat side.
Recover the coolant which comes out in a suitable container.
Removing
Position the vehicle on the ramp.
Drain the air conditioner coolant circuit - 0010T84 coolant for air conditioning system dehydrate and recharge.
Proceed with removal - 4450B12 front or rear wheels (two) - r+r.
Proceed with removal - 7055B66 Engine compartment DUST SHIELD protection in right front wheel arch - R.R..
Proceed with removal - 7055B91 Right front WHEEL ARCH LINER - R.R..
Proceed with removal - 5530B10 battery - r+r.
Proceed with removal - 5530B52 Battery DRIP TRAY/SUPPORT - R.R..
Proceed with removal - 1048A10 air cleaner filtering element - replace.
1. Loosen the collar and disconnect the engine oil vapour intake pipe from the tappet cover.
2. Disconnect the engine oil vapour inlet pipe from the intake manifold.
3. Loosen the band, disconnect the hose from the air filter to the intake manifold, intake manifold side and remove it.
4. Loosen band and disconnect the upper coolant inlet hose to the radiator thermostat side.
Recover the coolant which comes out in a suitable container.
Removing
Position the vehicle on the ramp.
Proceed with removal - 4450B12 front or rear wheels (two) - r+r.
Proceed with removal.
Proceed with removal - 7055B66 Engine compartment DUST SHIELD protection in right front wheel arch - R.R..
Proceed with removal - 7055B90 Left front WHEEL ARCH LINER - R.R..
Proceed with removal - 7055B91 Right front WHEEL ARCH LINER - R.R..
Proceed with removal - 5530B10 battery - r+r.
Proceed with removal - 5530B52 Battery DRIP TRAY/SUPPORT - R.R..
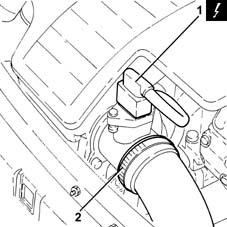
1. Disconnect the electrical connection from the air flow meter.
| Name | Connector | |
|---|---|---|
| 1 | Air flow meter | K41 |
2. Loosen the band and disconnect the the turbocharger air inlet sleeve from the rigid pipe, air flow meter side.
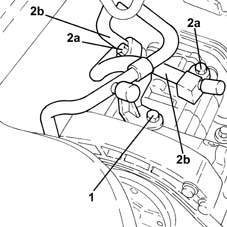
1. Undo the bolt securing the coolant pipe mounting bracket to the air conditioner compressor.
2. Undo the bolts (2a) and disconnect the coolant fluid inlet and outlet pipes (2b) from the air conditioning compressor and move aside.
1. Loosen the band and disconnect the lower radiator coolant outlet hose from the radiator, radiator side.
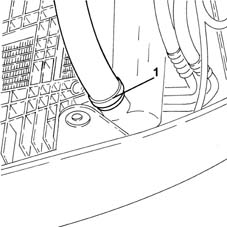
1. Loosen the band and disconnect the lower radiator coolant outlet hose from the radiator, radiator side.
1. Remove the air filter (1a) complete with air flow meter (1b) by releasing from the underlying pins and then from the rear fastenings.
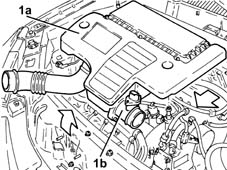
Remove the cover from the junction unit.
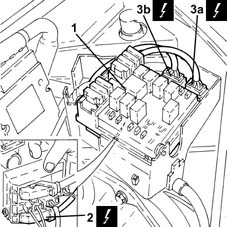
1. Release the junction unit from its seat.
2. Disconnect the electrical connection from the junction unit.
| Name | Connector | |
|---|---|---|
| 2 | Front / dashboard coupling | D1 |
3. Disconnect the electrical connections (3a) and (3b).
| Name | Connector | |
|---|---|---|
| 3a | Front / engine coupling | D4a |
| Name | Connector | |
|---|---|---|
| 3b | Front / engine coupling | D4b |
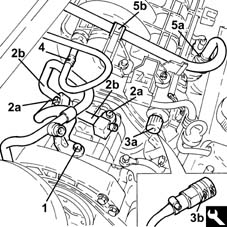
1. Undo the bolt securing the coolant pipe mounting bracket to the air conditioner compressor.
2. Undo the bolts (2a) and disconnect the coolant fluid inlet and outlet pipes (2b) from the air conditioning compressor and move to one side.
3. Undo the plug (3) for the fuel manifold pipe and use tool (3b) to drain the pressure from the fuel system.
Recover the fuel which comes out in a suitable container.
| Name | Country | |
|---|---|---|
| 3b | Rapid connector | 1.870.684.000 |
4. Disconnect the rapid connector for the fuel vapour recirculation pipe from the air chamber.
5. Disconnect the rapid attachment for the fuel supply pipe (5a) from the fuel manifold pipe and disengage from band (5b).
1. Undo the bolt securing the coolant pipe mounting bracket to the air conditioner compressor.
2. Undo the bolt (2a) and disconnect the coolant fluid inlet and outlet pipes (2b) from the air conditioning compressor and move aside.
3. Undo the protective plug (3a) for the fuel manifold and use tool (3b) to drain the pressure from the fuel system.
Recover the fuel which comes out in a suitable container.
| Name | Country | |
|---|---|---|
| 3b | Rapid connector | 1.870.684.000 |
4. Disconnect the rapid connector for the fuel vapour recirculation pipe from the air chamber.
5. Disconnect the rapid attachment for the fuel supply pipe (5a) from the fuel manifold and release from collar (5b).
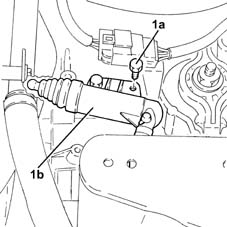
1. Undo the bolts (1a) and move the clutch operating cylinder (1b) aside without disconnecting the pipe.
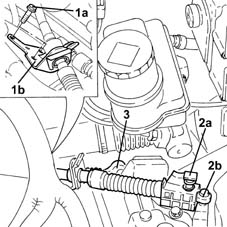
1. Undo the bolts (1a) fixing the gear selector and engagement cables mounting bracket (1b).
2. Press the release button (2a) and disconnect the gear selector cable (2b).
3. Disconnect the gear engagement cable.
Move the gear selector and engagement cables, complete with mounting bracket, sideways.
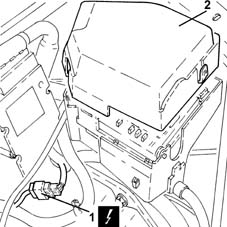
1. Disconnect the front engine coupling.
| Name | Connector | |
|---|---|---|
| 1 | Front / engine coupling | D4C |
2. Remove the cover from the junction unit.
1. Disconnect the front engine coupling.
| Name | Connector | |
|---|---|---|
| 1 | Front / engine coupling | D4C |
2. Remove the cover from the junction unit.
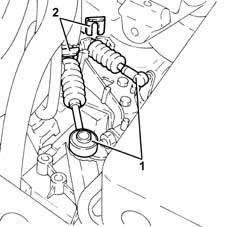
1. Disconnect the gear engagement/selector cables.
2. Remove the stops and release the gear engagement/selector cables from the mounting bracket.
1. Disconnect the electrical connection from the reversing lights switch.
| Name | Connector | |
|---|---|---|
| 1 | Reversing lights switch | I20 |
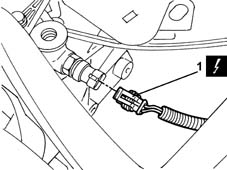
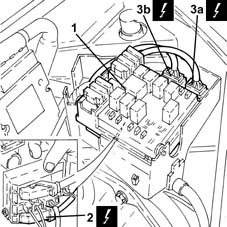
1. Remove the junction unit from its seat.
2. Disconnect the facia front coupling
| Name | Connector | |
|---|---|---|
| 2 | Front / dashboard coupling | D1 |
3. Disconnect the engine front junctions (3a) and (3b).
| Name | Connector | |
|---|---|---|
| 3a | Front / engine coupling | D4A |
| Name | Connector | |
|---|---|---|
| 3b | Front / engine coupling | D4B |
1. Release the junction unit from its seat.
2. Disconnect the front facia junction.
| Name | Connector | |
|---|---|---|
| 2 | Front / dashboard coupling | D1 |
3. Disconnect engine front coupling joints (3a) and (3b).
| Name | Connector | |
|---|---|---|
| 3a | Front / engine coupling | D4A |
| Name | Connector | |
|---|---|---|
| 3b | Front / engine coupling | D4B |
Drain the air conditioner coolant circuit - 0010T84 coolant for air conditioning system dehydrate and recharge.
1. Loosen the band and disconnect the lower radiator coolant outlet hose from the radiator, radiator side.
Collect the engine coolant in a suitable container.
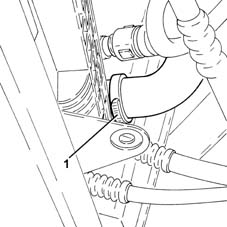
1. Undo the bolts (1a) and move aside the clutch slave cylinder (1b).
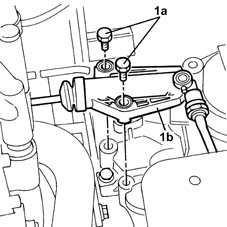
1. Undo the bolts (1a) and move the clutch operating cylinder (1b) aside without disconnecting the pipe.
2. Undo the nut (2a) and disconnect the battery earth lead (2b) from the gearbox.
| Name | Connector | |
|---|---|---|
| 2b | Battery earth | C1 |
3. Disconnect the electrical connection from the reversing lights switch.
| Name | Connector | |
|---|---|---|
| 3 | Reversing lights switch | I20 |
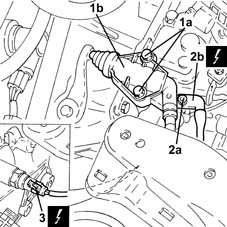
1. Undo the bolts (1a) and move the clutch operating cylinder (1b) aside without disconnecting the pipe.
2. Undo the nut (2a) and disconnect the battery earth lead (2b) from the gearbox.
| Name | Connector | |
|---|---|---|
| 2b | Battery earth | C1 |
3. Disconnect the electrical connection from the reversing lights switch.
| Name | Connector | |
|---|---|---|
| 3 | Reversing lights switch | I20 |
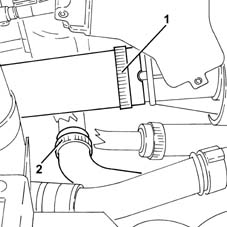
1. Loosen the band and disconnect the upper coolant inlet hose to the radiator thermostat side.
2. Loosen the band and disconnect the heater supply and return pipe, water pump rigid inlet pipe side.
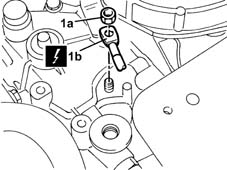
1. Undo the nut (1a) and disconnect the earth lead (1b) from the gearbox.
| Name | Connector | |
|---|---|---|
| 1b | Battery earth | C1 |
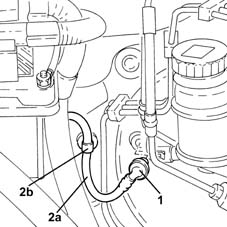
1. Disconnect the brake servo single-acting valve from the brake servo.
2. Release the vacuum pipe for the brake servo (2a) from the retaining band (2b).
1. Disconnect the brake servo single-acting valve from the brake servo.
2. Release the vacuum pipe for the brake servo (2a) from the retaining band (2b).
1. Loosen the band and disconnect the single heater water supply and return pipe, E.G.R. exhaust gas/water heat exchanger side.
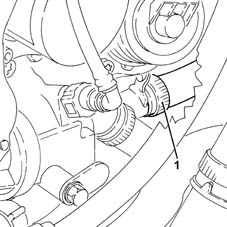
1. Prise out pipe (1a) of brake servo vacuum pump (1b) and release from the retaining clip.
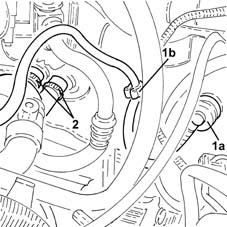
2. Remove the fastening bands and disconnect the heater side heater coolant supply/return pipes.
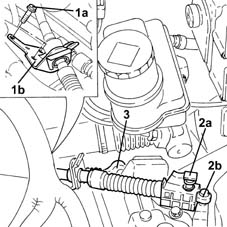
1. Undo the bolts (1a) fixing the gear selector and engagement cables mounting bracket (1b).
2. Press the release button (2a) and disconnect the gear selector cable (2b).
3. Disconnect the gear engagement cable.
Move the gear selector and engagement cables, complete with mounting bracket, sideways.
1. Undo the bolts (1a) fixing the gear selector and engagement cables mounting bracket (1b).
2. Press the release button (2a) and disconnect the gear selector cable (2b).
3. Disconnect the gear engagement cable.
Move the gear selector and engagement cables, complete with mounting bracket, sideways.
1. Disconnect the brake servo single-acting valve from the brake servo.
2. Undo the nut (2a) and disconnect the pipe from expansion valve to the compressor (2b), expansion valve side.
Seal the disconnected connectors, using suitable plugs, to prevent humidity and impurities from entering the system.
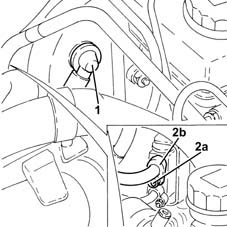
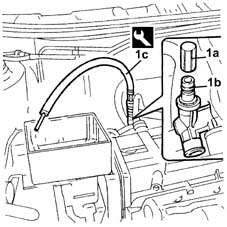
1. Remove the protective cap (1a) for the fuel manifold vent (1b) and use the tool (1c) to discharge the fuel pressure from the fuel system.
Recover the fuel which comes out in a suitable container.
| Name | Country | |
|---|---|---|
| 1c | Rapid connector | 1.870.684.000 |
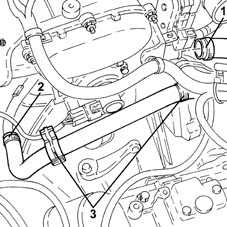
1. Loosen the band and disconnect the coolant return pipe to the climate control heater, cylinder head side.
2. Loosen the band and disconnect the coolant return pipe from the climate control heater, water pump rigid inlet pipe side.
3. Release the coolant return pipes to the heater for the climate control system from the fixing bands.
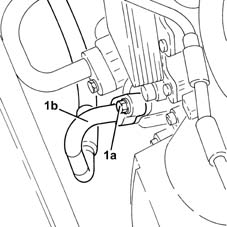
1. Loosen the band and disconnect the coolant return pipe to the climate control heater, thermostat side.
2. Loosen the band and disconnect the coolant return pipe from the climate control heater, water pump rigid inlet pipe side.
3. Release the coolatn return pipe from the climate control system heater from its bands.
1. Undo the bolt (1a) and disconnect the pipe from the compressor to the condenser for the air conditioner (1b), compressor side.
Seal the disconnected connectors, using suitable plugs, to prevent humidity and impurities from entering the system.
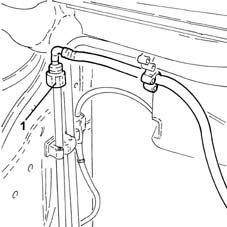
1. Disconnect the intermediate rapid attachment for the fuel vapour recirculation pipe.
Proceed with removal - 1072C44 exhaust manifold heat shield on bulkhead - r+r.
Proceed with removal - 1072C16 exhaust manifold with catalytic converter - r r.
1. Undo the nuts (1a) and disconnect the track rods (1b) from the steering knuckles usiing the tool (1c).
| Name | Country | |
|---|---|---|
| 1c | Extractor | 1.871.000.700 |
2. Undo the bolts fixing the front hub steering knuckle to the front shock absorbers.
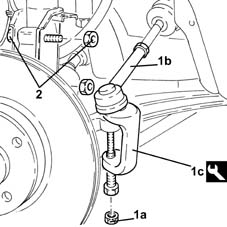
Proceed with removal - 1072C44 exhaust manifold heat shield on bulkhead - r+r.
Proceed with removal - 1072C16 exhaust manifold with catalytic converter - r r.
1. Undo the nuts (1a) and disconnect the track rods (1b) from the steering knuckles usiing the tool (1c).
| Name | Country | |
|---|---|---|
| 1c | Extractor | 1.871.000.700 |
2. Undo the bolts fixing the front hub steering knuckle to the front shock absorbers.
1. Disconnect the quick-release fitting of the coolant return pipe to the engine coolant reservoir, thermostat side.
2. Loosen the band and disconnect the supply pipe, reservoir side.
3. Undo the bolt (3a) and remove the engine coolant tank (3b).
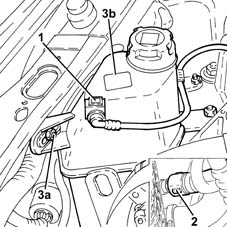
1. Disconnect the quick-release fitting on the fuel supply pipe to the manifold pipe.
2. Disconnect the accelerator control cable (2a) from the throttle valve (2b) and remove the cable from the mounting bracket (2c).
Place the accelerator cable to one side.
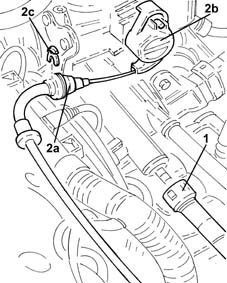
1. Loosen the bands (1a) and disconnect the driveshafts (1b ).
Secure the drive shafts.
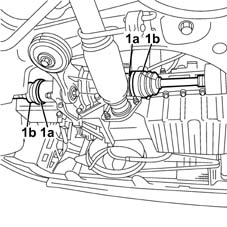
1. Loosen the bands (1a) and disconnect the driveshafts (1b ).
Secure the drive shafts.
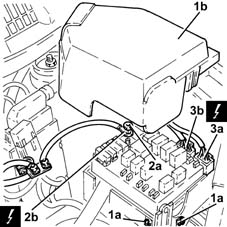
1. Open the clips (1a) and remove the cover (1b) from the engine compartment junction unit.
2. Undo the nut (2a) and disconnect the supply lead (2b) from the engine compartment junction unit.
3. Disconnect the electrical connections (3a) and (3b) from the engine compartment junction unit.
Proceed with removal - 1072C44 exhaust manifold heat shield on bulkhead - r+r.
Proceed with removal - 1072C16 exhaust manifold with catalytic converter - r r.
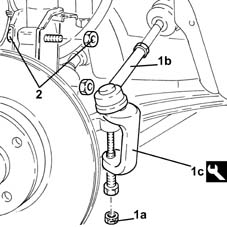
1. Undo the nuts (1a) and disconnect the track rods (1b) from the steering knuckles usiing the tool (1c).
| Name | Country | |
|---|---|---|
| 1c | Extractor | 1.871.000.700 |
2. Undo the bolts fixing the front hub steering knuckle to the front shock absorbers.
1. Undo the bolt fixing the air conditioning pipe mounting bracket to the alternator.
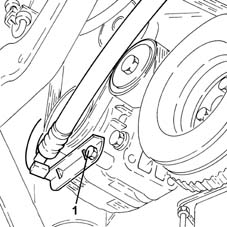
1. Undo the bolt fixing the air conditioning pipe mounting bracket to the alternator.
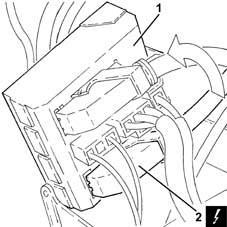
1. Rotate the engine compartment junction unit on its hinges.
2. Disconnect the electrical connection from the engine compartment junction unit.
1. Loosen the bands (1a) and disconnect the driveshafts (1b ).
secure the drive shafts.
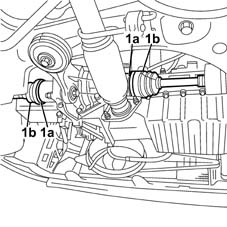
Position a hydraulic jack under the gearbox.
1. Undo the bolt (1a) and the bolt (1b) and remove the power unit lower reaction rod (1c).
Remove the hydraulic jack from under the gearbox.
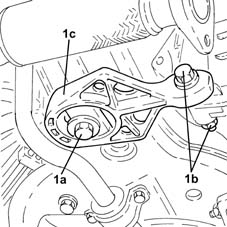
Position a hydraulic jack under the gearbox.
1. Undo the bolt (1a) and the bolt (1b) and remove the power unit lower reaction rod (1c).
Remove the hydraulic jack from under the gearbox.
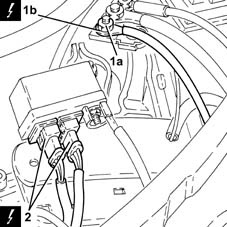
1. Undo the nut (1a) and disconnect the earth lead (1b) from the battery terminal (-).
2. Disconnect the electrical connections from the pre-heating control unit.
| Name | Connector | |
|---|---|---|
| 2 | Plug preheating control unit | M15 |
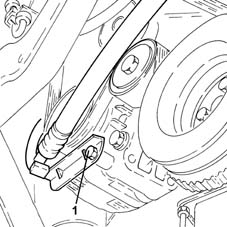
1. Undo the bolt fixing the air conditioning pipe mounting bracket to the alternator.
1. Support the power unit using a hydraulic hoist fitted with suitable chains connected to the engine as shown in the figure.
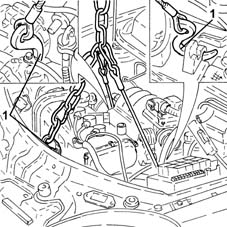
1. Support the power unit using a hydraulic hoist fitted with suitable chains connected to the engine as shown in the figure.
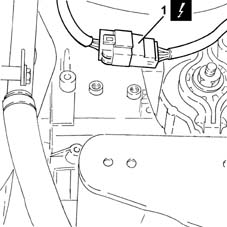
1. Disconnect the electrical connection.
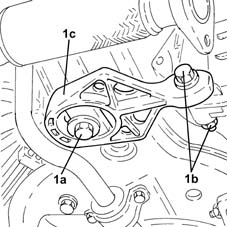
Position a hydraulic jack under the gearbox.
1. Undo the bolt (1a) and the bolt (1b) and remove the power unit lower reaction rod (1c).
Remove the hydraulic jack from under the gearbox.
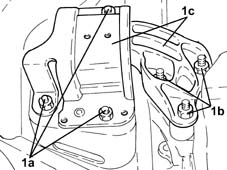
Position a suitable support under the power unit.
1. Undo the nuts (1a) and (1b), then remove the timing side power unit support flexible mounting (1c).
Position a suitable support under the power unit.
1. Undo the nuts (1a) and (1b), then remove the timing side power unit support flexible mounting (1c).
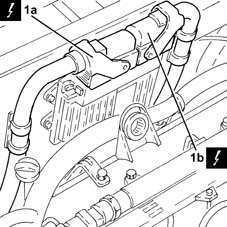
1. Disconnect the electrical connections (1a) and (1b) from the diesel electronic injection system control unit.
| Name | Connector | |
|---|---|---|
| 1a | Engine management control unit | M10A |
| Name | Connector | |
|---|---|---|
| 1b | Engine management control unit | M10B |
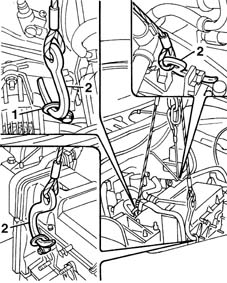
1. Secure ordinary brackets to the crankcase.
Use a hydraulic lift with chains and hooks.
2. Anchor the hooks to the brackets.
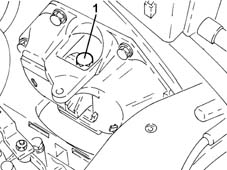
1. Undo the bolts fixing the power unit gearbox side rigid support to the flexible mounting.
1. Undo the bolts fixing the power unit gearbox side rigid support to the flexible mounting.
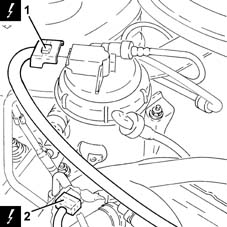
1. Disconnect the electrical connection from the fuel pre-heating device.
| Name | Connector | |
|---|---|---|
| 1 | Fuel heating resistance and temperature sensor | K100 |
2. Disconnect the electrical connection for the water-in-fuel filter sensor.
| Name | Connector | |
|---|---|---|
| 2 | Water in diesel filter sensor | K31 |
Position a suitable support under the power unit.
1. Undo the nuts (1a) and (1b), then remove the timing side power unit support flexible mounting (1c).
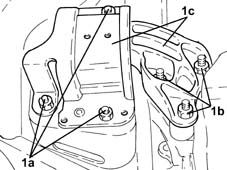
Slowly lower the power unit with the hydraulic hoist until it is resting on the support positioned previously.
Slowly lower the power unit with the hydraulic hoist until it is resting on the support positioned previously.
Undo the fuel filler cap and remove it to discharge the pressure in the system.
1. Disconnect the rapid connector for the fuel supply pipe from the fuel filter to the pressure pump, fuel filter side.
2. Disconnect the rapid connector for the fuel return pipe from the fuel filter.
3. Disconnect the rapid connector for the intermediate coupling for the fuel return pipe to the reservoir.
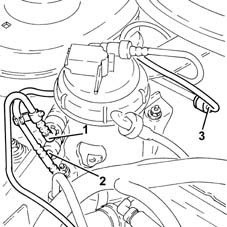
1. Undo the bolt fixing the gearbox side power unit rigid support to the flexible mounting.
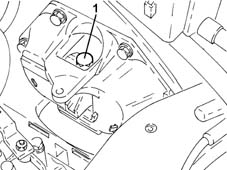
Refitting
Place the power unit back in the engine compartment using the hydraulic hoist.
1. Undo the bolt fixing the gearbox side rigid power unit support to the flexbile block to the specified torque.
| Fastening | Component | Ø | Value (daNm) | |
|---|---|---|---|---|
| 1 | Bolt | POWER UNIT GEAR BOX END RIGID MOUNT | M12 | (Flexible mounting side) 8.1 ÷ 9.9 |
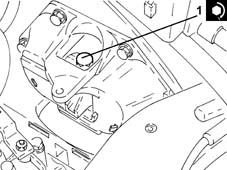
Refitting
Place the power unit back in the engine compartment using the hydraulic hoist.
1. Undo the bolt fixing the gearbox side rigid power unit support to the flexbile block to the specified torque.
| Fastening | Component | Ø | Value (daNm) | |
|---|---|---|---|---|
| 1 | Bolt | POWER UNIT GEAR BOX END RIGID MOUNT | M12 | (Flexible mounting side) 8.1 ÷ 9.9 |
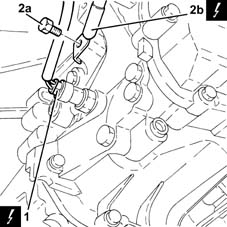
1. Disconnect the electrical connection from the reversing lights switch.
| Name | Connector | |
|---|---|---|
| 1 | Reversing lights switch | I20 |
2. Undo the bolt (2a) and disconnect the battery earth lead (2b) from the gearbox.
| Name | Connector | |
|---|---|---|
| 2b | Battery earth | C1 |
Slowly lower the power unit with the hydraulic hoist until it is resting on the support positioned previously.
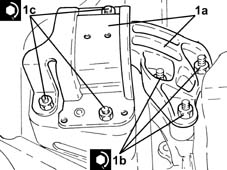
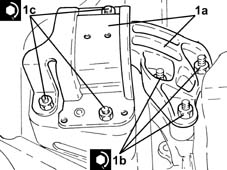
1. Place the timing side power unit support flexible mounting (1a) in position and secure it tightening the nuts (1b) and (1c) to the recommended torque.
| Fastening | Component | Ø | Value (daNm) | |
|---|---|---|---|---|
| 1b | Nut | FRONT RUBBER MOUNTS | M10 | (Rigid support side) 4.5 ÷ 5.5 |
| Fastening | Component | Ø | Value (daNm) | |
|---|---|---|---|---|
| 1c | Nut | FRONT RUBBER MOUNTS | M10 | (Bodyshell side) 4.1 ÷ 5.0 |
1. Place the timing side power unit support flexible mounting (1a) in position and secure it tightening the nuts (1b) and (1c) to the recommended torque.
| Fastening | Component | Ø | Value (daNm) | |
|---|---|---|---|---|
| 1b | Nut | FRONT RUBBER MOUNTS | M10 | (Rigid support side) 4.5 ÷ 5.5 |
| Fastening | Component | Ø | Value (daNm) | |
|---|---|---|---|---|
| 1c | Nut | FRONT RUBBER MOUNTS | M10 | (Bodyshell side) 4.1 ÷ 5.0 |
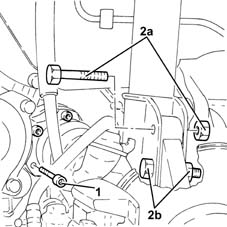
1. Undo the bolts fixing the left driveshaft to the differential internal driveshaft.
2. Undo the top bolt (2a) and loosen the bottom bolt (2b) securing the front left damper to the steering knuckle.
Move the left drive shaft away from the differential internal drive shaft and secure it as appropriate.
Refitting
Place the power unit back in the engine compartment using the hydraulic hoist and rest on the board positioned previously.
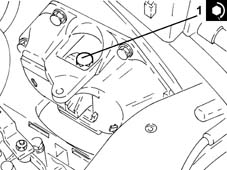
1. Tighten the bolt securing the gearbox side rigid power unit support to the flexible mounting to the recommended torque.
| Fastening | Component | Ø | Value (daNm) | |
|---|---|---|---|---|
| 1 | Bolt | POWER UNIT GEAR BOX END RIGID MOUNT | M12 | (Flexible mounting side) 8.1 ÷ 9.9 |
Remove the hydraulic hoist fitted with suitable chains used for supporting the power unit.
Position a hydraulic jack under the gearbox.
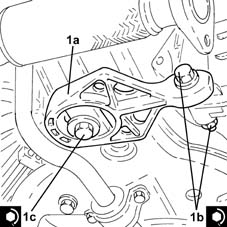
1. Place the power unit reaction rod (1a) back in its housing, then fasten by tightening bolts (1b) and (1c) to the recommended torque.
| Fastening | Component | Ø | Value (daNm) | |
|---|---|---|---|---|
| 1b | Bolt | LOWER ROD ON ENGINE | M12 | (Gearbox side) 7.2 ÷ 8.8 |
| Fastening | Component | Ø | Value (daNm) | |
|---|---|---|---|---|
| 1c | Bolt | LOWER ROD ON ENGINE | M12 | (Front suspension crossmember side) 11.4 ÷ 12.6 |
Remove the hydraulic jack from under the gearbox.
Remove the hydraulic hoist fitted with suitable chains used for supporting the power unit.
Position a hydraulic jack under the gearbox.
1. Place the power unit reaction rod (1a) back in its housing, then fasten by tightening bolts (1b) and (1c) to the recommended torque.
| Fastening | Component | Ø | Value (daNm) | |
|---|---|---|---|---|
| 1b | Bolt | LOWER ROD ON ENGINE | M12 | (Gearbox side) 7.2 ÷ 8.8 |
| Fastening | Component | Ø | Value (daNm) | |
|---|---|---|---|---|
| 1c | Bolt | LOWER ROD ON ENGINE | M12 | (Front suspension crossmember side) 11.4 ÷ 12.6 |
Remove the hydraulic jack from under the gearbox.
1. Unscrew the bolts securing the right drive shaft to the intermediate drive shaft.
Recover the safety plates.
2. Undo the top bolt (2a) and loosen the bottom boltt (2b) securing the front right damper to the steering knuckle.
Move the right drive shaft away from the intermediate drive shaft and secure it as appropriate.
1. Place the timing side power unit support flexible mounting (1a) in position and secure it tightening the nuts (1b) and (1c) to the recommended torque.
| Fastening | Component | Ø | Value (daNm) | |
|---|---|---|---|---|
| 1b | Nut | FRONT RUBBER MOUNTS | M10 | (Rigid support side) 4.5 ÷ 5.5 |
| Fastening | Component | Ø | Value (daNm) | |
|---|---|---|---|---|
| 1c | Nut | FRONT RUBBER MOUNTS | M10 | (Bodyshell side) 4.1 ÷ 5.0 |
Tighten the bolt fixing the air conditioning pipe mounting bracket to the alternator.
Connect the driveshafts and tighten the bands.
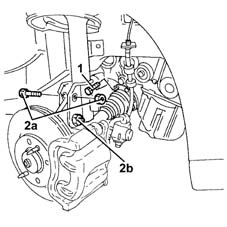
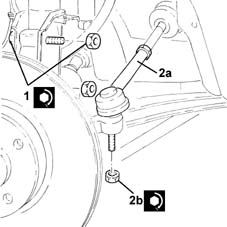
1. Tighten the front wheel hub fastening bolts to the front shock absorbers to the recommended torque.
| Fastening | Component | Ø | Value (daNm) | |
|---|---|---|---|---|
| 1 | Bolt | FRONT HUB STEERING KNUCKLE. | M10 | (Shock absorber side) 6.2 ÷ 6.8 |
2. Connect the steering rods (2a) to the front steering knuckles and tighten the nut (2b) to the recommended torque.
| Fastening | Component | Ø | Value (daNm) | |
|---|---|---|---|---|
| 2b | Nut | ADJUSTABLE STEERING LINKS | M10 | (Steering knuckle side) 3.6 ÷ 4.4 |
Tighten the bolt fixing the air conditioning pipe mounting bracket to the alternator.
Connect the driveshafts and tighten the bands.
1. Tighten the front wheel hub fastening bolts to the front shock absorbers to the recommended torque.
| Fastening | Component | Ø | Value (daNm) | |
|---|---|---|---|---|
| 1 | Bolt | FRONT HUB STEERING KNUCKLE. | M10 | (Shock absorber side) 6.2 ÷ 6.8 |
2. Connect the steering rods (2a) to the front steering knuckles and tighten the nut (2b) to the recommended torque.
| Fastening | Component | Ø | Value (daNm) | |
|---|---|---|---|---|
| 2b | Nut | ADJUSTABLE STEERING LINKS | M10 | (Steering knuckle side) 3.6 ÷ 4.4 |
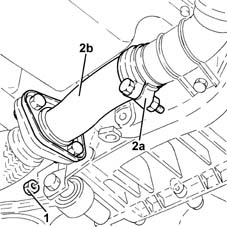
1. Tighten the nuts fastening the rigid section of the exhaust pipe between the catalytic converter and the silencer, silencer side.
Release the rigid pipe for the exhaust pipe between the catalytic converter and silencer from the silencer.
2. Loosen the collar (2a) and remove the rigid pipe for the exhaust pipe between the catalytic converter and the silencer (2b).
Remove the hydraulic hoist fitted with suitable chains used for supporting the power unit.
Position a hydraulic jack under the gearbox.
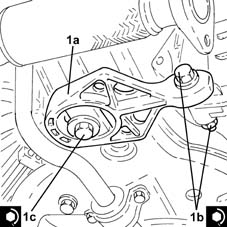
1. Place the power unit reaction rod (1a) back in its housing, then fasten by tightening bolts (1b) and (1c) to the recommended torque.
| Fastening | Component | Ø | Value (daNm) | |
|---|---|---|---|---|
| 1b | Bolt | LOWER ROD ON ENGINE | M12 | (Gearbox side) 7.2 ÷ 8.8 |
| Fastening | Component | Ø | Value (daNm) | |
|---|---|---|---|---|
| 1c | Bolt | LOWER ROD ON ENGINE | M12 | (Front suspension crossmember side) 11.4 ÷ 12.6 |
Remove the hydraulic jack from under the gearbox.
Proceed with refitting - 1072C16 exhaust manifold with catalytic converter - r r.
Proceed with refitting - 1072C44 exhaust manifold heat shield on bulkhead - r+r.
Connect the coolant return hose from the climate control heater on the side of the rigid inlet pipe to the water pump and do up the band.
Connect the engine coolant return pipe from the climate control system heater, thermostat side, and tighten the band.
Place the gear selector and engagement cables, complete with mounting bracket, back in their housings.
Connect the gear selector cable.
Connect the gear engagement cable.
Tighten the bolts fixing the gear selector and engagement mounting bracket.
Fix the vacuum pipe for the brake servo to the securing band.
Connect the brake servo one-way valve to the brake servo.
Connect the electrical connection to the reversing lights switch.
Connect the battery earth lead and tighten the nut.
Replace the clutch operating cylinder, then fix it tightening the bolts to the recommended torque.
| Fastening | Component | Ø | Value (daNm) | |
|---|---|---|---|---|
| Bolt | CLUTCH SLAVE CYLINDER | M8 | (Gearbox side) 1.6 ÷ 2.4 |
Connect the engine front joints.
Connect the facia front coupling.
Refit the junction unit in its seating.
Refit the junction unit cover in its seat.
Connect the front enginec oupling.
Connect the rapid attachment for the fuel supply pipe to the fuel manifold pipe and secure with a band.
Connect the rapid connector for the fuel vapour recirculation pipe to the air chamber.
Connect the coolant inlet and outlet pipes to the air conditioning compressor and secure by tightening the bolts to the specified torque.
| Fastening | Component | Ø | Value (daNm) | |
|---|---|---|---|---|
| Bolt | PIPES FROM COMPRESSOR TO CONDENSOR | M6 | 0.7 ÷ 1.1 |
| Fastening | Component | Ø | Value (daNm) | |
|---|---|---|---|---|
| Bolt | EXPANSION VALVE - COMPRESSOR PIPE | M6 | 0.7 ÷ 1.1 |
Tighten the coolant pipe bracket bolt to the air conditioner compressor.
Connect the lower coolant outlet hose from the radiator, radiator side, and tighten the band.
Connect the upper coolant inlet hose to the radiator, thermostat side, and tighten the band.
Place the hose from the air filter to the intake manifold back in its housing, connect it to the intake manifold and tighten the band.
Connect the engine oil vapour inlet pipe to the intake manifold.
Connect the engine oil vapour intake pipe to the tappet cover and tighten the band.
Proceed with refitting - 1048A10 air cleaner filtering element - replace.
Proceed with refitting - 5530B52 Battery DRIP TRAY/SUPPORT - R.R..
Proceed with refitting - 5530B10 battery - r+r.
Proceed with refitting - 7055B91 Right front WHEEL ARCH LINER - R.R..
Proceed with refitting - 7055B66 Engine compartment DUST SHIELD protection in right front wheel arch - R.R..
Proceed with refitting - 4450B12 front or rear wheels (two) - r+r.
Refill the engine cooling system with coolant - 0010T20 coolant change.
Fill the air conditioner coolant circuit - 0010T84 coolant for air conditioning system dehydrate and recharge.
Remove the car from the ramps.
Proceed with refitting - 1072C16 exhaust manifold with catalytic converter - r r.
Proceed with refitting - 1072C44 exhaust manifold heat shield on bulkhead - r+r.
Connect the coolant return hose from the climate control heater on the side of the rigid inlet pipe to the water pump and do up the band.
Connect the engine coolant return pipe from the climate control system heater, thermostat side, and tighten the band.
Place the gear selector and engagement cables, complete with mounting bracket, back in their housings.
Connect the gear selector cable.
Connect the gear engagement cable.
Tighten the bolts fixing the gear selector and engagement mounting bracket.
Fix the vacuum pipe for the brake servo to the securing band.
Connect the brake servo one-way valve to the brake servo.
Connect the electrical connection to the reversing lights switch.
Connect the battery earth lead and tighten the nut.
Replace the clutch operating cylinder, then fix it tightening the bolts to the recommended torque.
| Fastening | Component | Ø | Value (daNm) | |
|---|---|---|---|---|
| Bolt | CLUTCH SLAVE CYLINDER | M8 | (Gearbox side) 1.6 ÷ 2.4 |
Connect the front engine coupling.
Connect the front facia coupling.
Refit the junction unit in its seating.
Refit the junction unit cover.
Connect the front engine coupling.
Connect the rapid attachment for the fuel supply pipe to the fuel manifold pipe and secure with the band.
Connect the rapid connector for the fuel vapour recirculation pipe to the air chamber.
Connect the coolant inlet and outlet pipes to the air conditioning compressor and secure by tightening the bolts to the specified torque.
| Fastening | Component | Ø | Value (daNm) | |
|---|---|---|---|---|
| Bolt | PIPES FROM COMPRESSOR TO CONDENSOR | M6 | 0.7 ÷ 1.1 |
| Fastening | Component | Ø | Value (daNm) | |
|---|---|---|---|---|
| Bolt | EXPANSION VALVE - COMPRESSOR PIPE | M6 | 0.7 ÷ 1.1 |
Tighten the bolt securing the coolant pipe mounting brackets to the air conditioner compressor.
Connect the lower coolant outlet hose from the radiator, radiator side, and tighten the band.
Connect the upper coolant inlet hose to the radiator, thermostat side, and tighten the band.
Place the hose from the air filter to the intake manifold back in its housing, connect it to the intake manifold and tighten the band.
Connect the engine oil vapour inlet pipe to the intake manifold.
Connect the engine oil vapour intake pipe to the tappet cover and tighten the band.
Proceed with refitting - 1048A10 air cleaner filtering element - replace.
Proceed with refitting - 5530B52 Battery DRIP TRAY/SUPPORT - R.R..
Proceed with refitting - 5530B10 battery - r+r.
Proceed with refitting - 7055B91 Right front WHEEL ARCH LINER - R.R..
Proceed with refitting - 7055B66 Engine compartment DUST SHIELD protection in right front wheel arch - R.R..
Proceed with refitting - 4450B12 front or rear wheels (two) - r+r.
Refill the engine cooling system with coolant - 0010T20 coolant change.
Fill the air conditioner coolant circuit - 0010T84 coolant for air conditioning system dehydrate and recharge.
Remove the car from the ramps.
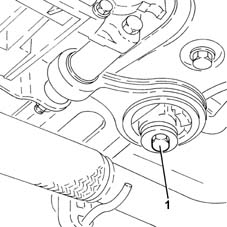
1. Undo the bolt fixing the power unit lower reaction rod to the front suspension crossmember.
Tighten the bolt fixing the air conditioning pipe mounting bracket to the alternator.
Connect the driveshafts and tighten the bands.
1. Tighten the front wheel hub fastening bolts to the front shock absorbers to the recommended torque.
| Fastening | Component | Ø | Value (daNm) | |
|---|---|---|---|---|
| 1 | Bolt | FRONT HUB STEERING KNUCKLE. | M10 | (Shock absorber side) 6.2 ÷ 6.8 |
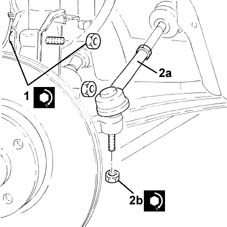
2. Connect the steering rods (2a) to the front steering knuckles and tighten the nut (2b) to the recommended torque.
| Fastening | Component | Ø | Value (daNm) | |
|---|---|---|---|---|
| 2b | Nut | ADJUSTABLE STEERING LINKS | M10 | (Steering knuckle side) 3.6 ÷ 4.4 |
1. Loosen the band and disconnect the air supply hose between the turbocharger and the heat exchanger, heat exchanger side.
2. Loosen the band and disconnect the air supply hose from the heat exchanger to the rigid pipe, heat exchanger side.
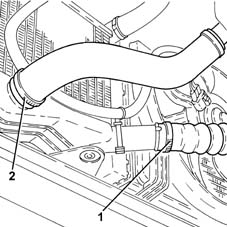
Proceed with refitting - 1072C16 exhaust manifold with catalytic converter - r r.
Proceed with refitting - 1072C44 exhaust manifold heat shield on bulkhead - r+r.
Connect the accelerator cable to the throttle valve.
Connect the rapid attachment for the fuel supply pipe to the manifold pipe.
Connect the rapid connector for the fuel vapour recirculation pipe.
Connect the coolant outlet/inlet pipes to the heater on the heater side and secure with collars.
Connect the vacuum pump pipe and secure with the collar.
Connect the battery earth lead and fix it using the nut.
Position the clutch slave cylinder and tighten bolts to the specified torque.
| Fastening | Component | Ø | Value (daNm) | |
|---|---|---|---|---|
| Bolt | CLUTCH SLAVE CYLINDER | M8 | (Gearbox side) 1.6 ÷ 2.4 |
Connect the electrical connection to the reversing lights switch.
Place the gear selector and engagement cables, complete with mounting bracket, back in their housings.
Connect the gear selector cable.
Connect the gear engagement cable.
Tighten the bolts fixing the gear selector and engagement mounting bracket.
Connect the electrical connections to the junction unit.
Refit the junction unit in its seating.
Refit the junction unit cover.
Connect the coolant inlet and outlet pipes to the air conditioner compressor and secure by tightening the bolt to the specified torque.
| Fastening | Component | Ø | Value (daNm) | |
|---|---|---|---|---|
| Bolt | PIPES FROM COMPRESSOR TO CONDENSOR | M6 | (Compressor side) 09. |
| Fastening | Component | Ø | Value (daNm) | |
|---|---|---|---|---|
| Bolt | EXPANSION VALVE - COMPRESSOR PIPE | M6 | (Compressor side) 09. |
Tighten the bolt securing the coolant pipe mounting bracket to the air conditioner compressor.
Connect the lower and upper radiator hoses to the radiator and secure with collars.
Proceed with refitting - 1048A10 air cleaner filtering element - replace.
Proceed with refitting - 5530B52 Battery DRIP TRAY/SUPPORT - R.R..
Proceed with refitting - 5530B10 battery - r+r.
Proceed with refitting - 7055B91 Right front WHEEL ARCH LINER - R.R..
Proceed with refitting - 7055B66 Engine compartment DUST SHIELD protection in right front wheel arch - R.R..
Proceed with refitting - 4450B12 front or rear wheels (two) - r+r.
Proceed with refitting - 1068A10 accelerator pedal control - check, adjust if necessary and lubricate.
Refill the engine cooling system with coolant - 0010T20 coolant change.
Fill the air conditioner coolant circuit - 0010T84 coolant for air conditioning system dehydrate and recharge.
Remove the vehicle from the ramp.
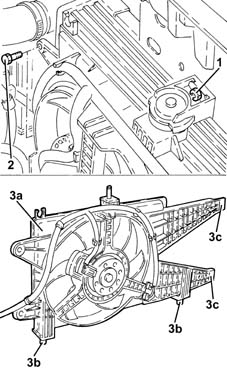
1. Undo the nut securing the upper cooling fan bracket to the upper beam.
2. Undo the side bolts fixing the radiator cooling fan to the radiator.
3. Remove the radiator cooling fan (3a), complete with electrical wiring, after having released the lower lugs (3b) from the lower radiator crossmember and the tabs (3c) fitted on the radiator.
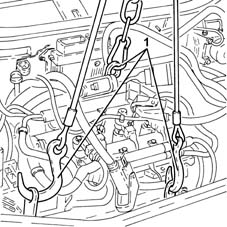
1. Support the power unit using a hydraulic hoist fitted with suitable chains connected to the special brackets on the engine.
Position a suitable support under the power unit.
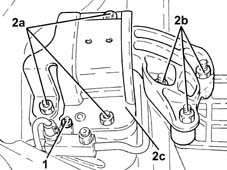
1. Undo the nut fixing the air conditioning system pipes mounting bracket.
2. Undo the nuts (2a) and (2b), then remove the timing side power unit support flexible mounting (2c).
1. Undo the nut fixing the gearbox side power unit rigid support to the flexible mounting.
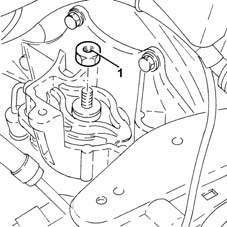
Slowly lower the power unit with the hydraulic hoist until it is resting on the support positioned previously.
Refitting
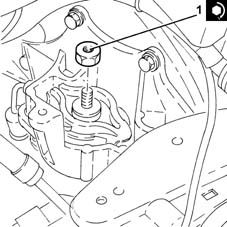
Place the power unit back in the engine compartment using the hydraulic hoist.
1. Tighten the nut securing the gearbox side rigid power unit support to the flexible mounting to the recommended torque.
| Fastening | Component | Ø | Value (daNm) | |
|---|---|---|---|---|
| 1 | Nut | POWER UNIT GEAR BOX END RIGID MOUNT | M12 | (Flexible mounting side) 8.1 ÷ 9.9 |
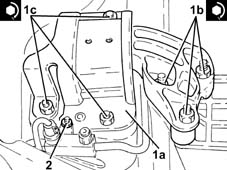
1. Place the timing side power unit support flexible mounting (1a) in position and secure it tightening the nuts (1b) and (1c) to the recommended torque.
| Fastening | Component | Ø | Value (daNm) | |
|---|---|---|---|---|
| 1b | Nut | FRONT RUBBER MOUNTS | M10 | (Rigid support side) 4.5 ÷ 5.5 |
| Fastening | Component | Ø | Value (daNm) | |
|---|---|---|---|---|
| 1c | Nut | FRONT RUBBER MOUNTS | M10 | (Bodyshell side) 4.1 ÷ 5.0 |
2. Tighten the nut securing the air conditioning system pipe bracket to the power unt flexible mounting block, timing side.
Remove the support positioned under the power unit.
Remove the hydraulic hoist fitted with suitable chains used for supporting the power unit.
Place the radiator cooling fan, complete with electrical wiring, in its housing fastening the lower lugs to the lower radiator crossmember and the tabs fitted on the radiator.
Tighten the side bolts securing the radiator cooling fan to to the radiator.
Tighten the nut securing the upper radiator cooling fan to the upper beam.
Connect the air supply hose from the heat exchanger to the rigid pipe, heat exchanger side and tighten the band.
Connect the air supply hose between the turbocharger and the intercooler, intercooler side and tighten the band.
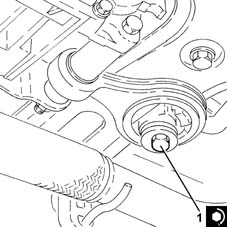
1. Tighten the bolt fixing the power unit lower reaction rod to the front suspension crossmember to the recommended torque.
| Fastening | Component | Ø | Value (daNm) | |
|---|---|---|---|---|
| 1 | Bolt | LOWER ROD ON ENGINE | M12 | (Front suspension crossmember side) 11.4 ÷ 12.6 |
Refit the rigid exhaust pipe section between the catalytic converter and the silencer and secure it using the collar.
Tighten the nuts fastening the rigid section of the exhaust pipe between the catalytic converter and the silencer, silencer side.
Connect the right drive shaft to the intermediate drive shaft.
1. Tighten the bolts securing the front right damper to the steering knuckle to the specified torque.
| Fastening | Component | Ø | Value (daNm) | |
|---|---|---|---|---|
| 1 | Bolt | FRONT DAMPER | M10 | (ore) 7.1 ÷ 7.9 |
2. Tighten the bolts securing the right drive shaft to the intermediate drive shaft to the specified torque.
| Fastening | Component | Ø | Value (daNm) | |
|---|---|---|---|---|
| 2 | Bolt | FRONT DRIVE SHAFT COMPLETE WITH JOINTS | M8 | (Intermediate driveshaft side) 3.6 ÷ 4.4 |
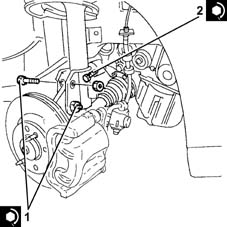
Connect the left drive shaft to the differential inner drive shaft.
1. Tighten the bolts securing the front left shock absorber to the steering knuckle to the specified torque.
| Fastening | Component | Ø | Value (daNm) | |
|---|---|---|---|---|
| 1 | Bolt | FRONT DAMPER | M10 | (ore) 7.1 ÷ 7.9 |
2. Tighten the bolts fixing the left driveshaft to the left differential internal driveshaft to the recommended torque.
| Fastening | Component | Ø | Value (daNm) | |
|---|---|---|---|---|
| 2 | Bolt | FRONT DRIVE SHAFT COMPLETE WITH JOINTS | M8 | (Differential internal driveshaft side) 3.6 ÷ 4.4 |
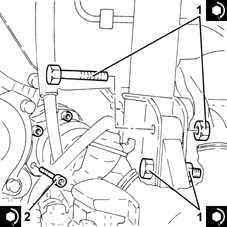
Connect the battery earth lead to the gearbox and fix it using the bolt.
Connect the electrical connection to the reversing lights switch.
Connect the rapid connector for the intermediate coupling for the tank fuel return pipe.
Connect the rapid connector for the fuel return pipe, fuel filter side.
Connect the rapid connector for the fuel supply pipe from the filter to the pressure pump, fuel filter side.
Connect the electrical connection to the water-in-fuel filter presence sensor.
Connect the electrical connection to the fuel pre-heating device.
Connect the electrical connections to the diesel electronic injection control unit.
Connect the electrical connection.
Connect the electrical connections to the pre-heating control unit.
Connect the earth leads to the battery terminal (-) and fasten them using the nut.
Connect the electrical connection to the engine compartment junction box.
Refit the engine compartment junction box in its seating, rotating it on its hinges.
Connect the electrical connections to the engine compartment junction box.
Connect the supply lead to the engine compartment junction unit and fasten it using the nut.
Refit the engine compartment junction box cover in its seating.
Refit the coolant reservoir in its seating and secure with its bolts.
Connect the supply pipe, reservoir side and tighten the band.
Connect the quick-release fitting on the coolant return pipe to the engine coolant reservoir, thermostat side.
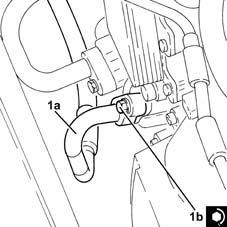
1. Connect the pipes from the air conditioning compressor to the condenser (1a), compressor side and secure them tightening the bolt (1b) to the recommended torque.
Replace the O-rings for the connectors using green coloured seals only, resistant to R134a refrigerant fluid.
Lubricate the thread of the connectors using anti-freeze..
| Fastening | Component | Ø | Value (daNm) | |
|---|---|---|---|---|
| 1b | Bolt | PIPES FROM COMPRESSOR TO CONDENSOR | M6 | (Compressor side) 0.7 ÷ 1.1 |
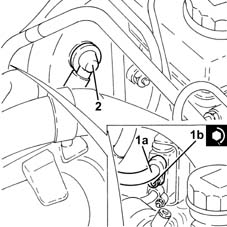
1. Connect the pipe from the expansion valve to the compressor (1a), expansion valve side and fix it tightening the nut (1b) to the recommended torque.
Replace the O-rings for the connectors using green coloured seals only, resistant to R134a refrigerant fluid.
Lubricate the thread of the connectors using anti-freeze..
| Fastening | Component | Ø | Value (daNm) | |
|---|---|---|---|---|
| 1b | Nut | EXPANSION VALVE - COMPRESSOR PIPE | M6 | (Expansion valve side) 0.7 ÷ 1.1 |
2. Connect the brake servo one-way valve to the brake servo.
Connect the heater single coolant supply and return pipe, E.G.R. exhaust gas/water heat exchanger side and tighten the band.
Connect the heater single coolant supply and return pipe, water pump rigid inlet pipe side and tighten the band.
Connect the upper coolant inlet hose to the radiator, thermostat side, and tighten the band.
Connect the lower coolant outlet hose from the radiator, radiator side, and tighten the band.
Secure the gear engagement/selector cables to the mounting bracket with the stops.
Connect the gear engagement/selector cables.
Replace the clutch operating cylinder, then fix it using the bolts.
Replace the air filter, complete with air flow meter, in its housing.
Connect the air intake sleeve to the turbocharger, air flow meter side, and tighten the band.
Connect the electrical connection to the air flow meter.
Proceed with refitting - 5530B52 Battery DRIP TRAY/SUPPORT - R.R..
Proceed with refitting - 5530B10 battery - r+r.
Refill the engine cooling system with coolant - 0010T20 coolant change.
Fill the air conditioner coolant circuit - 0010T84 coolant for air conditioning system dehydrate and recharge.
Proceed with refitting - 7055B91 Right front WHEEL ARCH LINER - R.R..
Proceed with refitting - 7055B90 Left front WHEEL ARCH LINER - R.R..
Proceed with refitting - 7055B66 Engine compartment DUST SHIELD protection in right front wheel arch - R.R..
Proceed with refitting.
Proceed with refitting - 4450B12 front or rear wheels (two) - r+r.
Remove the car from the ramps.
Parts & tools for this job Staging For 2003 Lancia Ypsilon
- PARTClutch kitSearch: Lancia Ypsilon 2003 clutch kit
- TOOLClutch alignment toolSearch: clutch alignment tool
- FLUIDGear oilSearch: Lancia Ypsilon manual gearbox oil
Links open Amazon search results in a new tab. As an Amazon Associate I earn from qualifying purchases.