
Engine cooling RADIATOR - R.R.
- Make
- Lancia
- Model
- Thesis Factory Service Manual
- Year
- 2002–2009
- Section
- Engine cooling › Engine cooling RADIATOR - R.R.
Engine cooling RADIATOR - R.R.
Removing
See in Op. 7055B54 PROTECTION/GUARD under engine - R.R.
See in Op. 4450B12 Front WHEELS (two) - R.R.
See in Op. 7055B42 FRONT WHEEL ARCH LINER (one), left or right - R.R.
- (right side)
See in Op. 7055B64 Engine compartment DUST SEAL in front wheel arch (one), left or right - R.R.
- (right side)
See in Op. 7210E10 FRONT BUMPER
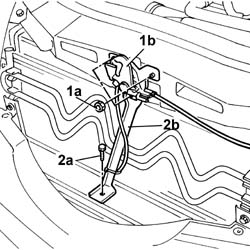
1. Undo the fixing nuts (1a) and remove the bonnet lock (1b) from its housing in the crossmember.
2. Undo the lower nut (2a) and remove the lock reinforcement bracket (2b).
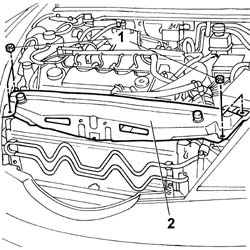
1. Undo the fixing bolts.
2. Remove the upper front crossmember.
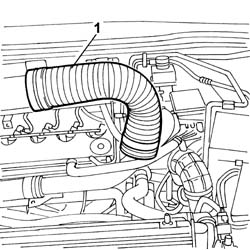
1. Remove the cold air intake from the connector on the air filter.
- Have a suitable container for collecting the coolant ready.
- Raise the lift.
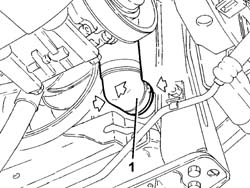
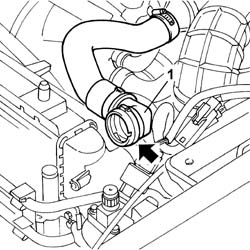
1. Disconnect the lower radiator pipe.
- Lower the lift.
1. Disconnect the upper radiator pipe.
- Remove the container for collecting the engine coolant.
To disconnect both pipes, press the springs, manually, and release the rapid pipe connector from the attachments on the radiator.
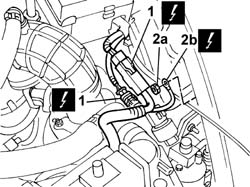
1. Disconnect the electrical connections (1a) and (1b) for the engine cables/fan-radiator cables coupling.
2. Undo the nut (2a) and disconnect the earth lead (2b) from the bodyshell.
| Description | Connector | |
|---|---|---|
| 1a | Front/radiator coupling | D009A |
| Description | Connector | |
|---|---|---|
| 1b | Front/radiator coupling | D009B |
| Description | Connector | |
|---|---|---|
| 2b | Right front earth | C011 |
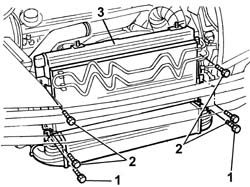
1. Undo the bolts fixing the air/air heat exchanger to the radiator.
2. Undo the bolts fixing the condenser to the radiator.
3. Release the radiator-fan assembly from the lower fastenings and remove it through the top of the engine compartment.
Refitting
- Position the radiator-condenser-fan assembly in the special housing on the lower crossmember, engaging the rubber mountings in the lower part of the radiator in the special housing in the crossmember.
- Tighten the bolts fixing the air/air heat exchanger to the radiator.
- Tighten the bolts fixing the condenser to the radiator.
- Connect the electrical connections for the engine cables/fan-radiator cables coupling.
| Description | Connector | |
|---|---|---|
| Front/radiator coupling | D009A |
| Description | Connector | |
|---|---|---|
| Front/radiator coupling | D009B |
- Connect the earth lead to the bodyshell and secure it using the fixing nut.
| Description | Connector | |
|---|---|---|
| Right front earth | C011 |
- Connect the upper and lower engine coolant pipes to the radiator.
- Fit the cold air intake to the connector on the air filter.
- Fit the upper front crossmember and tighten the fixing nuts to torque.
| Value - daNm | Fastening | Component | Ø | |
|---|---|---|---|---|
| 0.6 | Bolts | FRONT WING CROSSMEMBER HEADLAMP HOUSINGS | M6 |
- Fit the bonnet lid lock complete with bracket and tighten the nuts fixing it to the upper crossmember and to the lower crossmember.
See in Op. 7210E10 FRONT BUMPER
See in Op. 7055B42 FRONT WHEEL ARCH LINER (one), left or right - R.R.
- (right side)
See in Op. 7055B64 Engine compartment DUST SEAL in front wheel arch (one), left or right - R.R.
- (right side)
See in Op. 4450B12 Front WHEELS (two) - R.R.
See in Op. 7055B54 PROTECTION/GUARD under engine - R.R.
Removing
- Position the vehicle on a lift.
- Open the boot, remove the cover on the left hand side and disconnect the negative battery lead.
- Raise the vehicle on the lift.
See in Op. 7055B54 PROTECTION/GUARD under engine - R.R.
- Position a suitable container for collecting the engine coolant.
- Raise the lift.
1. Disconnect the lower radiator pipe.
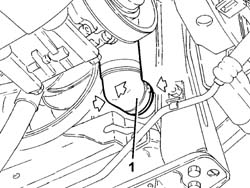
See in Op. 7040D50 ENGINE COMPARTMENT UPPER SOUND INSULATION SHIELD - R.R.
See in Op. 1048A21 AIR INLET HOSE FROM INTAKE TO FILTER - R.R.
See in Op. 1048A23 Cold AIR INTAKE for air filter - R.R.
See in Op. 1048A28 vacuum air circuit resonator pipe - r+r
See in Op. 1048A10 COMPLETE AIR FILTER -R.R.
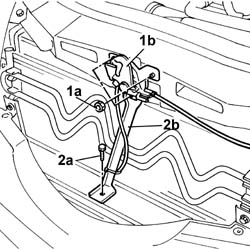
1. Undo the fixing nuts (1a) and remove the bonnet lock (1b) from the housing in the crossmember.
2. Undo the lower bolt (2a) and remove the lock reinforcement bracket (2b).
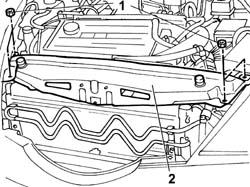
1. Undo the retaining nuts.
2. Remove the front crossmember.
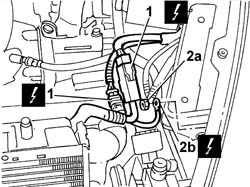
1. Disconnect the electrical connections (1a) and (1b) for the engine cables/radiator fan cables coupling.
| Description | Connector | |
|---|---|---|
| 1 | Front/radiator coupling | D009A |
| Description | Connector | |
|---|---|---|
| 1 | Front/radiator coupling | D009B |
2. Undo the nut (2a) and disconnect the earth lead (2b) from the bodyshell.
| Description | Connector | |
|---|---|---|
| 2b | Right front earth | C011 |
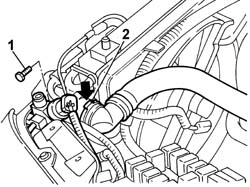
1. Undo the two bolts fixing the drier filter to the radiator.
2. Disconnect the uppper radiator pipe.
1. Undo the four bolts fixing the radiator to the condenser and remove the radiator, complete with fan, upwards, releasing it from the lower mountings.
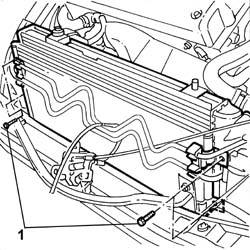
- Separate the fan from the radiator at the bench.
Refitting
- Fit the fan on the radiator.
- Position the radiator/fan assembly in the vehicle and secure it to the condenser using the bolts.
- Tighten the two bolts fixing the drier filter to the radiator.
- Connect the uppper radiator pipe.
- Connect the electrical connections for the engine cables/radiator fan cables coupling.
| Description | Connector | |
|---|---|---|
| Front/radiator coupling | D009A |
| Description | Connector | |
|---|---|---|
| Front/radiator coupling | D009B |
- Connect the earth lead to the bodyshell using the nut.
| Description | Connector | |
|---|---|---|
| Right front earth | C011 |
- Fit the front crossmember.
- Fit the bonnet lock and the reinforcement bracket.
See in Op. 1048A10 COMPLETE AIR FILTER -R.R.
See in Op. 1048A28 vacuum air circuit resonator pipe - r+r
See in Op. 1048A23 Cold AIR INTAKE for air filter - R.R.
See in Op. 1048A21 AIR INLET HOSE FROM INTAKE TO FILTER - R.R.
- Connect the lower radiator pipe.
See in Op. 0010T20 Engine REFRIGERANT FLUID - Change
See in Op. 7055B54 PROTECTION/GUARD under engine - R.R.
See in Op. 7040D50 ENGINE COMPARTMENT UPPER SOUND INSULATION SHIELD - R.R.
- Connect the negative battery lead.
- Remove the vehicle from the lift.
Removing
- Position the vehicle on a lift.
- Open the boot, remove the cover on the left hand side and disconnect the negative battery lead.
- Raise the vehicle on the lift.
See in Op. 7055B54 PROTECTION/GUARD under engine - R.R.
- Position a suitable container for collecting the engine coolant.
- Raise the lift.
1. Disconnect the lower radiator pipe.
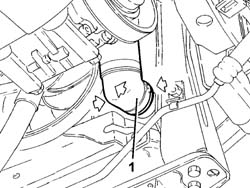
See in Op. 7040D50 ENGINE COMPARTMENT UPPER SOUND INSULATION SHIELD - R.R.
See in Op. 1048A21 AIR INLET HOSE FROM INTAKE TO FILTER - R.R.
See in Op. 1048A23 Cold AIR INTAKE for air filter - R.R.
See in Op. 1048A28 vacuum air circuit resonator pipe - r+r
See in Op. 1048A10 COMPLETE AIR FILTER -R.R.
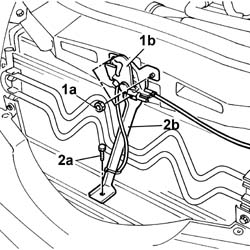
1. Undo the fixing nuts (1a) and remove the bonnet lock (1b) from the housing in the crossmember.
2. Undo the lower bolt (2a) and remove the lock reinforcement bracket (2b).
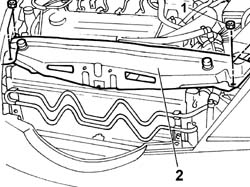
1. Undo the retaining nuts.
2. Remove the front crossmember.
1. Disconnect the electrical connections (1a) and (1b) for the engine cables/radiator fan cables coupling.
| Description | Connector | |
|---|---|---|
| 1 | Front/radiator coupling | D009A |
| Description | Connector | |
|---|---|---|
| 1 | Front/radiator coupling | D009B |
2. Undo the nut (2a) and disconnect the earth lead (2b) from the bodyshell.
| Description | Connector | |
|---|---|---|
| 2b | Right front earth | C011 |
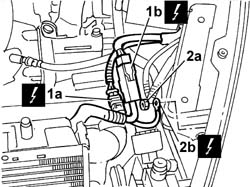
1. Undo the two bolts fixing the drier filter to the radiator.
2. Disconnect the uppper radiator pipe.
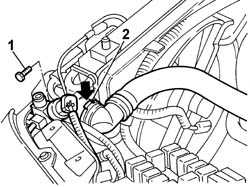
1. Undo the four bolts fixing the radiator to the condenser and remove the radiator, complete with fan, upwards, releasing it from the lower mountings.
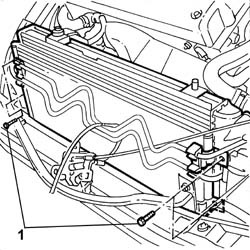
- Separate the fan from the radiator at the bench.
Refitting
- Fit the fan on the radiator.
- Position the radiator/fan assembly in the vehicle and secure it to the condenser using the bolts.
- Tighten the two bolts fixing the drier filter to the radiator.
- Connect the uppper radiator pipe.
- Connect the electrical connections for the engine cables/radiator fan cables coupling.
| Description | Connector | |
|---|---|---|
| Front/radiator coupling | D009A |
| Description | Connector | |
|---|---|---|
| Front/radiator coupling | D009B |
- Connect the earth lead to the bodyshell using the nut.
| Description | Connector | |
|---|---|---|
| Right front earth | C011 |
- Fit the front crossmember.
- Fit the bonnet lock and the reinforcement bracket.
See in Op. 1048A10 COMPLETE AIR FILTER -R.R.
See in Op. 1048A28 vacuum air circuit resonator pipe - r+r
See in Op. 1048A23 Cold AIR INTAKE for air filter - R.R.
See in Op. 1048A21 AIR INLET HOSE FROM INTAKE TO FILTER - R.R.
- Connect the lower radiator pipe.
See in Op. 0010T20 Engine REFRIGERANT FLUID - Change
See in Op. 7055B54 PROTECTION/GUARD under engine - R.R.
See in Op. 7040D50 ENGINE COMPARTMENT UPPER SOUND INSULATION SHIELD - R.R.
- Connect the negative battery lead.
- Remove the vehicle from the lift.
Removing
- Position the vehicle on a lift.
- Open the boot, remove the cover on the left hand side and disconnect the negative battery lead.
- Raise the vehicle on the lift.
See in Op. 7055B54 PROTECTION/GUARD under engine - R.R.
- Position a suitable container for collecting the engine coolant.
- Raise the lift.
1. Disconnect the lower radiator pipe.
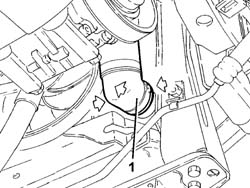
See in Op. 7040D50 ENGINE COMPARTMENT UPPER SOUND INSULATION SHIELD - R.R.
See in Op. 1048A21 AIR INLET HOSE FROM INTAKE TO FILTER - R.R.
See in Op. 1048A50 air inlet pipe to turbocharger - r + r
See in Op. 1048A10 COMPLETE AIR FILTER -R.R.
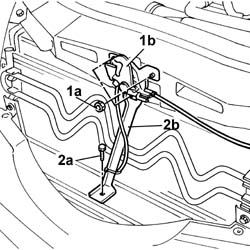
1. Undo the fixing nuts (1a) and remove the bonnet lock (1b) from the housing in the crossmember.
2. Undo the lower bolt (2a) and remove the lock reinforcement bracket (2b).
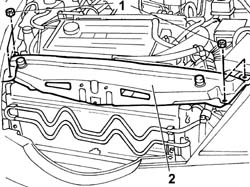
1. Undo the retaining nuts.
2. Remove the front crossmember.
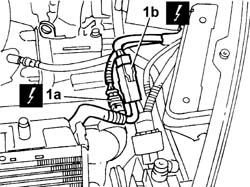
1. Disconnect the electrical connections for the engine cables/fradiator fan cables coupling.
| Description | Connector | |
|---|---|---|
| 1a | Front/radiator coupling | D009A |
| Description | Connector | |
|---|---|---|
| 1b | Front/radiator coupling | D009B |
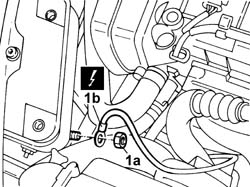
1. Undo the nut (1a) and disconnect the earth lead (1b) from the bodyshell.
1. Undo the two bolts fixing the drier filter to the radiator.
2. Disconnect the uppper radiator pipe.
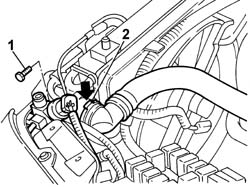
1. Undo the four bolts fixing the radiator to the condenser and remove the radiator, complete with fan, upwards, releasing it from the lower mountings.
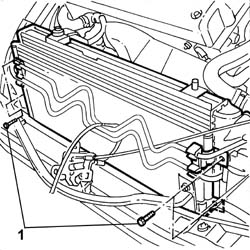
- Separate the fan from the radiator at the bench.
Refitting
- Fit the fan on the radiator.
- Position the radiator/fan assembly in the vehicle and secure it to the condenser using the bolts.
- Tighten the two bolts fixing the drier filter to the radiator.
- Connect the uppper radiator pipe.
- Connect the earth lead to the bodyshell using the nut.
- Connect the electrical connections for the engine cables/radiator fan cables coupling.
| Description | Connector | |
|---|---|---|
| Front/radiator coupling | D009A |
| Description | Connector | |
|---|---|---|
| Front/radiator coupling | D009B |
- Fit the front crossmember.
- Fit the bonnet lock and the reinforcement bracket.
See in Op. 1048A10 COMPLETE AIR FILTER -R.R.
See in Op. 1048A50 air inlet pipe to turbocharger - r + r
See in Op. 1048A21 AIR INLET HOSE FROM INTAKE TO FILTER - R.R.
- Connect the lower radiator pipe.
See in Op. 0010T20 Engine REFRIGERANT FLUID - Change
See in Op. 7055B54 PROTECTION/GUARD under engine - R.R.
See in Op. 7040D50 ENGINE COMPARTMENT UPPER SOUND INSULATION SHIELD - R.R.
- Connect the negative battery lead.
- Remove the vehicle from the lift.
Removing
See in Op. 7055B54 PROTECTION/GUARD under engine - R.R.
See in Op. 4450B12 Front WHEELS (two) - R.R.
See in Op. 7055B42 FRONT WHEEL ARCH LINER (one), left or right - R.R.
- (right side)
See in Op. 7055B64 Engine compartment DUST SEAL in front wheel arch (one), left or right - R.R.
- (right side)
See in Op. 7210E10 FRONT BUMPER
1. Undo the fixing nuts (1a) and remove the bonnet lock (1b) from the housing in the crossmember.
2. Undo the lower nut (2a) and remove the lock reinforcement bracket (2b).
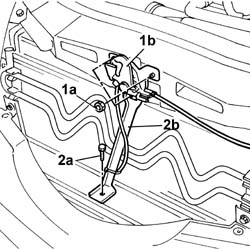
1. Undo the retaining bolts.
2. Remove the upper front crossmember.
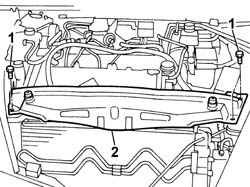
- Position a suitable container for collecting the engine coolant.
- Raise the lift.
1. Disconnect the lower radiator pipe.
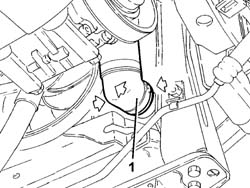
- Lower the lift.
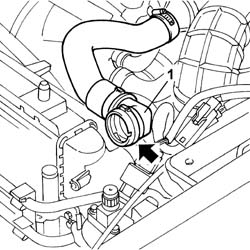
1. Disconnect the upper radiator pipe.
- Remove the container for collecting the engine coolant.
To disconnect both pipes, press the springs, manually, and release the rapid pipe connector from the attachments on the radiator.
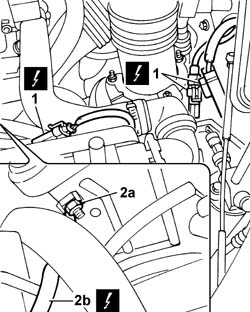
1. Disconnect the electrical connections for the engine cables/fan-radiator cables coupling.
| Description | Connector | |
|---|---|---|
| 1 | Front/radiator coupling | D009A |
| Description | Connector | |
|---|---|---|
| 1 | Front/radiator coupling | D009B |
| Description | Connector | |
|---|---|---|
| 1 | Front/radiator coupling | D009C |
2. Undo the nut (2a) and disconnect the earth lead (2b) from the bodyshell.
| Description | Connector | |
|---|---|---|
| 2b | Right front earth | C011 |
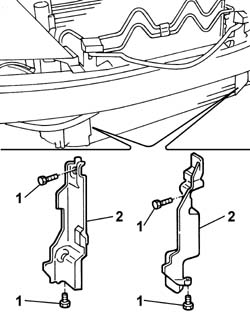
1. Undo the retaining bolts.
2. Remove both right and left ducts on the radiator.
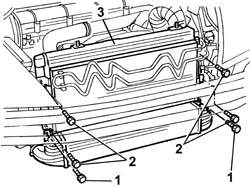
1. Undo the bolts fixing the air/air heat exchanger to the radiator.
2. Undo the bolts fixing the condenser to the radiator.
3. Release the radiator-fan assembly from the lower fastenings and remove it through the top of the engine compartment.
Refitting
- Position the radiator-condenser-fan assembly in the special housing on the lower crossmember, engaging the rubber mountings in the lower part of the radiator in the special housing in the crossmember.
- Tighten the bolts fixing the air/air heat exchanger to the radiator.
- Tighten the bolts fixing the condenser to the radiator.
- Fit both right and left ducts in the seat on the radiator and tighten the bolts.
- Connect the electrical connections for the engine cables/fan-radiator cables coupling.
| Description | Connector | |
|---|---|---|
| Front/radiator coupling | D009A |
| Description | Connector | |
|---|---|---|
| Front/radiator coupling | D009C |
| Description | Connector | |
|---|---|---|
| Front/radiator coupling | D009B |
- Connect the earth lead to the bodyshell and secure it using the fixing nut.
| Description | Connector | |
|---|---|---|
| Right front earth | C011 |
- Connect the upper and lower engine coolant pipes to the radiator.
- Fit the cold air intake on the connector for the air filter.
- Fit the upper front crossmember and tighten the fixing nuts to torque.
| Value - daNm | Fastening | Component | Ø | |
|---|---|---|---|---|
| 0.6 | Bolts | FRONT WING CROSSMEMBER HEADLAMP HOUSINGS | M6 |
- Fit the bonnet lid lock complete with bracket and tighten the nuts fixing it to the upper crossmember and to the lower crossmember.
See in Op. 7210E10 FRONT BUMPER
See in Op. 7055B42 FRONT WHEEL ARCH LINER (one), left or right - R.R.
- (right side)
See in Op. 7055B64 Engine compartment DUST SEAL in front wheel arch (one), left or right - R.R.
- (right side)
Parts & tools for this job Staging For 2002 Lancia Thesis
- PARTEngine gasket setSearch: Lancia Thesis 2002 engine gasket set
- TOOLTorque wrenchSearch: 3/8 inch torque wrench
- TOOLFeeler gauge setSearch: feeler gauge set
Links open Amazon search results in a new tab. As an Amazon Associate I earn from qualifying purchases.