
PRESSURE PUMP drive PULLEY - R.R.
- Make
- Lancia
- Model
- Thesis Factory Service Manual
- Year
- 2002–2009
- Section
- Diesel fuel injection system › PRESSURE PUMP drive PULLEY - R.R.
PRESSURE PUMP drive PULLEY - R.R.
Removing
- Position the vehicle on a lift.
- Open the boot and disconnect the negative battery terminal.
See in Op. 7055B54 PROTECTION/GUARD under engine - R.R.
See in Op. 4450B04 Right FRONT WHEEL (one) - R.R.
See in Op. 7055B42 FRONT WHEEL ARCH LINER (one), left or right - R.R.
See in Op. 7055B64 Engine compartment DUST SEAL in front wheel arch (one), left or right - R.R.
See in Op. 1016A10 SOUND-PROOFING COVER - R.R.
See in Op. 7040D50 ENGINE COMPARTMENT UPPER SOUND INSULATION SHIELD - R.R.
See in Op. 1048B44 RIGID air supply PIPE from heat exchanger to intake manifold - R.R.
See in Op. 1048A56 UPPER RESONATOR - R.R.
See in Op. 1092G10 Engine components single drive BELT - R.R.
See in Op. 1092G21 Engine components single belt FIXED TENSIONER - R.R. with belt removed
See in Op. 1092A10 Crankshaft PULLEY - R.R.
See in Op. 1032D12 Timing system protective COVER(S) - R.R.
See in Op. 1032B10 TOOTHED timing BELT - R.R. for timing adjustment or replacement
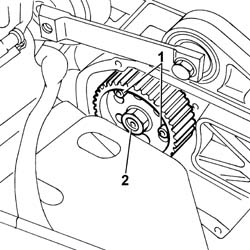
1. Tighten the two bolts securing the pressure pump pulley.
2. Undo the nut fixing the pressure pump pulley to the pump shaft.
- Remove the two bolts securing the pulley positioned previously.
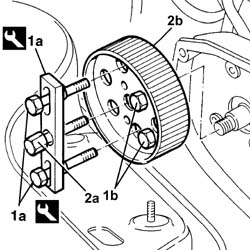
1. Position the extractor (1a) and tighten the pulley fixing bolts (1b) once again.
| Description | Code | Function | |
|---|---|---|---|
| 1a | Extractor | 1.871.000.800 | Removing pressure pump pulley |
2. Acting on the extractor bolt hexagonal head (2a), release the pulley (2b) from the tapered housing in the pressure pump drive shaft, then remove the pulley.
Refitting
- Fit the pressure pump pulley on the pump drive shaft.
- Fit the two pulley lock bolts.
- Tighten the nut fixin the pressure pump pulley to torque.
| Value - daNm | Fastening | Component | Ø | |
|---|---|---|---|---|
| 5 | Nut | PRESSURE PUMP CONTROL PULLEY | M14 |
- Remove the two pulley lock bolts.
See in Op. 1032B10 TOOTHED timing BELT - R.R. for timing adjustment or replacement
See in Op. 1032D12 Timing system protective COVER(S) - R.R.
See in Op. 1092A10 Crankshaft PULLEY - R.R.
See in Op. 1092G21 Engine components single belt FIXED TENSIONER - R.R. with belt removed
See in Op. 1092G10 Engine components single drive BELT - R.R.
See in Op. 1048A56 UPPER RESONATOR - R.R.
See in Op. 1048B44 RIGID air supply PIPE from heat exchanger to intake manifold - R.R.
See in Op. 7040D50 ENGINE COMPARTMENT UPPER SOUND INSULATION SHIELD - R.R.
See in Op. 1016A10 SOUND-PROOFING COVER - R.R.
See in Op. 7055B64 Engine compartment DUST SEAL in front wheel arch (one), left or right - R.R.
See in Op. 7055B42 FRONT WHEEL ARCH LINER (one), left or right - R.R.
See in Op. 7055B54 PROTECTION/GUARD under engine - R.R.
See in Op. 4450B04 Right FRONT WHEEL (one) - R.R.
- Top up the engine coolant, following the instructions in the description:
See in Op. 0010T21 ENGINE COOLANT - Check density and top up if necessary
- Connect the negative battery terminal.
- Remove the vehicle from the lift.
Removing
- Position the vehicle on a lift.
- Open the boot and disconnect the negative battery terminal.
See in Op. 7040D50 ENGINE COMPARTMENT UPPER SOUND INSULATION SHIELD - R.R.
See in Op. 1016A10 SOUND-PROOFING COVER - R.R.
See in Op. 7055B54 PROTECTION/GUARD under engine - R.R.
See in Op. 4450B04 Right FRONT WHEEL (one) - R.R.
See in Op. 7055B42 FRONT WHEEL ARCH LINER (one), left or right - R.R.
See in Op. 7055B64 Engine compartment DUST SEAL in front wheel arch (one), left or right - R.R.
See in Op. 1092G10 Engine components single drive BELT - R.R.
See in Op. 1032D12 Timing system protective COVER(S) - R.R.
See in Op. 1032B10 TOOTHED timing BELT - R.R. for timing adjustment or replacement
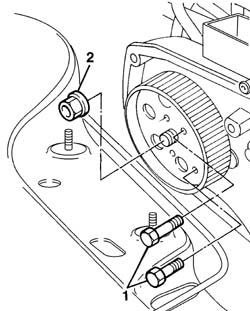
1. Tighten the two bolts securing the pressure pump pulley.
2. Undo the nut fixing the pressure pump pulley to the pump shaft.
- Remove the two bolts securing the pulley positioned previously.
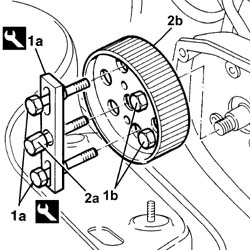
1. Position the extractor (1a) and tighten the pulley fixing bolts (1b) once again.
2. Acting on the extractor bolt hexagonal head (2a), release the pulley (2b) from the tapered housing in the pressure pump drive shaft, then remove the pulley.
| Description | Code | Function | |
|---|---|---|---|
| 1a | Extractor | 1.860.850.000 | Removing pressure pump pulley |
In order to be able to fit the tool in the housing in the pressure pump the length of the threaded part of the tool bolt must be shortened so that it is around 28 mm.
Refitting
- Fit the pressure pump pulley on the pump drive shaft.
- Fit the two pulley lock bolts.
- Tighten the nut fixin the pressure pump pulley to torque.
| Value - daNm | Fastening | Component | Ø | |
|---|---|---|---|---|
| 5 | Nut | PRESSURE PUMP CONTROL PULLEY | M14 |
- Remove the two pulley lock bolts.
See in Op. 1032B10 TOOTHED timing BELT - R.R. for timing adjustment or replacement
See in Op. 1032D12 Timing system protective COVER(S) - R.R.
See in Op. 1092G10 Engine components single drive BELT - R.R.
See in Op. 7055B64 Engine compartment DUST SEAL in front wheel arch (one), left or right - R.R.
See in Op. 7055B42 FRONT WHEEL ARCH LINER (one), left or right - R.R.
See in Op. 4450B04 Right FRONT WHEEL (one) - R.R.
See in Op. 7055B54 PROTECTION/GUARD under engine - R.R.
See in Op. 1016A10 SOUND-PROOFING COVER - R.R.
See in Op. 7040D50 ENGINE COMPARTMENT UPPER SOUND INSULATION SHIELD - R.R.
- Open the boot and connect the negative battery terminal.
- Remove the vehicle from the lift.
Parts & tools for this job Staging For 2002 Lancia Thesis
- PARTGlow plugsSearch: Lancia Thesis 2002 glow plugs
- TOOLGlow plug socketSearch: glow plug socket
- TOOLDiesel compression testerSearch: diesel compression tester
Links open Amazon search results in a new tab. As an Amazon Associate I earn from qualifying purchases.