
Engine oil pump, removed - check at bench
- Make
- Alfa Romeo
- Model
- 159 Factory Service Manual
- Year
- 2005–2011
- Section
- Engine lubrication › Engine oil pump, removed - check at bench
ENGINE OIL PUMP, REMOVED - CHECK AT BENCH
Removing
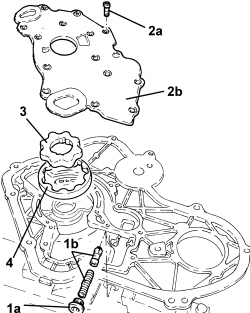
1. Undo the cap (1a) and remove the engine oil pressure relief valve (1b).
2. Undo the bolts (2a) and remove the pump cover (2b).
3. Remove the drive gear.
4. Remove the driven gear.
Refitting
- Check that the radial clearance between the driven gear and the pump casing is within the recommended limits; if this is not the case, replace the oil pump assembly.
| Measurement | Value | Validity |
|---|---|---|
| Radial clearance between pump casing and driven gear | 0.314 mm | 1.9 JTS 2.2 JTS |
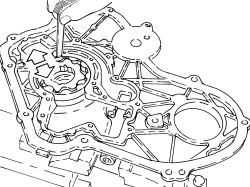
- Place the engine oil pump cover back in its housing and secure it using the bolts.
Manually rotate the gear to check that it does not stick.
- Place the oil pressure relief valve in position and tighten the cap.
Removing
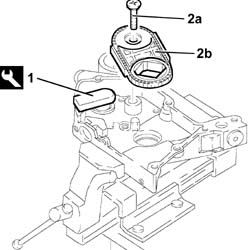
Position the engine oil pump in the vice fitted with protective jaws.
1. Fit the tool.
| Description | Code | Function | |
|---|---|---|---|
| 1 | Counter-torque/Template | 1.870.799.000 | Oil pump timing |
2. Undo the (left hand0 bolt (2a) and remove the oil pump drive chain assembly (2b).
Remove the tool.
| Description | Code | Function | |
|---|---|---|---|
| Counter-torque/Template | 1.870.799.000 | Oil pump timing |
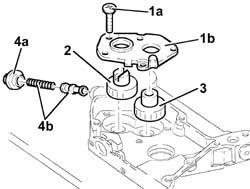
1. Undo bolts (1a) and remove the oil pump cover (1b).
2. Remove the driven gear.
3. Remove the drive gear.
4. Undo the cap (4a) and release the oil pressure relief valve (4b).
Remove the crankshaft front oil seal.
Refitting
Check the oil pump drive chain assembly for wear and, if necessary, replace it.
Check that the radial clearance between the gears and the pump casing is within the recommended limits; if this is not the case, replace the engine oil pump.
| Subject | Value | |
|---|---|---|
| Oil/water pump driveshaft seal | mm | |
| Radial clearance between gears and pump casing | 0.110 - 0.180 |
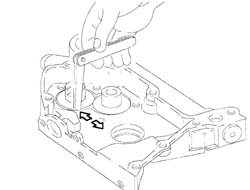
Check that the endfloat between the top of the gears and the oil pump cover support plane is within the reocmmended values; if this is not the case, replace the engine oil pump.
| Subject | Value | |
|---|---|---|
| Oil/water pump driveshaft seal | mm | |
| Endfloat between top of gears and pump casing support plane | 0.016 - 0.086 |
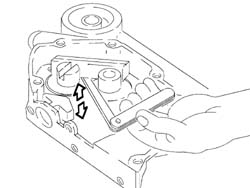
Check that the height of the oil pressure relief valve spring is within the recommended values; if not, replace the spring.
| Subject | Value | |
|---|---|---|
| Oil/water pump driveshaft seal | mm | |
| Height of engine oil pressure relief valve spring | 11.96 - 12.76 |
| Subject | Value | |
|---|---|---|
| Oil/water pump driveshaft seal | mm | |
| Height released | 49.5 |
Fit the oil pressure relief valve and tighten the nut.
| Value daNm | Fastening | Component | Ø | |
|---|---|---|---|---|
| 1.6 ÷ 2.0 | Nut | PRESSURE RELIEF VALVE ENGINE OIL PUMP |
Fit the drive gear.
Fit the driven gear.
Fit the oil pump cover and tighten the fixing bolts to the recommended torque.
| Value daNm | Fastening | Component | Ø | |
|---|---|---|---|---|
| 0.8 ÷ 1.2 | Bolts | OIL/COOLANT PUMP DRIVESHAFT SEAL |
Manually rotate the gears to check that they turn without sticking.
Position the engine oil pump in the vice fitted with protective jaws.
1. Fit the tool.
| Description | Code | Function | |
|---|---|---|---|
| 1 | Counter-torque/Template | 1.870.799.000 | Oil pump timing |
2. Fit the oil pump drive chain assembly (2a) and tighten the (left hand) bolt (2c) to the recommended torque.
| Value daNm | Fastening | Component | Ø | |
|---|---|---|---|---|
| 2c | 4.5 ÷ 5.5 | Left hand bolt | OIL PUMP GEARS | M10 |
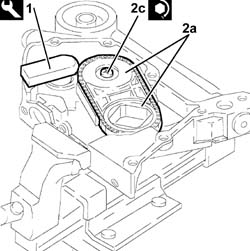
Removing
1. Undo bolts (1a) and remove the oil pump cover (1b).
2. Remove the drive gear.
3. Remove the driven gear.
4. Undo the cap (4a) and remove the oil pressure relief valve (4b).
5. Remove the crankshaft front oil seal.
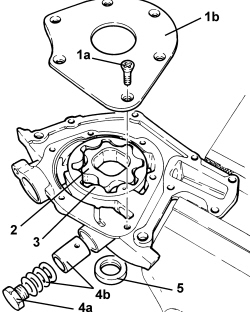
Refitting
Check that the radial clearance between the driven gear and the pump casing is within the recommended limits; if this is not the case, replace the oil pump assembly.
| Measurement | Value | Validity |
|---|---|---|
| Radial clearance between driven gear and pump casing (mm) | 0.080 ÷ 0.186 | 1.9 JTD 16V |
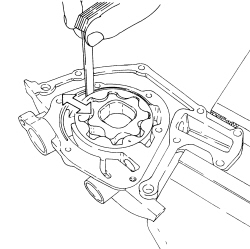
Check that the axial clearance between the pump cover support plane and the top of the gears is within the recommended values; if this is not the case, replace the oil pump assembly.
| Measurement | Value | Validity |
|---|---|---|
| Endfloat between the pump casing support plane and the top of the gears (mm) | 0.025 ÷ 0.070 | 1.9 JTD 16V |
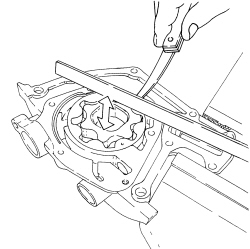
Check that the height of the oil pressure relief valve spring is within the recommended values; if not, replace the spring.
| Measurement | Value | Validity |
|---|---|---|
| Height of engine oil pressure relief valve spring with test load of 8.78 - 9.66 daN (mm) | 36.0 | 1.9 JTD 16V |
Place the oil pressure relief valve in position and tighten the cap.
Place the driven gear in position.
Place the drive gear in position.
Fit the oil pump cover in its housing and tighten the bolts.
Manually rotate the gears to check that they turn without sticking.
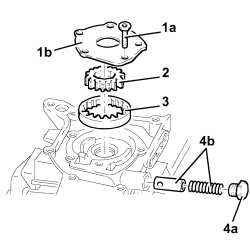
Removing
1. Undo the bolts (1a) and remove the oil pump cover (1b).
2. Remove the drive gear.
3. Remove the driven gear.
4. Undo the cap (4a) and remove the oil pressure relief valve (4b).
- Remove the crankshaft front oil seal
Refitting
- Check that the radial clearance between the driven gear and the pump casing is within the recommended limits; if this is not the case, replace the oil pump assembly.
| Measurement | Value | Validity |
|---|---|---|
| Radial clearance between pump casing and driven gear | 0.080 - 0.186 mm | 1.9 JTD 8V 1.9 JTD 16V |
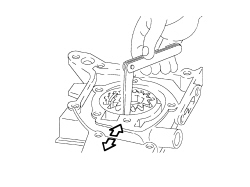
- Check that the axial clearance between the pump cover support plane and the top of the gears is within the recommended values; if this is not the case, replace the oil pump assembly.
| Measurement | Value | Validity |
|---|---|---|
| Endfloat between the pump casing support plane and the top of the gears | 0.025 - 0.070 mm | 1.9 JTD 8V 1.9 JTD 16V |
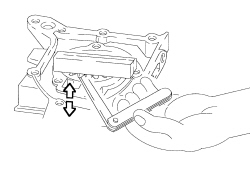
- Check that the height of the oil pressure relief valve spring is within the recommended values; if not, replace the spring.
| Measurement | Value | Validity |
|---|---|---|
| Height of engine oil pressure relief valve spring with test load of 8.78 - 9.66 daN | 36.0 mm | 1.9 JTD 8V 1.9 JTD 16V |
| Measurement | Value | Validity |
|---|---|---|
| Length of engine oil pressure relief valve spring | 49.8 mm | 1.9 JTD 8V |
- Fit the engine oil pressure relief valve and tighten the cap.
- Fit the driven gear.
- Fit the drive gear.
- Fit the oil pump cover and tighten the bolts.
Manually rotate the gears to check that they turn without sticking.
Removing
1. Undo the bolts (1a) and separate the cover (1b) from the engine oil pump casing (1c).
2. Remove the drive gear.
3. Remove the driven gear.
4. Remove the circlip, remove the plug (so that it is "destroyed") and extract the engine oil pressure relief valve components.
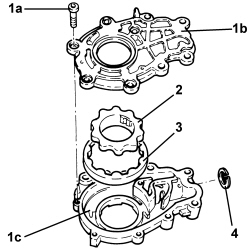
Refitting
- Check that the gears show no signs of wear or seizing; if this is not the case, replace the oil pump assembly.
- Check that the radial clearance between the driven gear and the pump casing is within the recommended limits; if this is not the case, replace the oil pump assembly.
| Measurement | Value | Validity |
|---|---|---|
| Radial clearance between driven gear and pump casing (mm) | 3.2 JTS |
- Check that the height of the engine oil pressure relief valve spring is within the recommended values; if not, replace the spring.
| Measurement | Value | Validity |
|---|---|---|
| Height of engine oil pressure relief valve spring with load of (mm) | 3.2 JTS |
- Place the engine oil pressure relief valve components in their housing, fit a new plug using a suitable tool and fit the circlip.
- Place the driven gear in position.
- Place the drive gear in position.
- Fit the cover on the oil pump and tighten the bolts.
Removing
1. Undo the bolts (1a) and remove the oil pump cover (1b).
2. Remove the inner rotor (2a) and the outer rotor (2b).
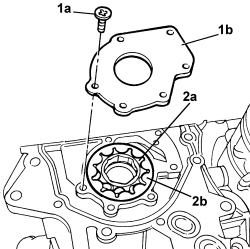
- Remove the crankshaft front oil seal
Refitting
- Clean the rotors and the oil pump casing thoroughly.
- Visually inspect that there are no signs of wear on the rotors or the pump casing, replace any damaged components.
1. Fit the outer rotor (1a) keeping the reference (1b) in sight.
2. Fit the inner rotor (2a) positioning the guide seal (2b) on the marked surface (2c) inside the housing (2d) on the pump casing.
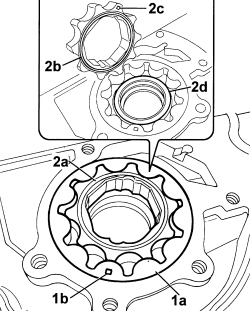
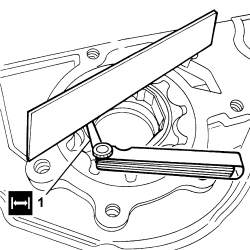
1. Check that the axial clearance between the pump cover support plane and the top of the gears is within the recommended values; if this is not the case, replace the oil pump assembly.
| Measurement | Value | Validity |
|---|---|---|
| Endfloat between the pump casing support plane and the top of the gears (mm) | 0.020 ÷ 0.058 | 1.8 |
- Place the oil pump cover back in its housing and secure it using the bolts.
- Place the crankshaft front oil seal in position using the special tool.
| Tool | Description | Function | Validity |
|---|---|---|---|
| 2000004100 | Fitting tool | Fitting crankshaft front oil seal | 1.8 |
Parts & tools for this job Staging For 2005 Alfa Romeo 159
- PARTEngine gasket setSearch: Alfa Romeo 159 2005 engine gasket set
- TOOLTorque wrenchSearch: 3/8 inch torque wrench
- TOOLFeeler gauge setSearch: feeler gauge set
Links open Amazon search results in a new tab. As an Amazon Associate I earn from qualifying purchases.