
Engine cooling radiator - r + r
- Make
- Lancia
- Model
- Ypsilon Factory Service Manual
- Year
- 2003–2011
- Section
- Engine cooling › Engine cooling radiator - r + r
Engine cooling radiator - r + r
Removing
Position the vehicle on the ramp.
Ensure that the ignition key is in OFF position, then disconnect the battery negative terminal (-).
| Name | Connector | |
|---|---|---|
| Battery | A1B |
Proceed with removal - 1048A10 air cleaner filtering element - replace.
Proceed with removal - 7210E10 R.R. FRONT BUMPER.
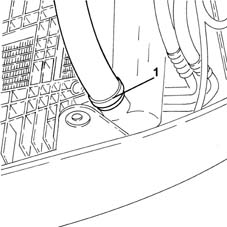
1. Loosen the band and disconnect the lower radiator coolant outlet hose from the radiator, radiator side.
Recover the coolant using a suitable container.
Removing
Position the vehicle on the ramp.
Ensure that the ignition key is in OFF position, then disconnect the battery negative terminal (-).
| Name | Connector | |
|---|---|---|
| Battery | A1B |
Proceed with removal - 1048A10 air cleaner filtering element - replace.
Proceed with removal - 7210E10 R.R. FRONT BUMPER.
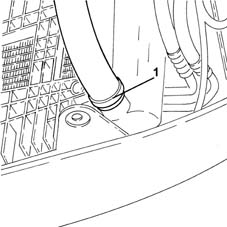
1. Loosen the band and disconnect the lower radiator coolant outlet hose from the radiator, radiator side.
Recover the coolant using a suitable container.
Removing
Position the vehicle on the ramp.
Ensure that the ignition key is in OFF position, then disconnect the battery negative terminal (-).
| Name | Connector | |
|---|---|---|
| Battery | A1B |
Proceed with removal - 1048A10 air cleaner filtering element - replace.
Proceed with removal - 7210E10 R.R. FRONT BUMPER.
1. Loosen the band and disconnect the lower radiator coolant outlet hose from the radiator, radiator side.
Recover the coolant using a suitable container.
Removing
Position the vehicle on the ramp.
Proceed with removal.
Proceed with removal - 7210E10 R.R. FRONT BUMPER.
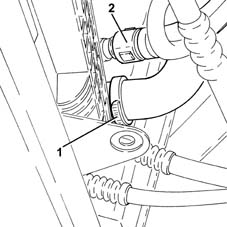
1. Loosen the band and disconnect the lower radiator coolant outlet hose from the radiator, radiator side.
Collect the engine coolant in a suitable container.
2. Disconnect the supply pipe, radiator side.
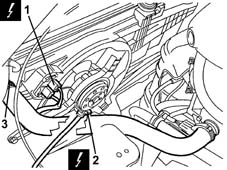
1. Disconnect the electrical connections from the engine cooling fan resistor.
| Name | Connector | |
|---|---|---|
| 1 | Engine fan adjustment resistor | O10 |
2. Disconnect the electrical connection for the radiator cooling fan.
| Name | Connector | |
|---|---|---|
| 2 | Engine electric fan motor | N11 |
3. Loosen the band and disconnect the upper coolant inlet hose to the radiator.
1. Disconnect the electrical connections from the engine cooling fan resistor.
| Name | Connector | |
|---|---|---|
| 1 | Engine fan adjustment resistor | O10 |
2. Disconnect the electrical connection for the radiator cooling fan.
| Name | Connector | |
|---|---|---|
| 2 | Engine electric fan motor | N11 |
3. Loosen the band and disconnect the upper coolant inlet hose to the radiator.
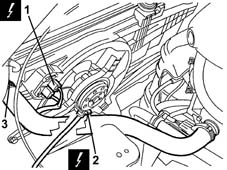
1. Disconnect the electrical connections from the engine cooling fan resistor.
| Name | Connector | |
|---|---|---|
| 1 | Engine fan adjustment resistor | O10 |
2. Disconnect the electrical connection for the radiator cooling fan.
| Name | Connector | |
|---|---|---|
| 2 | Engine electric fan motor | N11 |
3. Loosen the band and disconnect the upper coolant inlet hose to the radiator.
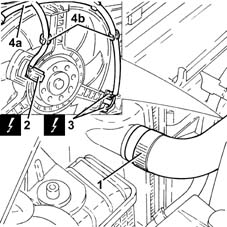
1. Loosen the band and disconnect the upper coolant inlet hose to the radiator.
2. Disconnect the electrical connection from the engine fan motor.
| Name | Connector | |
|---|---|---|
| 2 | Engine electric fan motor | N11 |
3. Disconnect the electrical connections from the engine cooling fan resistor.
| Name | Connector | |
|---|---|---|
| 3 | Engine fan adjustment resistor | O10 |
4. Release the electrical wiring (4a) from the securing bands (4b), then move aside.
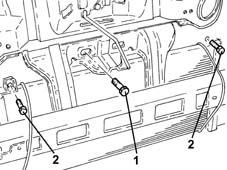
1. Undo the bolt fixing the radiator cooling fan to the bodyshell.
Secure the air conditioning condenser to the bodyshell.
2. Undo the bolts fixing the air conditioning condenser to the radiator cooling fan.
1. Undo the bolt fixing the radiator cooling fan to the bodyshell.
Secure the air conditioning condenser to the bodyshell.
2. Undo the bolts fixing the air conditioning condenser to the radiator cooling fan.
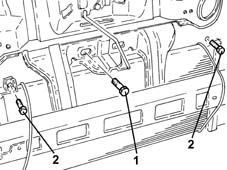
1. Undo the bolt fixing the radiator cooling fan to the bodyshell.
Secure the air conditioning condenser to the bodyshell.
2. Undo the bolts fixing the air conditioning condenser to the radiator cooling fan.
Secure the air conditioner condenser to the body.
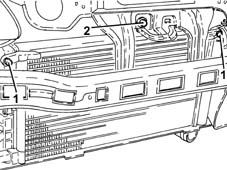
1. Undo the bolts securing the air conditioner condenser to the engine cooling radiator.
2. Undo the upper bolt fixing the engine cooling radiator to the bodyshell.
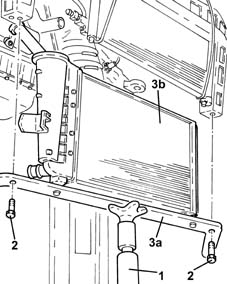
1. Position a hydraulic jack under the radiator lower crossmember.
2. Undo the bolts fixing the lower radiator crossmember
3. Lower the hydraulic jack and remove the lower radiator crossmember (3a), complete with engine cooling radiator (3b) and radiator cooling fan.
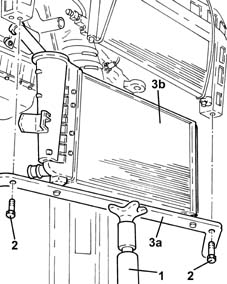
1. Position a hydraulic jack under the radiator lower crossmember.
2. Undo the bolts fixing the lower radiator crossmember
3. Lower the hydraulic jack and remove the lower radiator crossmember (3a), complete with engine cooling radiator (3b) and radiator cooling fan.
1. Position a hydraulic jack under the radiator lower crossmember.
2. Undo the bolts fixing the lower radiator crossmember
3. Lower the hydraulic jack and remove the lower radiator crossmember (3a), complete with engine cooling radiator (3b) and radiator cooling fan.
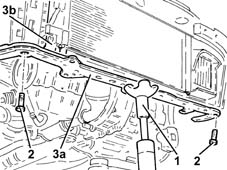
1. Position a hydraulic jack under the radiator lower crossmember.
2. Undo the bolts securing the radiator bottom crossmember to the bodywork.
3. Lower the hydraulic jack and remove the lower radiator crossmember (3a), complete with engine cooling radiator (3b) and radiator cooling fan.
While lowering the hydraulic jack, check that the turbocharging air-air intercooler pins are released from the lower radiator beam.
Refitting
Place the lower radiator crossmember complete with engine cooling radiator and radiator cooling fan back in its housing using the hydraulic jack.
Tighten the bolts fixing the lower radiator crossmember.
Tighten the bolts fixing the air conditioning compressor to the radiator cooling fan.
Tighten the bolt fixing the radiator cooling fan to the bodyshell.
Connect the radiator upper coolant inlet hose to the radiator and tighten the band.
Connect the electrical connection to the radiator cooling fan.
Connect the electrical connections to the resistor for the engine cooling fan.
Connect the lower coolant outlet hose from the radiator, radiator side, and tighten the band.
Proceed with refitting - 7210E10 R.R. FRONT BUMPER.
Proceed with refitting - 1048A10 air cleaner filtering element - replace.
Connect the negative (-) battery terminal.
Refill the engine cooling system with coolant - 0010T20 coolant change.
Remove the car from the ramps.
Refitting
Place the lower radiator crossmember complete with engine cooling radiator and radiator cooling fan back in its housing using the hydraulic jack.
Tighten the bolts fixing the lower radiator crossmember.
Tighten the bolt fixing the radiator cooling fan to the bodyshell.
Tighten the bolt fixing the radiator cooling fan to the bodyshell.
Connect the radiator upper coolant inlet hose to the radiator and tighten the band.
Connect the electrical connection to the radiator cooling fan.
Connect the electrical connections to the resistor for the engine cooling fan.
Connect the lower coolant outlet hose from the radiator, radiator side, and tighten the band.
Proceed with refitting - 7210E10 R.R. FRONT BUMPER.
Proceed with refitting - 1048A10 air cleaner filtering element - replace.
Connect the negative (-) battery terminal.
Refill the engine cooling system with coolant - 0010T20 coolant change.
Remove the car from the ramps.
Refitting
Place the lower radiator crossmember complete with engine cooling radiator and radiator cooling fan back in its housing using the hydraulic jack.
Tighten the bolts fixing the lower radiator crossmember.
Tighten the bolts fixing the air conditioning condenser to the radiator cooling fan.
Tighten the bolt fixing the radiator cooling fan to the bodyshell.
Connect the radiator upper coolant inlet hose to the radiator and tighten the band.
Connect the electrical connection to the radiator cooling fan.
Connect the electrical connections to the resistor for the engine cooling fan.
Connect the lower coolant outlet hose from the radiator, radiator side, and tighten the band.
Proceed with refitting - 7210E10 R.R. FRONT BUMPER.
Proceed with refitting - 1048A10 air cleaner filtering element - replace.
Connect the negative (-) battery terminal.
Refill the engine cooling system with coolant - 0010T20 coolant change.
Remove the car from the ramps.
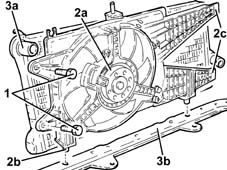
1. Working at the bench, release the side bolts securing the radiator cooling fan.
2. Remove the radiator fan (2a) after releasign lower pins (2b) from the lower radiator beam and tabs (2c) press-fitted to the radiator.
3. Separate engine cooling radiator (3a) from the lower radiator beam (3b).
Refitting
Install the engine cooling radiator on the lower radiator beam
Refit radiator cooling fan, securing the lower pins to the lower radiator beam and press-fitting the tabs to the radiator.
Tighten the side bolts fixing the radiator cooling fan.
Place the lower radiator crossmember complete with engine cooling radiator and radiator cooling fan back in its housing using the hydraulic jack.
Tighten the bolts securing the radiator bottom crossmember to the bodywork.
Remove the hydraulic jack from underneath the lower radiator crossmember.
Tighten the upper bolt fixing the engine cooling radiator to the bodyshell.
Tighten the bolts securing the air conditioner condenser to the engine cooling radiator.
Refit the electrical wiring in its seating and attach it.
Connect the electrical connections to the resistor for the engine cooling fan.
Connect the electrical connection to the engine fan motor.
Connect the radiator upper coolant inlet hose to the radiator and tighten the band.
Connec the system supply pipe, radiator side.
Connect the lower coolant outlet hose to the radiator and tighten the band.
Proceed with refitting - 7210E10 R.R. FRONT BUMPER.
Refill the engine cooling system with coolant - 0010T20 coolant change.
Proceed with refitting.
Remove the car from the ramps.
Parts & tools for this job Staging For 2003 Lancia Ypsilon
- PARTEngine gasket setSearch: Lancia Ypsilon 2003 engine gasket set
- TOOLTorque wrenchSearch: 3/8 inch torque wrench
- TOOLFeeler gauge setSearch: feeler gauge set
Links open Amazon search results in a new tab. As an Amazon Associate I earn from qualifying purchases.