
Water pump - R.R. with engine removed
- Make
- Lancia
- Model
- Thesis Factory Service Manual
- Year
- 2002–2009
- Section
- Engine cooling › Water pump - R.R. with engine removed
Water pump - R.R. with engine removed
Removing
See in Op. 1032B16 Toothed timing drive belt - R.R. with engine removed
- Proceed with the removal
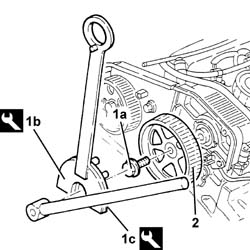
1. Undo the bolt (1a) for the toothed driven pulley using the tools (1b) and (1c) for counter-torque.
| Description | Code | Function | |
|---|---|---|---|
| 1b | Support for counter-torque | 1.831.146.000 | Loosen/Tighten driven toothed pulley bolt |
| Description | Code | Function | |
|---|---|---|---|
| 1c | Counter-torque | 1.831.146.001 | Loosen/Tighten driven toothed pulley bolt |
2. Remove the toothed driven pulley.
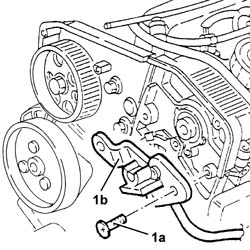
1. Undo the bolts (1a) and remove the cam angle sensor (1b).
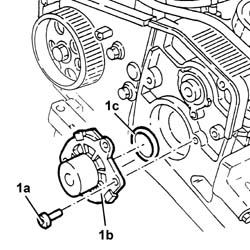
1. Undo the bolts (1a) and remove the water pump (1b) complete with O-ring (1c).
Refitting
- Position the water pump, complete with new O-ring, in its housing and secure it tightening the bolts to the recommended torque.
| Value - daNm | Fastening | Component | Ø | |
|---|---|---|---|---|
| (Cylinder head side) 2.3 - 3.3 | Bolt | COOLANT PUMP | M8 |
- Fit the cam angle sensor and secure it using the bolts.
| Value - daNm | Fastening | Component | Ø | |
|---|---|---|---|---|
| 0.8 - 1.2 | Bolt | CAM ANGLE SENSOR |
- Place the toothed driven pulleyin its housing.
- Tighten the toothed driven pulley bolt to the recommended torque using the tools for counter-torque.
| Value - daNm | Fastening | Component | Ø | |
|---|---|---|---|---|
| 11.0 ÷ 15.9 | Bolt | TIMING DUCT PULLEY | M12 |
| Description | Code | Function | |
|---|---|---|---|
| Support for counter-torque | 1.831.146.000 | Loosen/Tighten driven toothed pulley bolt |
| Description | Code | Function | |
|---|---|---|---|
| Counter-torque | 1.831.146.001 | Loosen/Tighten driven toothed pulley bolt |
See in Op. 1032B16 Toothed timing drive belt - R.R. with engine removed
- Proceed with refitting
Removing
See in Op. 1032B16 TOOTHED timing BELT - R.R. with engine removed
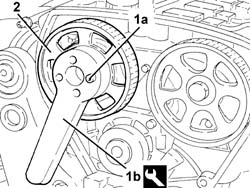
1. Undo the inlet side driven timing pulley bolt (1a) using the tool (1b) for counter-torque.
| Description | Code | Function | |
|---|---|---|---|
| 1b | Counter-torque | 1.860.856.000 | Loosen/tighten inlet side camshaft drive pulley |
2. Remove the inlet side timing driven pulley.
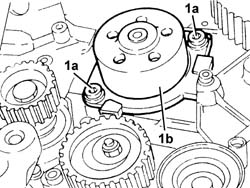
1. Undo the bolts (1a) and remove the water pump (1b) complete with O-ring.
Refitting
- Position the water pump, complete with O-ring, in its housing and secure it tightening the bolts to the recommended torque.
| Value - daNm | Fastening | Component | Ø | |
|---|---|---|---|---|
| (Cylinder head side) 2.3 - 3.3 | Bolt | COOLANT PUMP | M8 |
- Place the inlet side driven timing pulley in its housing.
- Tighten the bolts for the inlet side toothed timing driven pulley using the tool for counter-torque.
| Value - daNm | Fastening | Component | Ø | |
|---|---|---|---|---|
| (Inlet camshaft side) 0.9 -1.2 | Bolt | TIMING DUCT PULLEY | M6 |
| Description | Code | Function | |
|---|---|---|---|
| Counter-torque | 1.860.856.000 | Loosen/tighten bolts fixing inlet side toothed driven timing pulley |
See in Op. 1032B16 TOOTHED timing BELT - R.R. with engine removed
Removing
See in Op. 1032B16 TOOTHED timing BELT - R.R. with engine removed
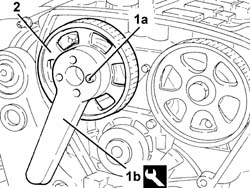
1. Undo the inlet side driven timing pulley bolt (1a) using the tool (1b) for counter-torque.
| Description | Code | Function | |
|---|---|---|---|
| 1b | Counter-torque | 1.860.856.000 | Loosen/tighten bolts fixing inlet side toothed driven timing pulley |
2. Remove the inlet side timing driven pulley.
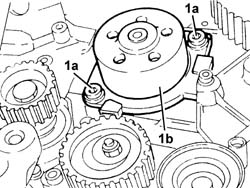
1. Undo the bolts (1a) and remove the water pump (1b) complete with O-ring.
Refitting
- Position the water pump, complete with O-ring, in its housing and secure it tightening the bolts to the recommended torque.
| Value - daNm | Fastening | Component | Ø | |
|---|---|---|---|---|
| (Cylinder head side) 2.3 - 3.3 | Bolt | COOLANT PUMP | M8 |
- Place the inlet side driven timing pulley in its housing.
- Tighten the bolts for the inlet side toothed timing driven pulley using the tool for counter-torque.
| Value - daNm | Fastening | Component | Ø | |
|---|---|---|---|---|
| (Inlet camshaft side) 0.8 -1.0 | Bolt | TIMING DUCT PULLEY | M6 |
| Description | Code | Function | |
|---|---|---|---|
| Counter-torque | 1.860.856.000 | Loosen/tighten bolts fixing inlet side toothed driven timing pulley |
See in Op. 1032B16 TOOTHED timing BELT - R.R. with engine removed
Removing
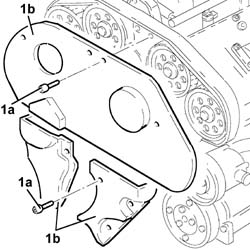
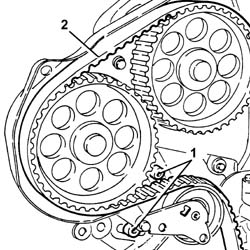
1. Undo the bolts (1a) and remove the timing belt guards (1b).
1. Loosen the timing belt tensioner bolts.
2. Release the timing drive belt from the camshaft drive pullies.
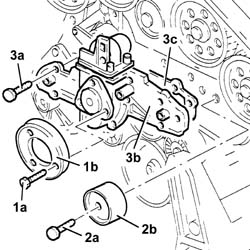
1. Undo the bolts (1a) and remove the water pump drive pulley (1b).
2. Undo the bolt (2a) and remove the timing belt fixed tensioner (2b).
3. Undo the bolts (3a) and remove the water pump (3b) complete with gasket (3c).
Refitting
- Fit the water pump with a new gasket and secure it to the crankcase tightening the bolts to torque C.
| Value - daNm | Fastening | Component | Ø | |
|---|---|---|---|---|
| 0.8 - 1.2 | WATER PUMP | M6 |
- Fit the fixed belt tensioner for the timing belt and fasten it using the bolt.
- Fit the water pump drive pulley and secure it using the bolts.
| Value - daNm | Fastening | Component | Ø | |
|---|---|---|---|---|
| 0,8 - 1,2 | ENGINE OIL PUMP DRIVE PULLY | M6 |
- Engine tuning.
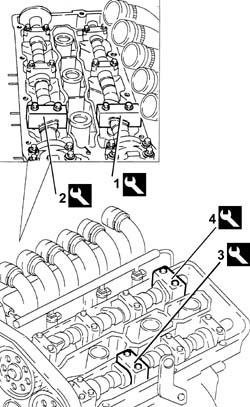
1. Fit tool A in place of the camshaft caps removed.
| Description | Code | Function | |
|---|---|---|---|
| Template Kit | 1.860.820.000 | Timing |
1. Position the template for the right inlet cylinder no. 1 1.860.820.001
2. Position the template for the right exhaust cylinder no. 1 1.825.040.002
3. Position the template for the left exhaust cylinder no. 4 1.825.040.003
4. Position the template for the left inlet cylinder no. 6 1.860.820.002
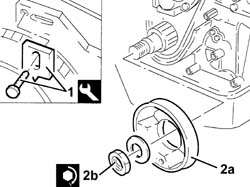
- Loosen the bolts for the camshaft drive pullies using the special tool for counter-torque.
| Description | Code | Function | |
|---|---|---|---|
| Support for counter-torque | 1.860.831.000 |
- Fit the timing belt drive pulley.
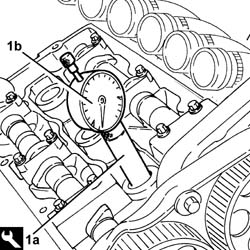
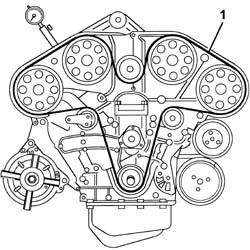
1. Fit the tool A (1a) complete with dial gauge (1b) in the seat for the spark plug for cylinder no. 1.
| Description | Code | Function | |
|---|---|---|---|
| 1a | Extension | 1.860.895.000 |
- Rotate the crankshaft through small rotations (in both directions) until the piston for the right head timing side cylinder no. 1 is at T.D.C. in the explosion stroke.
Take care that the last rotation of the crankshaft is in the direction of rotation of the engine.
1. Fit the timing drive belt starting from the drive pulley and continuing in an anti-clockwise direction making sure that the drive branches are properly taut.
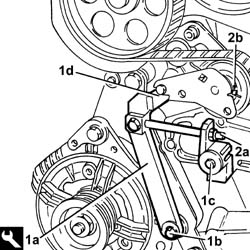
1. Fit the tool (1a) and secure it using bolt (1b) for the alternator and bolt (1c) for the water pump.
A suitable spacer should be fitted on the bolt (1b) to regain the size of the alternator.
The tooth (1d) for the tool should engage with the moving part of the timing belt tensioner.
| Description | Code | Function | |
|---|---|---|---|
| 1a | Belt tensioner | 1.860.950.000 |
2. Act on the belt tensioner tool nut (2a) until the moving reference for the belt tensioner (2b) is under the fixed reference.
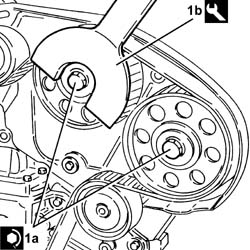
1. Tighten the bolts (1a) for the camshaft drive pullies to torque C using tools (1b) A for counter-torque.
| Value - daNm | Fastening | Component | Ø | |
|---|---|---|---|---|
| 1a | 7.3 - 10.6 | CAMSHAFT DRIVE PULLIES | M10 |
| Description | Code | Function | |
|---|---|---|---|
| 1b | Support for counter-torque | 1.860.831.000 |
- Remove the tool A.
| Description | Code | Function | |
|---|---|---|---|
| Template Kit | 1.860.820.000 |
- Fit the camshaft caps in place of the tool removed and secure them by tightening the bolts to torque C.
| Value - daNm | Fastening | Component | Ø | |
|---|---|---|---|---|
| 1.8 - 2.5 | Bolt | CAMSHAFT CAPS | M8 |
- Rotate the crankshaft through two revolutions in its direction of rotation to allow the timing belt to bed in.
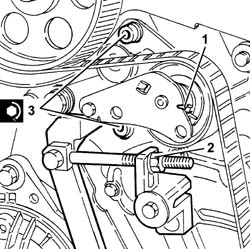
1. Check that the moving reference for the timing belt tensioner coincides with the fixed reference.
2. If the references are not aligned, gently release the tensioner tension acting on the nut for the tensioning tool until the reference coincide.
3. Tighten the bolts for the timing belt tensioner to torque C.
| Value - daNm | Fastening | Component | Ø | |
|---|---|---|---|---|
| 3 | 2.4 - 3.2 | Bolt | TIMING BELT TENSIONER | M8 |
- Remove the tool A.
| Description | Code | Function | |
|---|---|---|---|
| Belt tensioner | 1.860.950.000 |
1. Fit the tool A.
| Description | Code | Function | |
|---|---|---|---|
| 1 | Counter-torque | 1.860.779.000 |
2. Fit the engine components single belt pulley (2a) and secure it tightening the nuts (2b) to torque C.
| Value - daNm | Fastening | Component | Ø | |
|---|---|---|---|---|
| 2d | 23.2 ÷ 31.2 | Nut | SINGLE ENGINE COMPONENTS DRIVE BELT PULLEY | M28 |
- Remove the tool A.
| Description | Code | Function | |
|---|---|---|---|
| Counter-torque | 1.860.779.000 |
- Fit the tappet covers and secure them using the bolts.
- Fit the ignition coils and secure them using the bolts.
- Fit the protective timing cover mounting bracket and secure it using the bolts.
- Fit the timing belt guards and secure them using the bolts.
- Place the electrical wiring in position and fasten it to the bands.
- Connect the electrical connections to the ignition coils.
- Connect the electrical connections to the injectors.
- Fit the electrical wiring mounting brackets to the tappet covers and secure them using the bolts.
- Connect the electrical connection for the front detonation sensor.
- Fit the ignition coil cover for the left cylinder head and secure it using the bolts.
- Connect the earth lead to the left cylinder head tappet cover.
- Connect the electrical connection to the engine coolant temperature sensor.
- Connect the electrical connection for the rear detonation sensor.
- Connect the electrical connection for the engine rpm and timing sensor.
- Connect the electrical connection for the cam angle sensor.
- Fit the intake chamber assembly and secure it using the bolts.
- Tighten the bands securing the air intake manifolds to the intake chamber.
- Connect the engine oil vapour recovery pipe.
- Connect the electrical connection for the throttle casing.
- Connect the earth lead to the left cylinder head tappet cover.
Removing
See in Op. 1004D40 ENGINE - Position on stand and Remove
1. Open the cover for the electrical connections box.
2. Disconnect the electrical connection for the timing side knock sensor.
| Description | Connector | |
|---|---|---|
| 2 | Detonation sensor - 2 | K050 |
1. Loosen the bands securing the intake manifolds to the air chamber.
2. Loosen the band fixing the engine oil vapour recovery pipe to the air chamber,
3. Disconnect the electrical connection from the throttle casing with D.V.L.
| Description | Connector | |
|---|---|---|
| 3 | Integrated throttle casing actuator | N075 |
1. Unscrew the retaining bolt (1a) and disconnect the earth lead (1b) from the air chamber.
| Description | Connector | |
|---|---|---|
| 1b | Earth on engine | C040 |
2. Undo the bolt fixing the strengthening strut to the support on the engine for the reaction rod.
3. Undo the bolts (3a) and remove the air chamber assembly (3b).
1. Disconnect the electrical connections from the right cylinder head injectors.
| Description | Connector | |
|---|---|---|
| 1 | Injector | N070A |
| Description | Connector | |
|---|---|---|
| Injector | N070F |
| Description | Connector | |
|---|---|---|
| Injector | N070E |
| Description | Connector | |
|---|---|---|
| Injector | N070D |
| Description | Connector | |
|---|---|---|
| Injector | N070C |
| Description | Connector | |
|---|---|---|
| Injector | N070B |
2. Disconnect the electrical connections from the right cylinder head ignition coils.
| Description | Connector | |
|---|---|---|
| 2 | Ignition coil | A030A |
| Description | Connector | |
|---|---|---|
| Ignition coil | A030F |
| Description | Connector | |
|---|---|---|
| Ignition coil | A030E |
| Description | Connector | |
|---|---|---|
| Ignition coil | A030D |
| Description | Connector | |
|---|---|---|
| Ignition coil | A030C |
| Description | Connector | |
|---|---|---|
| Ignition coil | A030B |
3. Undo the bolts (3a) and move the electrical wiring duct (3b) to the side.
1. Undo the bolts (1a) and remove the ignition coils (1b) from the right cylinder head.
1. Undo the nut (1a) and disconnect the earth lead (1b) from the left cylinder head.
| Description | Connector | |
|---|---|---|
| 1b | Earth on engine | C040 |
1. Undo the bolts (1a) and remove the ignition coil cover on the left cylinder head (1b).
1. Disconnect the electrical connections from the left cylinder head injectors.
| Description | Connector | |
|---|---|---|
| 1 | Injector | N070A |
| Description | Connector | |
|---|---|---|
| Injector | N070F |
| Description | Connector | |
|---|---|---|
| Injector | N070E |
| Description | Connector | |
|---|---|---|
| Injector | N070D |
| Description | Connector | |
|---|---|---|
| Injector | N070C |
| Description | Connector | |
|---|---|---|
| Injector | N070B |
2. Disconnect the electrical connections from the left cylinder head ignition coils.
| Description | Connector | |
|---|---|---|
| 2 | Ignition coil | A030A |
| Description | Connector | |
|---|---|---|
| Ignition coil | A030F |
| Description | Connector | |
|---|---|---|
| Ignition coil | A030E |
| Description | Connector | |
|---|---|---|
| Ignition coil | A030D |
| Description | Connector | |
|---|---|---|
| Ignition coil | A030C |
| Description | Connector | |
|---|---|---|
| Ignition coil | A030B |
3. Undo the bolts (3a) and move the electrical wiring duct (3b) to the side.
1. Undo the bolts (1a) and remove the ignition coils (1b) from the left cylinder head.
1. Undo the bolts (1a) and remove the upper protective timing cover (1b).
1. Undo the bolts (1a) and remove the lower protective timing covers (1b).
1. Loosen the timing belt moving tensioner fixing bolts.
2. Release the timing drive belt from the driven pullies.
1. Undo the bolts (1a), the bolt (1b) and remove the bracket (1b).
1. Undo the bolts (1a) and remove the left cylinder head tappet cover (1b) complete with gasket.
1. Loosen the bolts (1a) fixing the driven toothed pullies using the tool (1b) for counter-torque.
| Description | Code | Function | |
|---|---|---|---|
| 1b | Counter-torque | 1.822.146.000 | Loosen/tighten driven toothed pulley bolts |
1. Undo the bolts (1a) and remove the right cylinder head tappet cover (1b) complete with gasket.
1. Undo the bolt (1a) and remove the fixed timing tensioner (1b).
2. Undo the fixing bolts (2a) and remove the water pump (2b) complete with cover (2c) and bracket (2d).
Take care when removing the water pump not to release the rigid water pump inlet pipe from the thermostat.
3. Remove the seal.
Refitting
1. Place the water pump (1a), complete with cover, bracket and gasket in position, then tighten the bolts (1b) to the recommended torque.
| Value - daNm | Fastening | Component | Ø | |
|---|---|---|---|---|
| 1b | (Engine crankcase side) 0.8 - 1.0 | Bolt | COOLANT PUMP | M6 |
2. Position the fixed timing tensioner (2a) in its housing and secure it tightening the bolt (2b) to the recommended torque.
| Value - daNm | Fastening | Component | Ø | |
|---|---|---|---|---|
| 2b | (Cylinder head side) 4.5 - 5.5 | Bolt | FIXED TENSIONER | M10 |
1. Carry out the preliminary timing of the camshafts: fit a spanner in the special housing (1a) in the centre of the camshafts and rotate them until the references (1b) in the actual shafts are aligned with the upper cylinder head plane.
The references should be facing the centre of each cylinder head.
1. Remove caps 4 to 7 from the left cylinder head.
2. Remove caps B and G from the right cylinder head.
1. Position the timing templates in place of the camshaft caps removed.
| Description | Code | Function | |
|---|---|---|---|
| 1 | Templates | 1.870.849.000 | Engine tuning |
1. Fit the tool (1a) complete with dial gauge (1b) in the seat for the spark plug for cylinder no. 1.
| Description | Code | Function | |
|---|---|---|---|
| 1a | Extension | 1.821.225.000 | T.D.C. check |
- Rotate the crankshaft through small rotations (in both directions) until the piston for the right head timing side cylinder no. 1 is at T.D.C. in the explosion stroke.
Take care that the last rotation of the crankshaft is in the direction of operation.
1. Fit the toothed timing drive belt starting from the toothed drive pulley and continuing in an anti-clockwise direction making sure that the drive branches are properly taut.
1. Fit the tool (1a) and secure it using bolt (1b) for the alternator and bolt (1c) for the water pump.
The tooth for the tool should engage with the moving part of the timing belt moving tensioner.
| Description | Code | Function | |
|---|---|---|---|
| 1a | Belt tensioner | 1.860.950.000 | Toothed timing drive belt tensioner |
2. Act on the belt tensioner tool nut (2a) until the moving reference on the moving belt tensioner (2b) is under the fixed reference.
1. Tighten the bolts (1a) fixing the driven toothed pullies to the recommended torque using the tool (1b) for counter-torque.
| Value - daNm | Fastening | Component | Ø | |
|---|---|---|---|---|
| 1a | (camshaft side) 7.2 - 8.8 | bolt | TIMING DRIVEN PULLIES | M12 |
| Description | Code | Function | |
|---|---|---|---|
| 1b | Counter-torque | 1.860.831.000 | Loosen/Tighten driven toothed pulley bolts |
- Remove the tools for timing the camshafts.
| Description | Code | Function | |
|---|---|---|---|
| Templates | 1.870.849.000 | Engine tuning |
- Place the camshaft caps in their housings in place of the tools removed and tighten the bolts to the recommended torque.
| Value - daNm | Fastening | Component | Ø | |
|---|---|---|---|---|
| (Cylinder head side) 1.8 - 2.0 | Bolt | CAMSHAFT CAPS | M8 |
- Rotate the crankshaft through two revolutions in its direction of rotation to allow the timing belt to bed in.
1. Check that the moving reference for the timing belt moving tensioner coincides with the fixed reference.
2. If the references are not aligned, gently release the tensioner tension acting on the nut for the tensioning tool until the reference coincide.
3. Tighten the bolts fixing the moving timing tensioner to the recommended torque.
| Value - daNm | Fastening | Component | Ø | |
|---|---|---|---|---|
| 3 | (Cylinder head side) 1.9 - 2.3 | Bolt | MOBILE TIMING TENSIONER | M8 |
- Remove the belt tensioner tool.
| Description | Code | Function | |
|---|---|---|---|
| Belt tensioner | 1.860.950.000 | Toothed timing drive belt tensioner |
1. Place the cylinder head tappet covers (1a) in their housings complete with gaskets and secure them tightening the bolts (1b) to the recommended torque.
| Value - daNm | Fastening | Component | Ø | |
|---|---|---|---|---|
| 1b | (Cylinder head side) 1.4 - 1.7 | Bolt | TAPPET COVERS | M7 |
- Fit the bracket in its housing and secure it using the bolts.
- Fit the lower timing belt protective covers and secure them using the bolts.
- Fit the upper timing belt protective covers and secure them using the bolts.
1. Place the ignition coils (1a) in their housings in the left cylinder head and secure them tightening the bolts (1b) to the recommended torque.
| Value - daNm | Fastening | Component | Ø | |
|---|---|---|---|---|
| 1b | (Cam cover side) 0.8 ÷ 1.0 | Bolt | IGNITION COIL/REEL | M6 |
- Place the electrical wiring duct in its housing and secure it using the bolts.
- Connect the electrical connections to the left cylinder head ignition coils.
- Connect the electrical connections to the left cylinder head injectors.
- Place the ignition coil cover on the left cylinder head back in its housing and secure it using the bolts.
- Connect the earth lead to the cylinder head and secure it using the nut.
1. Place the ignition coils (1a) in their housings in the right cylinder head and secure them tightening the bolts (1b) to the recommended torque.
| Value - daNm | Fastening | Component | Ø | |
|---|---|---|---|---|
| 1b | (Cam cover side) 0.8 ÷ 1.0 | Bolt | IGNITION COIL/REEL | M6 |
- Place the electrical wiring duct in its housing and secure it using the bolts.
- Connect the electrical connections to the right cylinder head ignition coils.
- Connect the electrical connections to the right cylinder head injectors.
- Fit the air chamber in its housing and secure it using the bolts.
- Tighten the bolt fixing the strengthening strut to the support on the engine for the reaction rod.
- Connect the earth lead to the air chamber and secure it using the bolt.
- Connect the electrical connection to the throttle casing with D.V.L.
- Tighten the band fixing the engine oil vapour recovery pipe to the air chamber,
- Tighten the bands securing the intake manifolds to the air chamber.
- Connect the electrical connection for the timing side knock sensor.
- Close the electrical connections box.
Parts & tools for this job Staging For 2002 Lancia Thesis
- PARTEngine gasket setSearch: Lancia Thesis 2002 engine gasket set
- TOOLTorque wrenchSearch: 3/8 inch torque wrench
- TOOLFeeler gauge setSearch: feeler gauge set
Links open Amazon search results in a new tab. As an Amazon Associate I earn from qualifying purchases.