
Catalytic preconverter - r.r.
- Make
- Lancia
- Model
- Thesis Factory Service Manual
- Year
- 2002–2009
- Section
- Emission control system › Catalytic preconverter - r.r.
CATALYTIC PRECONVERTER - R.R.
Removing
- Position the vehicle on a lift.
- Make sure that the ignition key is in the OFF position, then open the boot, remove the cover on the left hand side and disconnect the negative battery lead.
See in Op. 7040D50 ENGINE COMPARTMENT UPPER SOUND INSULATION SHIELD - R.R.
See in Op. 7055B54 PROTECTION/GUARD under engine - R.R.
See in Op. 1072C44 Exhaust manifold heat shield on BULKHEAD - R.R.
See in Op. 1088E10 Radiator cooling FAN - R.R.
See in Op. 1048A10 COMPLETE AIR FILTER -R.R.
See in Op. 1048A50 air inlet pipe to turbocharger - r + r
See in Op. 1048A21 AIR INLET HOSE FROM INTAKE TO FILTER - R.R.
See in Op. 1016A40 Ignition COIL COVER on cylinder head - R.R.
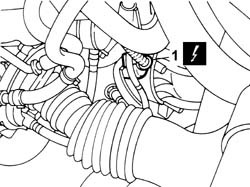
1. Disconnect the electrical connection for the rear Lambda sensor.
| Description | Connector | |
|---|---|---|
| 1 | Lambda sensor on catalyzer 2 | K018 |
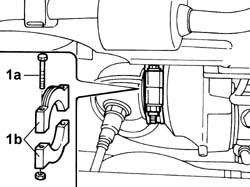
1. Undo the fixing bolts (1a) and remove the two half-rings (1b) between the catalytic preconverter and the turbine.
- Raise the lift.
- Support the catalytic preconverter appropriately.
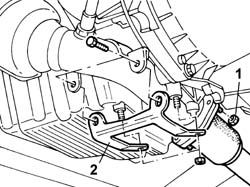
1. Undo the nuts fixing the catalytic converter to the centre section of the exhaust pipe.
2. Remove the catalytic converter mounting bracket.
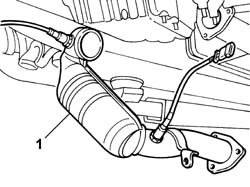
1. Remove the catalytic preconverter complete with Lambda sensors.
Refitting
- Position the catalytic preconverter.
- Position the gasket and tighten the nuts fixing the catalytic preconverter to the centre section of the exhaust pipe.
| Value - daNm | Fastening | Component | Ø | |
|---|---|---|---|---|
| 2.8 | Nut | CATALYTIC PRE-CONVERTER | M8 |
- Fit the catalytic converter mounting bracket.
| Value - daNm | Fastening | Component | Ø | |
|---|---|---|---|---|
| 4 | Nut | CATALYTIC CONVERTER MOUNT | M10 |
| Value - daNm | Fastening | Component | Ø | |
|---|---|---|---|---|
| 2.8 | Bolt | CATALYTIC CONVERTER MOUNT | M8 |
- Lower the lift.
- Fit the half-rings fastening the catalytic preconverter to the turbine and tighten the bolts.
| Value - daNm | Fastening | Component | Ø | |
|---|---|---|---|---|
| 2,8 | Bolt | CATALYTIC PRE-CONVERTER | M8 |
- Connect the electrical connection for the rear Lambda sensor.
| Description | Connector | |
|---|---|---|
| Lambda sensor on catalyzer 2 | K018 |
See in Op. 1072C44 Exhaust manifold heat shield on BULKHEAD - R.R.
See in Op. 1088E10 Radiator cooling FAN - R.R.
See in Op. 1048A10 COMPLETE AIR FILTER -R.R.
See in Op. 1048A50 air inlet pipe to turbocharger - r + r
See in Op. 1048A21 AIR INLET HOSE FROM INTAKE TO FILTER - R.R.
See in Op. 7055B54 PROTECTION/GUARD under engine - R.R.
See in Op. 1016A40 Ignition COIL COVER on cylinder head - R.R.
See in Op. 7040D50 ENGINE COMPARTMENT UPPER SOUND INSULATION SHIELD - R.R.
- Connect the negative battery terminal, then close the boot.
- Remove the vehicle from the lift.
Removing
- Position the vehicle on a lift.
See in Op. 7055B54 PROTECTION/GUARD under engine - R.R.
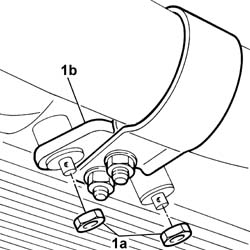
1. Undo the nuts (1a) fixing the mounting bracket (1b) for the front section of the exhaust pipe.
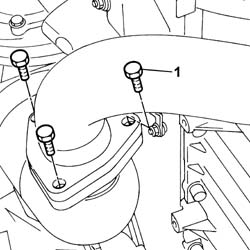
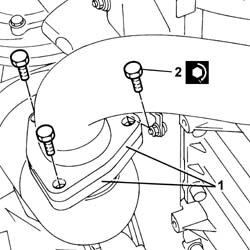
1. Undo the bolts fixing the front section of the exhaust pipe to the catalytic pre-converter.
- Lower the front section of the exhaust pipe and move it sideways.
- Keep the gasket for the front section of the exhaust pipe.
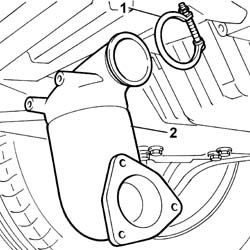
1. Loosen the nut fixing the collar joining the pre-converter to the turbocharger.
2. Remove the catalytic preconverter.
Refitting
- Fit the catalytic pre-converter in the housing on the turbocharger.
1. Tighten the nut fixing the collar joining the pre-converter to the turbocharger to torque.
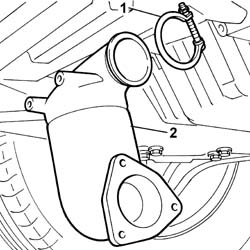
1. Join the flange for the front section of the exhaust pipe to the flange for the catalytic pre-converter tightening the fixing bolts.
- It is advisable to fit a new seal between the two flanges during this operation.
2. Tighten the fixing bolts to torque.
| Value - daNm | Fastening | Component | Ø | |
|---|---|---|---|---|
| (Preconverter) 2.8 | Bolts | EXHAUST PIPE TO ENGINE |
- Tighten the nuts fixing the mounting bracket for the first section of the exhaust pipe to the oil sump.
See in Op. 7055B54 PROTECTION/GUARD under engine - R.R.
- Lower the lift and remove the vehicle from the lift.
Parts & tools for this job Staging For 2002 Lancia Thesis
- PARTExhaust gasketSearch: Lancia Thesis 2002 exhaust gasket
- TOOLPenetrating oilSearch: penetrating oil
- TOOLOBD2 scannerSearch: OBD2 scanner
Links open Amazon search results in a new tab. As an Amazon Associate I earn from qualifying purchases.