
Timing system protective cover(s) - r + r
- Make
- Alfa Romeo
- Model
- GT Factory Service Manual
- Year
- 2003–2010
- Section
- Timing system › Timing system protective cover(s) - r + r
TIMING SYSTEM PROTECTIVE COVER(S) - R + R
Removing
Position the vehicle on a lift.
Proceed with the removal
Op. 4450B04 RIGHT FRONT WHEEL R R.
Proceed with the removal
Op. 7055B54 UNDER-ENGINE GUARD - R R.
Proceed with the removal
Op. 1016A40 IGNITION COIL COVER ON CYLINDER HEAD- R+R.
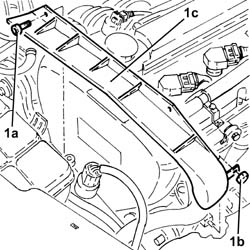
1. Unscrew bolts (1a), nut (1b) and remove the auxiliary drivebelt protection (1c).
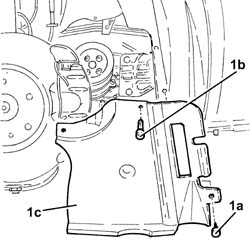
1. Prise open studs (1a), unscrew fastenings (1b) and remove the right front wheel arch dust guard (1c).
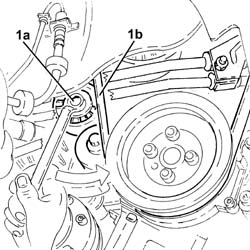
1. Adjust the mobile tensioner (1a) with a wrench and fit the auxiliary drivebelt (1b).
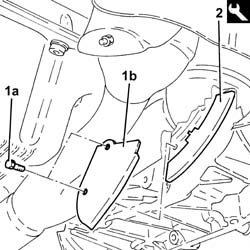
1. Undo the bolts (1a) and remove the protection (1b).
2. Fit the flywheel lock.
| Description | Code | |
|---|---|---|
| 2 | Counter-torque | 1.860.898.000 |
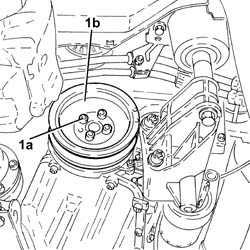
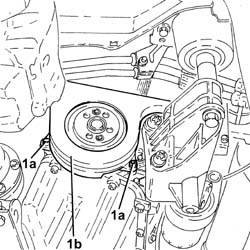
1. Undo the bolts (1a) and remove the crankshaft pulley (1b).
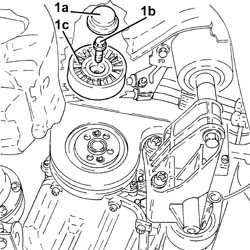
1. Remove plug (1a), undo bolt (1b) and remove the auxiliary drive belt fixed tensioner (1c).
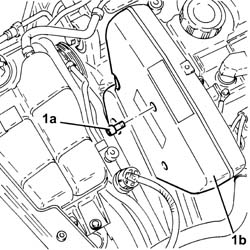
1. Undo the fixing bolts (1a) and remove the upper protective timing cover (1b).
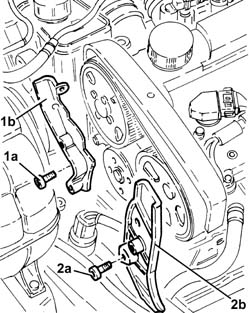
1. Undo the fixing bolts (1a) and remove the right side timing cover (1b).
2. Undo the fixing bolts (2a) and remove the left side timing cover (2b).
1. Undo the fixing bolts (1a) and remove the lower protective timing cover (1b).
Refitting
Fit the lower timing belt covers and secure them using the bolts.
Fit the side timing belt covers and secure them using the bolts.
Fit the upper timing belt covers and secure them using the bolts.
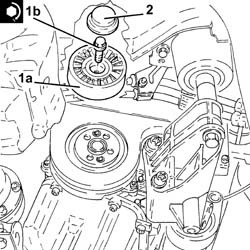
1. Position the engine components single belt fixed tensioner (1a) in its housing and secure it tightening the bolt (1b) to the recommended torque.
| Fastening | Component | Ø | Value (daNm) | |
|---|---|---|---|---|
| 1b | Bolt | SINGLE BELT FIXED TENSIONER VARIOUS | M8 | 2.2 ÷ 2.8 |
2. Refit the auxiliary drivebelt tensioner plug in its seat.
Fit the flywheel lock.
| Description | Code | |
|---|---|---|
| Counter-torque | 1.860.898.000 |
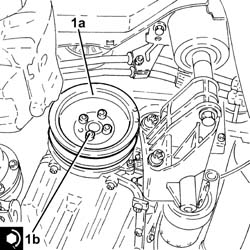
1. Position the crankshaft pulley (1a) in its housing and secure it tightening the bolts (1b) to the recommended torque.
| Fastening | Component | Ø | Value (daNm) | |
|---|---|---|---|---|
| 1b | Bolt | CRANKSHAFT PULLEY | M8 | 2.3 ÷ 2.8 |
Remove the flywheel lock.
| Description | Code | |
|---|---|---|
| Counter-torque | 1.860.898.000 |
Place the protection in its housing and secure it using the bolts.
Turn a wrench anti-clockwise direction on the moving tensioner and fit the engine components single drive belt.
Refit the right front wheel arch dust guard and secure with fastenings and studs.
Refit the auxiliary drivebelt protection and secure with the nut and bolts.
Proceed with the refitting
Op. 1016A40 IGNITION COIL COVER ON CYLINDER HEAD- R+R.
Proceed with the refitting
Op. 7055B54 UNDER-ENGINE GUARD - R R.
Proceed with the refitting
Op. 4450B04 RIGHT FRONT WHEEL R R.
Remove the vehicle from the lift.
Removing
Position the vehicle on a lift.
Proceed with the removal
Op. 4450B04 RIGHT FRONT WHEEL R R.
Proceed with the removal
Op. 7055B64 LH OR RH REFLECTOR(ONE) ON REAR BUMPERS - R R.
Proceed with the removal
Op. 1092G10 SINGLE ENGINE BELT R R.
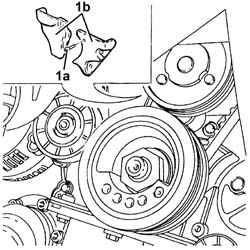
1. Undo the fixing bolts (1a) and remove the upper protective timing cover (1b).
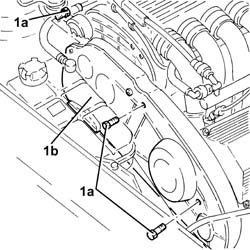
1. Undo the fixing bolts (1a) and remove the lower protective timing cover (1b).
Refitting
Refit the lower timing belt covers and secure them using the bolts.
Fit the upper timing belt covers and secure them using the bolts.
Proceed with the refitting
Op. 1092G10 SINGLE ENGINE BELT R R.
Proceed with the refitting
Op. 7055B64 LH OR RH REFLECTOR(ONE) ON REAR BUMPERS - R R.
Proceed with the refitting
Op. 4450B04 RIGHT FRONT WHEEL R R.
Remove the vehicle from the lift.
Removing
Position the vehicle on a lift.
Make sure that the ignition key is in the OFF position, then disconnect the negative battery terminal (-).
| Description | Connector | |
|---|---|---|
| Battery | See A1B BATTERY ( BATTERY NEGATIVE ) |
Proceed with the removal
Op. 1008C10 POWER UNIT UPPER REACTION LINK R R.
Proceed with the removal
Op. 1060G80 DS ELECTRIC INJECTION CONTROL UNIT - R R.
Proceed with the removal
Op. 4450B04 RIGHT FRONT WHEEL R R.
Proceed with the removal
Op. 7055B54 UNDER-ENGINE GUARD - R R.
Proceed with the removal
Op. 7055B91 RIGHT FRONT WHEEL ARCH LINER - R.R..
Proceed with the removal
Op. 1092G10 SINGLE ENGINE BELT R R.
Proceed with the removal
Op. 1092A10 CRANKSHAFT SERVICES PULLEY - R.R..
Proceed with the removal
Op. 1092G20 ENGINE COMPONENT SINGLE BELT FIXED TENSIONER - ONE - R + R.
1. Undo the fixing bolts (1a) and remove the lower protective timing cover (1b).
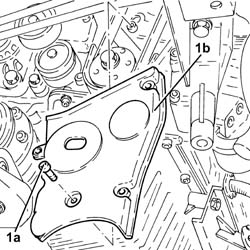
1. Undo the fixing bolts (1a) and remove the lower protective timing cover (1b).
Refitting
Refit the upper timing belt covers and secure them using the bolts.
Fit the lower timing belt covers and secure them using the bolts.
Proceed with the refitting
Op. 1092G20 ENGINE COMPONENT SINGLE BELT FIXED TENSIONER - ONE - R + R.
Proceed with the refitting
Op. 1092A10 CRANKSHAFT SERVICES PULLEY - R.R..
Proceed with the refitting
Op. 1092G10 SINGLE ENGINE BELT R R.
Proceed with the refitting
Op. 7055B91 RIGHT FRONT WHEEL ARCH LINER - R.R..
Proceed with the refitting
Op. 7055B54 UNDER-ENGINE GUARD - R R.
Proceed with the refitting
Op. 4450B04 RIGHT FRONT WHEEL R R.
Proceed with the refitting
Op. 1060G80 DS ELECTRIC INJECTION CONTROL UNIT - R R.
Proceed with the refitting
Op. 1008C10 POWER UNIT UPPER REACTION LINK R R.
Connect the negative battery terminal (-).
Remove the vehicle from the lift.
Removing
Position the vehicle on a lift.
Proceed with the removal
Op. 4450B04 RIGHT FRONT WHEEL R R
Proceed with the removal
Op. 7055B66 ENGINE COMPARTMENT DUST SHIELD PROTECTION IN RIGHT FRONT WHEEL ARCH - R.R.
Proceed with the removal
Op. 1092G10 SINGLE ENGINE BELT R R.
Proceed with the removal
Op. 1092A10 CRANKSHAFT SERVICES PULLEY - R.R..
Proceed with the removal
Op. 1092G20 ENGINE COMPONENT SINGLE BELT FIXED TENSIONER - ONE - R + R.
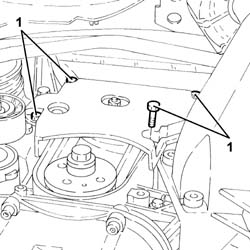
1. Undo the lower bolts fixing the timing belt cover.
1. Unscrew bolts (1a), nut (1b) and remove the auxiliary drivebelt protection (1c).
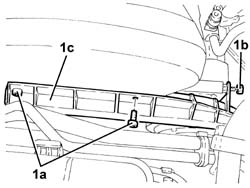
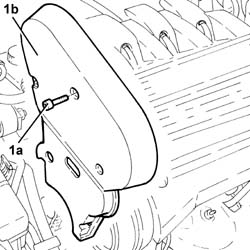
1. Undo the remaining bolt (1a) and remove the protective timing cover (1b).
Proceed with the removal
Op. 1016A40 IGNITION COIL COVER ON CYLINDER HEAD- R+R.
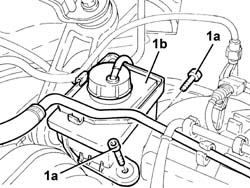
1. Undo the bolts (1a) and move the power steering fluid reservoir (1b) without disconnecting the pipes.
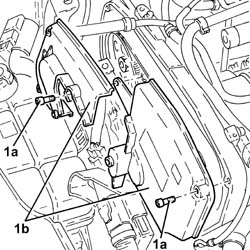
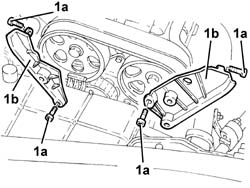
1. Undo the fixing bolts (1a) and remove the side protective timing cover (1b).
Refitting
Refit the side timing belt covers and secure them using the bolts.
Refit the power steering fluid reservoir and secure with bolts.
Proceed with the refitting
Op. 1016A40 IGNITION COIL COVER ON CYLINDER HEAD- R+R.
Refit the upper timing belt cover and secure it using the upper bolt.
Refit the auxiliary drivebelt protection and secure with the bolts and nut.
Tighten the lower bolts fixing the timing belt cover.
Proceed with the refitting
Op. 1092G20 ENGINE COMPONENT SINGLE BELT FIXED TENSIONER - ONE - R + R.
Proceed with the refitting
Op. 1092A10 CRANKSHAFT SERVICES PULLEY - R.R..
Proceed with the refitting
Op. 1092G10 SINGLE ENGINE BELT R R.
Proceed with the refitting
Op. 7055B66 ENGINE COMPARTMENT DUST SHIELD PROTECTION IN RIGHT FRONT WHEEL ARCH - R.R.
Proceed with the refitting
Op. 4450B04 RIGHT FRONT WHEEL R R
Remove the vehicle from the lift.
Parts & tools for this job Staging For 2003 Alfa Romeo GT
- PARTEngine gasket setSearch: Alfa Romeo GT 2003 engine gasket set
- TOOLTorque wrenchSearch: 3/8 inch torque wrench
- TOOLFeeler gauge setSearch: feeler gauge set
Links open Amazon search results in a new tab. As an Amazon Associate I earn from qualifying purchases.