
Pressure pump - r r
- Make
- Fiat
- Model
- Ulysse Factory Service Manual
- Year
- 2002–2010
- Section
- Diesel injection system › Pressure pump - r r
PRESSURE PUMP - R R
Removing
Op. 4450B04 RIGHT FRONT WHEEL R R
Op. 7055B91 RIGHT FRONT WHEEL ARCH LINER - R.R.
Op. 7055B54 UNDER-ENGINE GUARD - R R
Op. 5530B56 BATTERY DRIP TRAY COVER - R.R.
Op. 5010B18 CLIMATE CONTROL UNIT AIR INTAKE - R.R.
Op. 5050B34 WINDSCREEN WIPER ARM/S COMPLETE WITH BLADE - R+R
Op. 7055A18 L/H OR R/H SIDE RUBBING STRIP DECORATIVE SEAL - R+R
Op. 5050B38 WINDSCREEN WIPER ASSEMBLY - R+R OR REPAIR
See in Op. 1008C10
See in Op. 1092G10
See in Op. 1024B54
See in Op. 1092A10
See in Op. 1032D12
See in Op. 1008A46
See in Op. 1032B10
See in Op. 1060E30
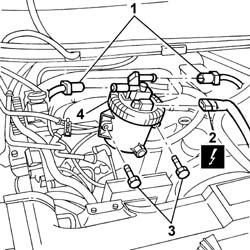
1. Disconnect the three rapid connectors for the fuel pipes from the fuel filter.
2. Disconnect the electrical connection.
3. Undo the bolts fixing the fuel filter to the mounting bracket.
4. Remove the fuel filter complete with filter element.
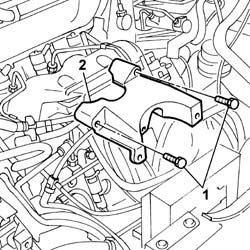
1. Undo the retaining bolts.
2. Remove the fuel filter mounting.
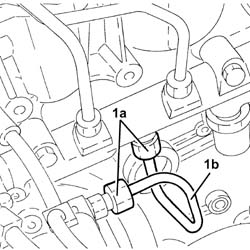
1. Undo the connectors (1a) and remove the pipe from the pressure pump to the fuel manifold (1b).
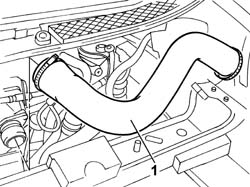
1. Remove the air hose from the intake manifold to the air/air heat exchanger.
- Disconnect the electrical connection for the fuel pressure regulator.
1. Disconnect the electrical connection for the pressure pump third piston deactivating solenoid valve.
2. Undo the bolts fixing the pump to the support.
3. Undo the nut fixing the pump to the support.
4. Remove the pressure pump.
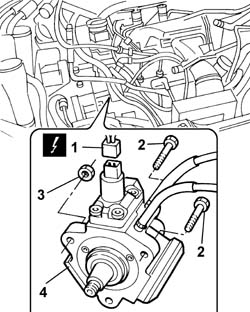
Refitting
- Position the pressure pump on the support.
- Tighten the bolts fixing the pump to the support to torque.
- Connect the electrical connection for the fuel pressure regulator.
- Connect the electrical connection for the pressure pump third piston deactivating solenoid valve.
- Fit the air hose from the intake manifold to the air/air heat exchanger.
- Fit the new pipe from the pressure pump to the fuel manifold.
Each time work is carried out on the pipe from the pressure pump to the fuel manifold it must be replaced with a new one to prevent fuel leaks from the connectors.
- Tighten the connectors on the pressure pump and on the return manifold to torque.
- Fit the fuel filter mounting and tighten the fixing bolts.
- Fit the fuel filter complete with filter element.
- Tighten the bolts fixing the fuel filter to the mounting bracket.
- Connect the electrical connection.
- Connect the three rapid connectors for the fuel pipes to the fuel filter.
See in Op. 1060E30
See in Op. 1032B10
See in Op. 1008A46
See in Op. 1032D12
See in Op. 1092A10
See in Op. 1024B54
See in Op. 1092G10
See in Op. 1008C10
Op. 5050B38 WINDSCREEN WIPER ASSEMBLY - R+R OR REPAIR
Op. 7055A18 L/H OR R/H SIDE RUBBING STRIP DECORATIVE SEAL - R+R
Op. 5050B34 WINDSCREEN WIPER ARM/S COMPLETE WITH BLADE - R+R
Op. 5010B18 CLIMATE CONTROL UNIT AIR INTAKE - R.R.
Op. 5530B56 BATTERY DRIP TRAY COVER - R.R.
Op. 7055B54 UNDER-ENGINE GUARD - R R
Op. 7055B91 RIGHT FRONT WHEEL ARCH LINER - R.R.
Op. 4450B04 RIGHT FRONT WHEEL R R
Removing
Op. 4450B04 RIGHT FRONT WHEEL R R
Op. 7055B91 RIGHT FRONT WHEEL ARCH LINER - R.R.
Op. 7055B54 UNDER-ENGINE GUARD - R R
Op. 5530B56 BATTERY DRIP TRAY COVER - R.R.
Op. 5010B18 CLIMATE CONTROL UNIT AIR INTAKE - R.R.
Op. 5050B34 WINDSCREEN WIPER ARM/S COMPLETE WITH BLADE - R+R
Op. 7055A18 L/H OR R/H SIDE RUBBING STRIP DECORATIVE SEAL - R+R
Op. 5050B38 WINDSCREEN WIPER ASSEMBLY - R+R OR REPAIR
See in Op. 1008C10
See in Op. 1092G10
See in Op. 1024B54
See in Op. 1092A10
See in Op. 1032D12
See in Op. 1008A46
See in Op. 1032B10
See in Op. 1060E30
1. Disconnect the three rapid connectors for the fuel pipes from the fuel filter.
2. Disconnect the electrical connection.
3. Undo the bolts fixing the fuel filter to the mounting bracket.
4. Remove the fuel filter complete with filter element.
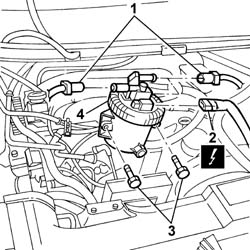
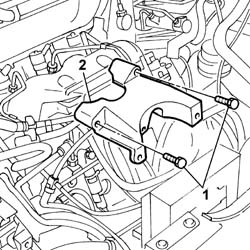
1. Undo the retaining bolts.
2. Remove the fuel filter mounting.
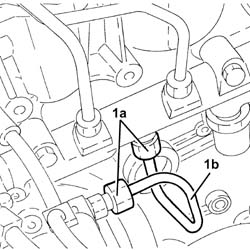
1. Undo the connectors (1a) and remove the pipe from pressure pump to the fuel manifold (1b).
1. Remove the air hose from the intake manifold to the air/air heat exchanger.
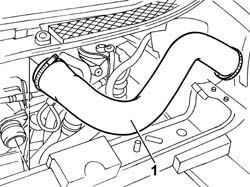
- Disconnect the electrical connection for the fuel pressure regulator.
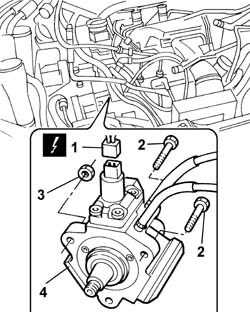
1. Disconnect the electrical connection for the pressure pump third piston deactivating solenoid valve.
2. Undo the bolts fixing the pump to the support.
3. Undo the nut fixing the pump to the support.
4. Remove the pressure pump.
Refitting
- Position the pressure pump on the support.
- Tighten the bolts fixing the pump to the support to torque.
- Connect the electrical connection for the fuel pressure regulator.
- Connect the electrical connection for the pressure pump third piston deactivating solenoid valve.
- Fit the air hose from the intake manifold to the air/air heat exchanger.
- Fit the new pipe from the pressure pump to the fuel manifold.
Each time work is carried out on the pipe from the pressure pump to the fuel manifold it must be replaced with a new one to prevent fuel leaks from the connectors.
- Tighten the connectors on the pressure pump and on the return manifold to torque.
- Fit the fuel filter mounting and tighten the fixing bolts.
- Fit the fuel filter complete with filter element.
- Tighten the bolts fixing the fuel filter to the mounting bracket.
- Connect the electrical connection.
- Connect the three rapid connectors for the fuel pipes to the fuel filter.
See in Op. 1060E30
See in Op. 1032B10
See in Op. 1008A46
See in Op. 1032D12
See in Op. 1092A10
See in Op. 1024B54
See in Op. 1092G10
See in Op. 1008C10
Op. 5050B38 WINDSCREEN WIPER ASSEMBLY - R+R OR REPAIR
Op. 7055A18 L/H OR R/H SIDE RUBBING STRIP DECORATIVE SEAL - R+R
Op. 5050B34 WINDSCREEN WIPER ARM/S COMPLETE WITH BLADE - R+R
Op. 5010B18 CLIMATE CONTROL UNIT AIR INTAKE - R.R.
Op. 5530B56 BATTERY DRIP TRAY COVER - R.R.
Op. 7055B54 UNDER-ENGINE GUARD - R R
Parts & tools for this job Staging For 2002 Fiat Ulysse
- PARTGlow plugsSearch: Fiat Ulysse 2002 glow plugs
- TOOLGlow plug socketSearch: glow plug socket
- TOOLDiesel compression testerSearch: diesel compression tester
Links open Amazon search results in a new tab. As an Amazon Associate I earn from qualifying purchases.