
Introduction
- Make
- Fiat
- Model
- Ulysse Factory Service Manual
- Year
- 2002–2010
- Section
- General › Introduction
INTRODUCTION
The vehicle interior has been designed and produced with the main aim of offering all the occupants the best that is available in terms of comfort and on board living conditions.
With this in mind, in addition to taking particular care over the fundamental aspects: design, high specification level and ergonomics, a great deal of attention has been paid to everything that could contribute to making the consumer truly satisfied.
FACIA
The structure of the dashboard is in two separate sections:
- Upper arch
- Actual dashboard
The standard dashboard is illustrated below
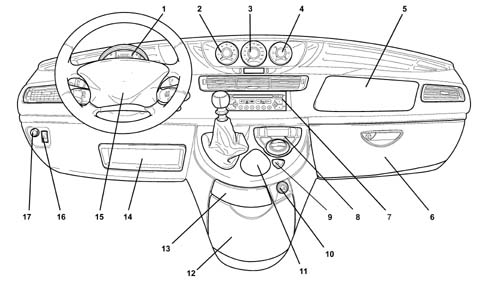
- 1 Instrument panel: milometer display and warning lights
- 2 Rev counter
- 3 Speedometer
- 4 Fuel gauge with reserve warning light and coolant temperature gauge and overheating warning light
- 5 Passenger air bag
- 6 Glove compartment
- 7 Radio
- 8 Automatic climate control system controls
- 9 Hazard warning lights button
- 10 Cigar lighter
- 11 Coin holder
- 12 Centre console
- 13 Ashtray and oddments pocket
- 14 Document holder
- 15 Driver''s air bag
- 16 Headlamp alignment corrector (except versions with xenon headlamps)
- 17 ASR system off/on
The top of the range dashboard is illustrated below
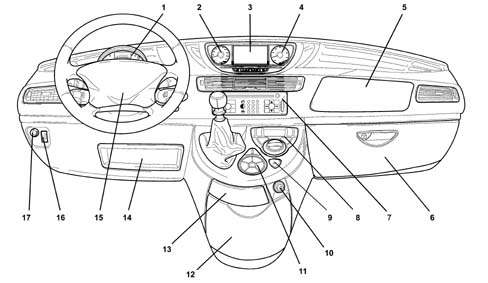
- 1 Instrument panel: milometer display and warning lights
- 2 Speedometer
- 3 Radio/Connect infotelematic system display
- 4 Rev counter
- 5 Passenger air bag
- 6 Glove compartment
- 7 Infotelematic system
- 8 Automatic climate control system controls
- 9 Hazard warning lights button
- 10 Cigar lighter
- 11 Connect infotelematic system remote controls
- 12 Centre console
- 13 Ashtray and oddments pocket
- 14 Document holder
- 15 Driver''s air bag
- 16 Headlamp alignment corrector (except versions with xenon headlamps)
- 17 ASR system off/on
Arc
The section above consists of two half casings matched together by "welding" and then, in turn, fastened to the dashboard casing.
The two half casings are produced by injecting polypropylene material to ensure good strength properties.
The top part is dark grey with opaque embossing which provides it with a non reflective effect whilst the bottom section differs in appearance (aluminium coloured for FIAT and dark grey for LANCIA).
Depending on the Marque and the version of the telematic system, there are two very different possible configurations for the instrument panel under the arch:
- panel with "3 spheres", i.e. 3 analagoue instruments which, located on the longitudinal axis of the vehicle, appear to be suspended from the arch. The three spheres respectively contain: speedometer, rev counter, fuel gauge/coolant temperature gauge.
- panel with 7" 16/9 colour screen. This instrument panel, which is part of the telematic system, changes the appearance of the dashboard considerably; in effect, the three spheres conceded their position to this single unit which contains the 7" 16/9 high definition colour screen in the centre with the speedometer to its left and the rev counter on its right.
Dashboard
The dashboard is in three pieces: main insert, front panel and lower panel, the latter is made from a soft foam material, covered in dark grey coloured laminte; the finished surface of the laminate gives it an opaque chrome effect which is aesthetically pleasing on the eye and pleasant to touch as well as having a non-glare effect.
There are two oddments pockets with flaps on the horizontal part of the dashboard.
As far as the interior of the dashboard is concerned, it is the component that differs the most between the FIAT and LANCIA versions.
On FIAT vehicles it is covered with fabric:
- glove compartments on the horizontal part of the dashboard,
- passenger side glove compartment flap.
On LANCIA vehicles the entire top section of the dashboard is covered in alcantara (horizontal section and front section).
The following are inserted in the dashboard:
- Horizontal section: 2 closed compartments, 1 open compartment (only for the instrument panel with the Connect Nav +)
- Front section: 2 side ventilation vents and adjustment controls, 1 centre ventilation vent with three sections and adjustment controls, passenger air bag
- Lower section: ESP deactivation button (where fitted), headlamp alignment corrector, open oddments pocket (on the left of the steering column), passenger oddments pocket.
The separation between the front section and the lower section of the dashboard is visually defined by the presence of a trim that continues along the door panels; in this case too, the LANCIA and FIAT versions differ both in appearance and materials:
- LANCIA: mahogany wood
- FIAT: plastic material with a satin chrome appearance.
The lower section of the dashboard is made from a rigid material in the same colour as the upper section (dary grey).
Centre console
The upper section is the control area which contains:
- gear lever (manual or automatic transmission),
- climate control system controls and display,
- telematic system controls,
- hazard warning lights button,
- small grille (on the right) for the interior temperature sensor.
The section straight underneath, which is retractable, contains:
- ashtray, which can be removed to become a glass holder,
- 1 glass holder,
- compartment for placing the cigar lighter (there is a cigar lighter/12V current socket at the side, on the passenger side).
In the lower part of the console there is a refrigerated compartment with a flap that can house three cans.
The console is made by polypropylene injection moulding.
Door panels
The door panels, like the dashboard, differ considerably between the FIAT and LANCIA versions:
- FIAT: the door panels have laminated perimeters, the same as the dashboard and a soft centre insert covered in the same fabric used on the dashboard and colour co-ordinated with the seats.
- LANCIA: the door panels have alcantara perimeters, continuing the theme of the covered sections of the dashboard and the centre section of the panel is covered in laminate with foam underneath.
The front door panel houses:
- rigid oddments pocket
- grab handle/door pull
- electric windows control panel (driver''s side: includes 2/4 control buttons, with a special safety design, automatic operation for opening all the windows and for closing the driver and passenger windows)
- electric child lock button
- 2 buttons for activating and adjusting the door mirror
- plastic door opening lever painted to give a metal effect
- speaker trim, in the lower front section
- lamp lighting the footwell area and the road (with the door open)
- reflector warning that the door is open
The sliding door panel houses:
- rigid oddments pocket
- grab handle/door pull
- electric windows control panel
- electric windows control panel
- safety closing knob, remains flush in closed position
Roof
The ceiling and front pillar covers are covered in a light grey coloured fabric with a layer of soft foam underneath.
The ceiling houses:
- 2 sun visors with courtesy mirrors with covers
- centre front courtesy light with 2 built in spot lights
- courtesy light for the 2nd row
- courtesy light for the 3rd row (depending on the version)
- 5 grab handles
Grab handle on pillar
The handle is fastened to the centre pillar and is designed to facilitate getting in and out of the vehicle for the passengers in the 2nd row.
As far as LANCIA versions are concerned, the handle is covered in leather with a layer of soft foam underneath.
Oddments pocket
The oddments pockets are very different from those of the competition; the total volume of these compartments is so large that the vehicle really has been designed with the user in mind.
In practical terms, in addition to a very spacious luggage compartment which can be adapted to suit different requirements, there are numerous and generous compartments located around the vehicle, namely:
Front passenger compartment:
- main glove compartment (12.3 lt.), passenger side, lockable, lit, with a housing on the flap.
- compartment in the dashboard (4.7 lt.), passenger side, with special compartments and sound insulation,
- compartment in the dashboard (1.25 lt.), driver''s side, with special compartments (for coins, pens, remote control, mobile phone, etc.) and sound insulation,
- open compartment under the instrument panel with sound insulation (only where colour screen instrument panel is fitted),
- open compartment under the steering column (2.5 lt. 210x125x50 mm) driver''s side where the Owner''s Handbook can be stored,
- removable ashtray plus can/bottle holder in centre console which can house the cigar lighter when the 12V current socket under the dashboard is occupied,
- 12V socket/cigar lighter housing in the passenger side console,
- spectacle holder in the ceiling, driver''s side,
- document holder in the sun visor,
- refrigerated compartment in the lower section of the centre console with three holders for three cans of drink
- front door panels with housings for a 1.5 lt. bottle, a can and a space for A4 size documents
- compartment under the driver and passenger seats (depending on the trim level)
- flexible belt on the front seat casing, to retain objects
Centre passenger compartment:
- front seat backrest: pocket, pen holder, folding shelf for a glass
- rear door panels with housing for 1.5 lt. bottle, can holder and file holder
- 5 hooks on the handles on the ceiling
Passenger compartment rear section and boot area:
- 2 glasses holders on the rear seat rigid backrest (available when the backrest is in a horizontal position)
- wheel arch area: 1.5 lt. bottle holder, can holder and an open compartment where a mobile phone or packet of tissues can be stored
- umbrella holder in the rigid rear parcel shelf
- housing in the left/right panel (both 7.5 lt.) for storing various items (work gloves, can of oil, cloths)
- boot area: a luggage compartment retaining net which can be positioned on the floor on arranged as a "hammock"
There is also a small rubbish container which can be positioned in any of the bottle holders like the removable ashtray by the driver''s seat which can, in turn, be placed in any of the can holders in the rear panels.
Lastly, the warning triangle can be placed behind either of the two air extraction grilles on the rear pillar.
Sun blinds: the vehicle has a particularly large glass area as the result of which there is a need to provide protection from the sun''s rays through the adoption of:
- sun blinds for the 2nd row, 3rd row and tailgate (where fitted): these are sliding type with a reel fitted in the door panel/tailgate and are easy to position thanks to the hooks; whilst providing protection from the sun''s rays it is still possible to see outside clearly whilst looking from the inside.
Luggage cover blind (where fitted): a sliding luggage cover blind has been developed for this vehicle in conjunction with the rigid rear parcel shelf which has a dual function of meeting the needs of the 5 seater versions with 2 rows of seats and the 6/7/8 seater versions with 3 rows of seats.
The PVC blind is connected to a reel, fastened to the left and right door panels, behind the second row, and can be extended until it is attached to the rigid rear parcel shelf covered in "moquette" which, in turn, is fastened to the left and right rear pillars; the rear parcel shelf, which has a housing for an umbrella, can therefore only be used on versions with 3 rows of seats.
Restraining nets (fitted as standard starting from Lev. 2): to prevent objects which would be constantly moving around whilst driving, there is a luggage restraining net available which, thanks to the rings on the floor panel (4) in the luggage compartment and the lower section of the rear pillar (2), allow objects placed on the floor panel to be restrained or else placed in a hammock type arrangement in the boot.
Restraining nets (fitted as standard starting from Lev. 2): to prevent objects which would move around constantly whilst driving, a luggage restraining net is available which can be fastened using the rings located on the floor panel
High load restraining net: this net, made from a semirigid plastic material, is located behind the 2nd row and is fastened through rings on the floor and the ceiling (hidden behind a cover); it has a safety function to prevent intrusions and is available as an option.
SEATS
The design of the shape of the seats have been developed with the main aim of providing even support for the entire body to ensure maximum comfort, especially on long journies.
In addition, special technology has been used to match the cover and the upholstery which allows the stitching (which can be annoying to the touch) to be kept to a minimum and to produce much more interesting shapes than using conventional technology.
This "in situ" technology basically consists of directly matching the defined shape, the foam and the cover during the moulding process.
Front seats
Backrest
It has an ample concave curve and extensive support right up to shoulder level to wrap around the back evenly; lower down, the presence of an accentuated protrusion, supported by a strong spring located behind the foam, guarantees excellent lumbar support.
The shape of the backrest created in this way prevents the rotation of the pelvis thereby guaranteeing that the spine is kept in the "S" shape; this configuration avoids the vertebra from coming into contact and compressing the discs.
Side container
This is sufficiently pronounced to guarantee that the curved shape is maintained but, at the same time, it is still possible to sit comfortably in the seat and, in the case of the rear seats, to move with ease from one seat to another.
Cushion
The length of the cushion has been designed to provide good support for the legs and ensure that the pedals can be easily reached and used, especially by those who are small in stature.
Backrest with plastic shell
The adoption of a plastic shell offers various advantages, such as:
- it does not get dirty
- when items are placed in the pocket at the bottom this does not disturb the occupant of the seat
- there is a small compartment at the top for a pen/pencil
- there is access to the inside of the backrest for servicing operations through a partial dismantling which takes less time
In addition, the backrest is fitted with a retractable table with a glass holder.
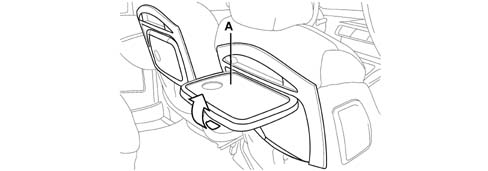
- A - open backrest
Head restraints
The head restraints have two special features:
- the concave shape of the front section,
- the possibility of lengthwise adjustment, at the top, all designed to increase the surface area in contact with the nape of the neck, rather than the top of the head, resulting in being less tiring on the neck.
The height adjustment (100 mm travel) is continous (no different stages) and effortless and can be done with one hand only.
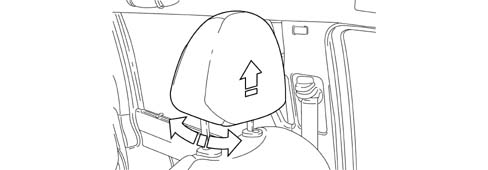
Height adjustment (driver only)
This device allows easy and precise adjustment, irrespective of the weight of the driver.
It can be extended by 50 mm and the position of the cushion changes during the adjustment, i.e.:
- the cushion assumes a horizontal position during an upwards adjustment,
- the rear of the cushion moves downwards during a downwards adjustment to be more comfortable for larger people.
The adjustment lever is on the right hand side, halfway along the cushion and is horizontal when in the rest position.
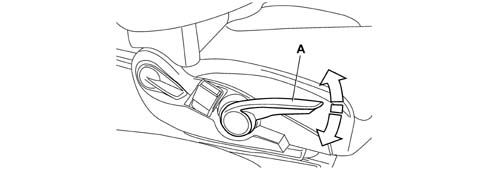
- A - seat height adjustment lever
Backrest angle adjustment
The adjustment is carried out using a lever, located on the backrest, which allows the seat to be adjusted through an angle of 69° (- 19° / + 50°)
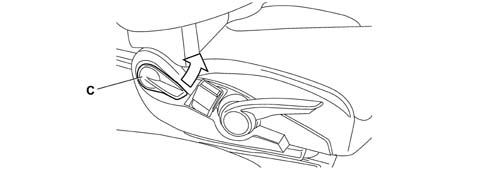
- B - seat angle adjustment lever
Lumbar adjustment (driver only and level 2)
This adjustment is carried out using a reduced travel lever (120° angle) which is more practical and easier than a knob.
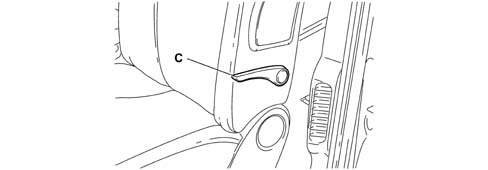
- C - lumbar adjustment lever
Reach adjustment
This adjustment is carried out by raising the lever located under the cushion at the front; the travel for the adjustment is 200 mm (currently on the Ulysse/Zeta the travel is 150 mm).
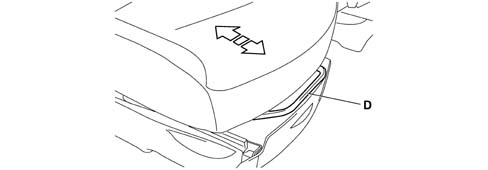
- D - lengthwise adjustment lever
Seat rotation (where fitted)
The front seats can rotate through 180° which makes it possible to create a "lounge" configuration (which can obviously only be used when the vehicle is stationary).
The operations that need to be carried out to produce this "lounge" configuration are:
- make sure that the seat height adjustment is over halfway so that the mechanical lock is exceeded (for the driver''s seat)
- place the seat in the completely forward position and the backrest in a vertical position, then lift up lever E, located behind the lengthwise adjustment control, turning the seat at the same
- with the handbrake lever applied, the rotation of the driver''s seat is limited to 180 °; button F must therefore be pulled forward and the lever lowered. The vehicle is, however, braked in this position.
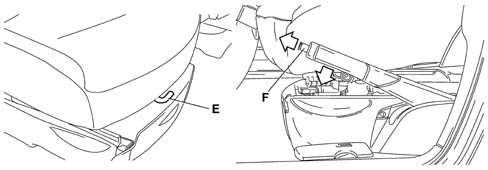
- E - seat rotation release lever
- F - handbrake button
Armrest (from level 2)
This adjustment device in addition to being precise, allows the armrest to be placed in a horizontal position even when the backrest is tilted completely backwards (50° in relation to the vertical position).
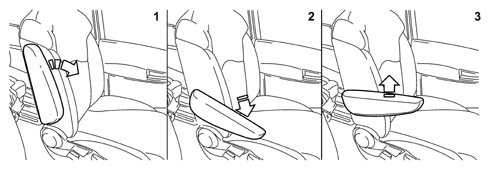
Proceed as follows to adjust the armrest:
- lift up the armrest and place it in position 1,
- lower the armrest until the end of travel position, position 2,
- lift up the armrest placing it in the desired position, position 3.
Seat with heated cushion
From level 1 onwards heated seats are available on request for the 1st row seats with the controls (three position) located on the right side of the seat.
Electrical adjustments with memories
There are three possible adjustment for the electric seats that can be memorized, namely:
- lengthwise
- height
- backrest angle
the adjustment of the door mirrors are also memorized in conjunction with the seat adjustment.
The memorizing system comprises:
- a special control unit incorporated in the seat which has two possible memories (M1/M2)
- 2 buttons for carrying out all the electrical adjustments
- 3 buttons on the right side of the driver''s seat casing: button 1 for defining adjustment 1, button 2 for defining adjustment 2 and M for confirming the memorizing of positions 1 and 2 (which become M1 and M2),
- electronic system on the steering column switch unit which receives information from the seat control unit and compares it, when the door is opened using the remote control or the key is inserted, with that memorized by the specific control unit when the door is first shut.
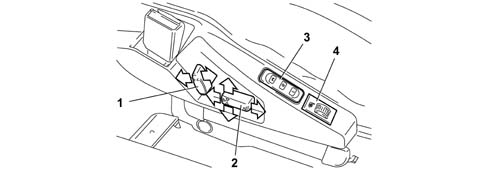
- 1 backrest angle adjustment
- 2 seat height and lengthwise adjustment
- 3 seat position memorizing contol panel
- 4 seat heating regulator
12 Volt socket
The 12V socket is located in the rear of the driver''s seat casing and is easily accessible for the driver, 1st row passenger and the passenger in the centre of the 2nd row.
The socket can be used for recharging a mobile phone, for connecting a baby bottle warmer or for connecting a games console (play station).
Flexible belt
Each seat ian the 1st row, from level 2 onwards, has a flexible belt attached to the casing that can be used to house objects like maps; in addition, the two belts (located on the left and right seats) can be attached between the two seats creating a flexible space where items such as bags or laptops can be placed.
Rear seats
The main new features compared with the current version of the Ulysse are:
- all the rear seats are the same size, including the middle one in the 2nd row (470 mm),
- the centre seat has an inertia reel belt,
- all the controls are dual (left and right sides),
- the lengthwise adjustment is continuous on guides,
- the lengthwise adjustment can be carried out from the next row,
- dual function folding control,
- seat packing on the left and right sides,
- backrest with plastic shell,
- retractable head restraint,
- ISOFEX fastenings.
All the seats in the 2nd and 3rd rows can be easily extracted from the guides and are interchangeable; the middle seat in the 2nd row can therefore even be relocated to the 3rd row on the left (area with a reinforced floor).
Backrest angle adjustment
This operation is carried out using the lever on either the left or right side of the backrest which allows a rapid adjustment through an angle of 69° (-40° / +65°).
To carry out the adjustment, whilst remaining seated, lift up lever A and place the backrest in the desired position, then release the lever.
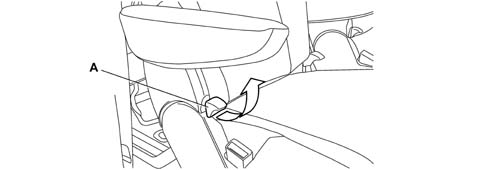
- A - backrest adjustment lever
Reach adjustment
This adjustment is carried out using the lever under the cushion at the front which allows the seat to slide on aluminium guides through a travel of 150 mm (current versions of the Ulysse/Zeta have two fixed positions, 120 mm apart).
For the adjustment of the rear seats, lift lever B then move the seat forwards or backwards until the desired position is reached.
The second row seat can be slid lengthwise, from the third row, by pulling handle C and moving the seat at the same time.
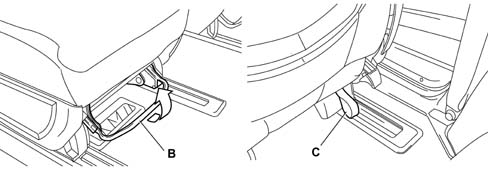
- B - lengthwise adjustment lever (front)
- C - lengthwise adjustment lever (rear)
Seat folding
To faciliate access to the 3rd row, all the rear side seats are fitted with a control (a small lever located on both the left and the right on the backrest) which folds the seat in a single manoeuvre.
The seat remains in position, even whilst driving, thanks to a spring.
The operation of folding the seat can be carried out easily in one go.
For the third row seats:
- to get in from the outside, lift up lever A from the outside and fold the complete seat forwards,
- to get out, lift lever D and fold the seat forwards.
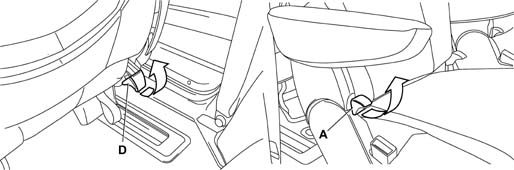
- A - seat folding lever (backrest adjustment)
- D - seat folding lever (rear)
Seat with backrest folded over into horizontal position
If you wish to place the backrest in a horizontal position, proceed as follows:
- Side seats: place the seat in the folded position and then turn the seat backwards or gently operate the control (located on the left/right of the backrest) which releases the backrest and place it in a horizontal position
- Centre seat: adjust the backrest release control located at the top of the backrest in the centre
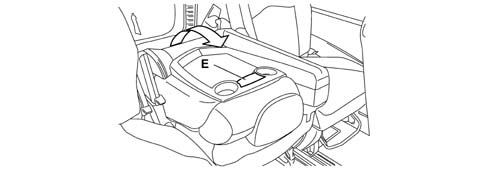
- E - backrest folding lever
Dual function control for "wallet" configuration
The side seats in the 2nd and 3rd rows are fitted with a control, located on the right near the backrest/cushion adjustment, which allows two functions to be carried out in quick succession: firstly, releasing the seat rear feet from the guides, then continuing to rotate the seat it assumes the "wallet" configuration; whilst adjusting the head restraints, if they are in the raised position, they retract with the seat forwards.
Before bing placed in a horizontal position and later on, by pulling the handle, positioned behind at the bottom on the left, the centre seat rotates and assumes the "wallet" position.
The "wallet" configuration produced in this way remains stable, even whilst driving, thanks to the opposing force of a spring, whilst a belt is used connected to the head restraint of the middle seat in the 2nd row; this prevents the sudden and unwanted fall of the seat onto the guides.
This control with a kinematic motion makes a normally complicated movement simple:
- the operation can be carried out quickly and with minimum effort,
- the head restraint does not have to be placed in the rest position because, at the time of folding over, the head restraint is retracted into the seat backrest.
In addition, when loading luggage, access can be gained from the luggage compartment to the 3rd row seats by placing them in the "wallet" position using the handle at the bottom left and, as a result, the capacity of the luggage compartment can be increased through a quick, simple manoeuvre.
Seat packaging on one side
The arrangement of the sliding guides, used for the lengthwise adjustment, has been designed to allow "packing" of the four seats, in a row, behind the front seats (on both sides) after they have been folded over.
Seat release from the guides
The following manoeuvres should be carried out:
- fold the seat over ("wallet" position)
- grab the upper bar with one hand
- with the other hand, pull lever F downwards and move it closer to the lower bar.
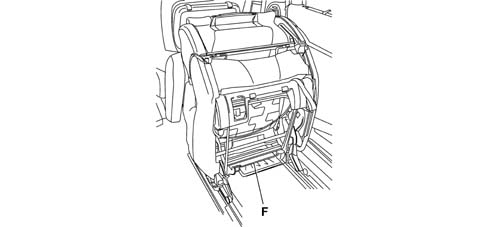
- F - seat release lever
Attaching the seat to the guides
This operation is extremely simple: simply position the small seat sliding wheels on the guides and push downwards.
Seat lifting control
All the rear seats have a control at the rear of the seat (lever at the bottom right) which allows the seat to be raised from behind (see rear seat folding).
Rear backrest
The plastic shell on the backrest has two housings for two cans and a larger area (~ A4) with the backrest folded.
Retractable head restraint
The head restraints are the retractable type; in effect, in the rest position they are in line with the top of the backrest and allow good rear visibility.
The height adjustment is continuous and can be carried out using one hand. To lower the head restraint simply push the top part forward and then press downward: this operation can be done with one hand.
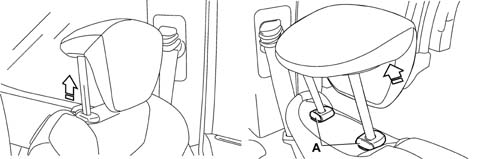
- A - head restraint release mechanism
Side seat seat belt adjustment
The seat belt mountings for the 1st and 2nd rows are adjustment by pressing the knob and, at the same time, moving the ring (on the centre pillar) up or down; the mounting for the 3rd row is fixed.
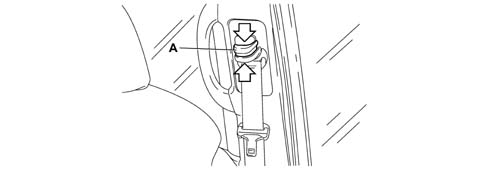
- A - seat belt height adjustment mechanism
2nd row middle seat seat belt
The middle seat, which can be removed like the seats in the 2nd and 3rd rows, has a seat belt with a three point mounting.
Seat arrangement
Depending on the version, the arrangement of the seats can be altered using the special housings in the floor.
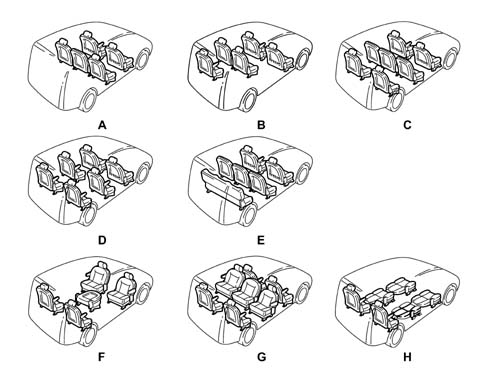
- A - 5 seater version
- B - arrangement with seats in line on the left (allows more lengthwise luggage space)
- C - 5 seater plus 2 version
- D - 6 seater version
- E - 5 seater version plus rear bench
- F - "games room" layout with centre table
- G - "rear lounge" layout
- H - "couchette" layout (second row front and rear seat backrests folded backwards).
6 seater configurations ("Coach")
The special features of this 6 seater configuration are:
- the 6 seats are arranged in three rows (+2+2) and the sliding guides are arranged on the same axis
- all the front and rear seats have two armrests
8 seater configuration
The 8 seats are produced by using a bench which has the following features:
- continuous lengthwise adjustment on guides (150 mm travel)
- backrest folds into horizontal position
- backrest with fixed comfort position at an angle of 23°
- inertia reel seat belt for middle seat
- 3 head restraints
ISOFIX mountings
The rear side seats in the 2nd and 3rd rows are fitted with ISOFIX mountings which make it possible to fit a special child seat (without using the vehicle seat belt).
The child seat, which can be purchased from Linea Accessori is, in turn, fitted with special brackets which attach to the fastenings on the seat frame, making it quick to fit and secure.
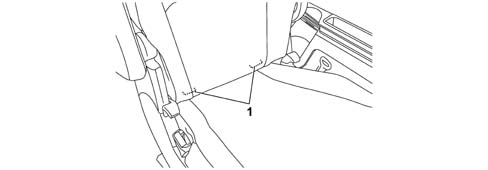
- 1 isofix mountings
Safety
To avoid driving with the bench and/or middle seat for the 2nd row (both with inertia reel seat belts) not correctly attached, the backrest can only be placed in a vertical position if the bench/middle seat "feet" are correctly inserted in the guides.
CLEANING SEATS
Cloth or velour seats
Remove dust and foreign matter using a vacuum cleaner and then a dampened brush made from natural bristles. Alternatively, adhesive roller brushes can be used to remove any foreign bodies.
Rub the seats with a sponge soaked in a solution of neutral detergent and water.
The use of special products available on the market is recommended for the removal of any grease marks, taking special care to follow the instructions.
The formation of down on velour is not a sign of any defect/wear: this effect is caused by static electricity and can be removed by cleaning appropriately.
Leather or alcantara seats
Remove dry dirt using either a chamois leather or a slightly dampened cloth without rubbing too hard.
Remove any liquid or grease stains using an absorbent dry cloth, without rubbing. Then go over with a dry cloth or chamois leather dampened with neutral soap foam and water.
If the stain persists, use special products taking care to follow the instructions. Never use alcohol or alcohol based products.
Parts & tools for this job Staging For 2002 Fiat Ulysse
- TOOLTrim removal tool kitSearch: trim removal tool kit
- PARTTouch-up paintSearch: Fiat touch up paint
- PARTPanel clip assortmentSearch: Fiat panel clips assortment
Links open Amazon search results in a new tab. As an Amazon Associate I earn from qualifying purchases.