
Piston connecting rod set - r r
- Make
- Fiat
- Model
- Panda Factory Service Manual
- Year
- 2003–2012
- Section
- Pistons and connecting rods › Piston connecting rod set - r r
Piston connecting rod set - r r
Refer to op. 1028H21 piston with connecting rod - r r
Refer to op. 1028H21 piston with connecting rod - r r
Removing
Remove the car from the ramps.
- 0010T84 coolant for air conditioning system dehydrate and recharge
- 4450B04 right front wheel r r
- 5530B52 Battery DRIP TRAY/SUPPORT - R.R.
- 1060G90 diesel injection wiring harness - r r
- 1092G11 Engine components single drive BELT - R.R. for versions with air conditioning
- 1092A12 crankshaft pulley - r+r for versions with air conditioner
- 1088B10 engine cooling tank - r + r
- 1016B10 single cylinder head extension - change gasket
- 1016C11 single cylinder head-r r gasket for versions with air conditioner
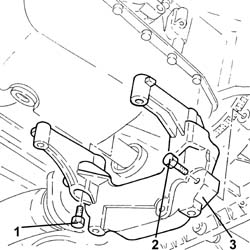
1. Undo the bolts securing the bracket between the manual gearbox/engine to the gearbox.
2. Undo the bolts securing the bracket between the manual gearbox/engine to the gearbox.
3. Remove the bracket between the manual gearbox/engine.
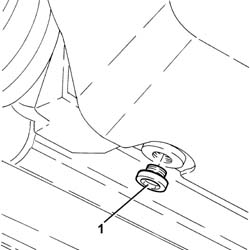
1. Undo the drain plug on the engine sump and drain the oil fully into a suitable container.
Do not disperse the oil into the environment, as indiscriminate dispersal of this product causes pollution.
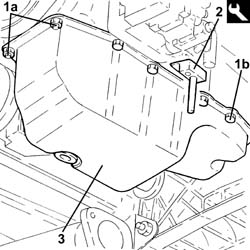
1. Undo nuts (1a) and bolts (1b) securing the oil sump to the crankcase.
2. Use the tool to cut the crankcase sump sealant.
| Name | Country | |
|---|---|---|
| 2 | Blade | 1.870.718.000 |
3. Remove the crankcase sump.
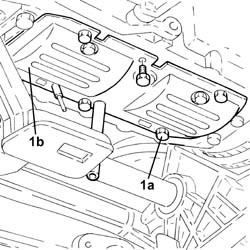
1. Undo the bolts (1a) and remove the crankcase oil sump partition (1b).
Remove the pin previously fitted from the hole in the gearbox.
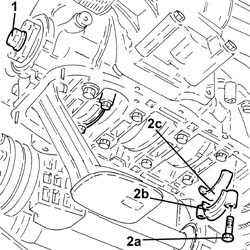
1. Adjust the bolt securing the pulley mount flange to the crankshaf to rotate the crankshaft until the pistons for cylinders 1 and 4 are at B.D.C.
2. Undo bolts (2a) and remove big end bearing caps (2b) complete with bearing shells (2c) for cylinders 1 and 4.
1. Release and remove the piston-connecting rod assemblies (1a), complete with half-bearings (1b) for cylinders 1 and 4.
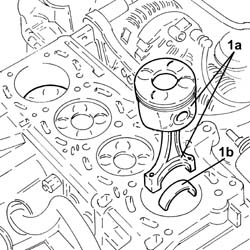
Follow the same procedure to remove the piston-connecting rod assemblies for the 2nd and 3rd cylinders.
Refitting
Clean any sealant residues from the matching surfaces between the lower engine crankcase and the crankcase sump.
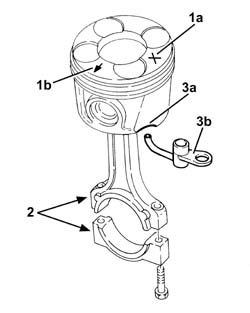
Fit the piston-connecting rod assemblies in accodance with the following references.
1. Piston category (1a) and arrow (1b) indicating timing side.
2. Area where number of cylinder bore/liner to which the connecting rod belongs is stamped.
3. Drain (3b) on the piston skirt must be aligned with oil spray (3b).
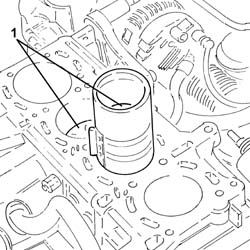
1. Place the piston-connecting rod assemblies for the 2nd and 3rd cylinders, complete with half-bearings back in their housings using a suitable fitting tool.
The big end bearing shells can be identified as follows:
upper big end bearing shells, dark coloured three metal connecting rod side;
lower big end bearing shells, light coloured two metal cap side with an opening.
Do not swap the position of the big end bearing shells.
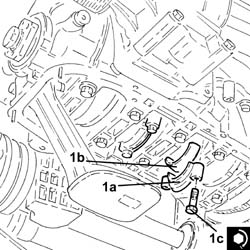
1. Fit the cylinder 2 and 3 connecting rod caps (1a), complete with half-bearings (1b), and secure by tightening the bolts (1c) to the recommended torque.
The big end bearing shells can be identified as follows:
upper big end bearing shells, dark coloured three metal connecting rod side;
lower big end bearing shells, light coloured two metal cap side with an opening.
Do not swap the position of the big end bearing shells.
| Fastening | Component | Ø | Value (daNm) | |
|---|---|---|---|---|
| 1c | Bolt | BIG END BEARING CAPS | M8 | 1.9 ÷ 2.1 + 40? ± 2? |
Use the tool for angular tightening of the connecting rod cap bolts.
| Name | Country | |
|---|---|---|
| Protractor | 1.860.942.000 |
Follow the same procedure when fitting the piston-connecting rod assemblies for the 1st and 4th cylinders.
Fit a suitable pin through the hole in the gearbox.
Fit the crankcase oil sump partition and fix it tightening the bolts to torque.
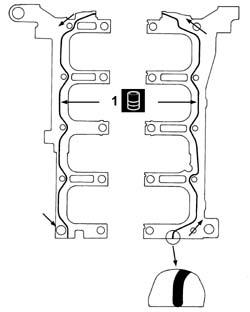
1. Apply a bead of recommended silicon sealant to the contact surfaces of the crankcase sump and the lower engine crankcase as illustrated in the diagram below.
No breaks are allowed in the sealant strip. Sealant strip diameter must be 3.5 0.5 mm.
| Type | Component | Name | Qty. | |
|---|---|---|---|---|
| 1 | Sealant | OIL SUMP | LOCTITE 5900 |
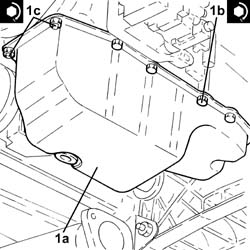
1. Place the crankcase sump (1a) back in its housing and secure it by tightening the bolts (1b) and the nuts (1c) to the recommended torque.
| Fastening | Component | Ø | Value (daNm) | |
|---|---|---|---|---|
| 1b | Bolt | OIL SUMP | M6 | (Lower engine crankcase side) 0.8 ÷ 1.0 |
| Fastening | Component | Ø | Value (daNm) | |
|---|---|---|---|---|
| 1c | Nut | OIL SUMP | M6 | (Timing cover side) 0.8 ÷ 1.0 |
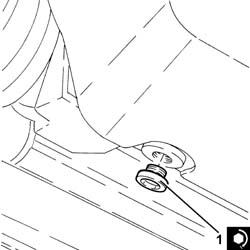
1. Tighten the crankcase sump drain plug to the recommended torque.
| Fastening | Component | Ø | Value (daNm) | |
|---|---|---|---|---|
| 1 | ENGINE OIL DRAIN PLUG | M14 | (Crankcase sump side) 1.8 ÷ 2.2 |
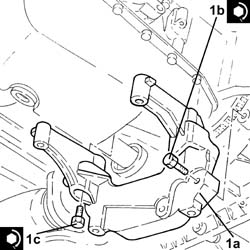
1. Refit the bracket between the manual gearbox/engine (1a) in its seating, then secure it with the bolts (1b) and (1c) to the specified torque.
| Fastening | Component | Ø | Value (daNm) | |
|---|---|---|---|---|
| 1b | Bolt | GEARBOX/ENGINE COUPLING BRACKET | M8 | (Gearbox side) 2.3 ÷ 2.8 |
| Fastening | Component | Ø | Value (daNm) | |
|---|---|---|---|---|
| 1c | Bolt | GEARBOX/ENGINE COUPLING BRACKET | M8 | (Engine crankcase side) 2.7 ÷ 3.3 |
- 1016C11 single cylinder head-r r gasket for versions with air conditioner
- 1016B10 single cylinder head extension - change gasket
When the bolts fixing the timing cover to the single camshaft housing are being tightened, tighten the bolts fixing it to the cylinder head as well.
fastening to the cylinder head.
- 1088B10 engine cooling tank - r + r
- 1092A12 crankshaft pulley - r+r for versions with air conditioner
- 1092G11 Engine components single drive BELT - R.R. for versions with air conditioning
- 1060G90 diesel injection wiring harness - r r
- 5530B52 Battery DRIP TRAY/SUPPORT - R.R.
- 4450B04 right front wheel r r
- 0010T84 coolant for air conditioning system dehydrate and recharge
- 0010T21 coolant check density and top up if necessary
Remove the car from the ramps.
Parts & tools for this job Staging For 2003 Fiat Panda
- PARTEngine gasket setSearch: Fiat Panda 2003 engine gasket set
- TOOLTorque wrenchSearch: 3/8 inch torque wrench
- TOOLFeeler gauge setSearch: feeler gauge set
Links open Amazon search results in a new tab. As an Amazon Associate I earn from qualifying purchases.