
Fuel tank - r + r and decant fuel
- Make
- Fiat
- Model
- Doblò Factory Service Manual
- Year
- 2000–2010
- Section
- Fuel tank and pipes › Fuel tank - r + r and decant fuel
Fuel tank - r + r and decant fuel
Removing
Disconnect the battery negative terminal.
Place the car on a ramp.
Drain the fuel from the tank using suitable equipment. Adopt protective measures to meet current safety requirements.
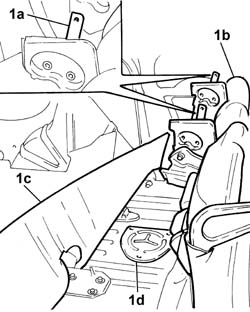
1. Acting on the levers (1a), lift up the rear seat cushion (1b) and move the floor covering (1c) aside to gain access to the fuel pump flap (1d).
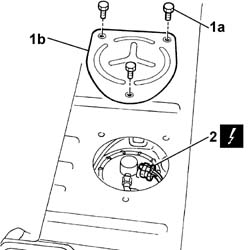
1. Undo the fixing bolts (1a) and remove the protective cover (1b).
2. Disconnect the electrical connection from the level gauge.
| Name | Connector | |
|---|---|---|
| 2 | Fuel pump and sender unit | See N040 FUEL PUMP AND LEVEL GAUGE |
Raise the vehicle.
Op. 7055B43 REAR WHEEL ARCH LINER (ONE) LEFT OR RIGHT - R.R.
]
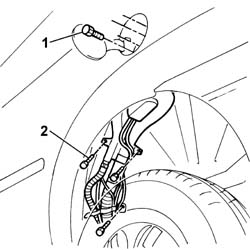
1. Undo the bolts fixing the fuel filler pipe fitting to the bodyshell.
2. Undo the bolts fixing the filler pipe to the bodyshell.
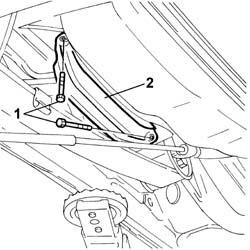
1. Unscrew the retaining bolts
2. Remove the pipe protection bracket
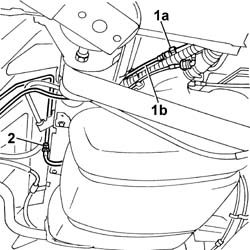
1. Disconnect the anti-evaporation pipe (1b) from the vapour separator to the active charcoal filter from the rapid connector (1a).
2. Disconnect the rapid connector for the rear supply pipe from the length of intermediate pipe.
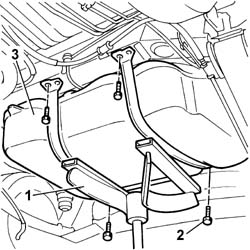
1. Position an appropriate stand beneath the tank in order to support it during removal.
2. Undo the tank bracket retaining bolts.
Lower the hydraulic jack.
3. Remove the fuel tank, complete with fuel filler pipe.
Refitting
Position the fuel tank on the stand.
Raise the tank and tighten the bolts fixing the tank to the bodyshell to torque.
| Fastening | Component | Ø | Value (daNm) | |
|---|---|---|---|---|
| Bolt | FUEL TANK | M8 | 2.4 |
Remove the tank stand.
Connect the anti-evaporation pipe connected to the vapour separator from the rapid attachment.
Connect the single fuel supply pipe.
Fit the pipe protection bracket and tighten the fixing bolts.
Position the filler pipe in the special housing and tighten the bolts fixing the fuel filler to the bodyshell.
Op. 7055B43 REAR WHEEL ARCH LINER (ONE) LEFT OR RIGHT - R.R.
]
Lower the vehicle.
Connect the fuel level guage electrical connection.
| Name | Connector | |
|---|---|---|
| Fuel pump and sender unit | See N040 FUEL PUMP AND LEVEL GAUGE |
Working from inside the vehicle, fit the protective cover and tighten the fixing bolts.
Refit the floor covering.
Lower the rear seat fastening it to the securing hooks.
Remove the vehicle from the ramp.
Refill the car with the recommended fuel. During this operation, use appropriate equipment and adopt protective measures to comply with current safety legislation.
Connect the battery negative terminal.
Remove the vehicle from the ramp.
Removing
Disconnect the battery negative terminal.
Place the car on a ramp.
Drain the fuel from the tank using suitable equipment and appropriate protection to meet current safety requirements.
1. Acting on the levers (1a), lift up the rear seat cushion (1b) and move the floor covering (1c) aside to gain access to the fuel pump flap (1d).
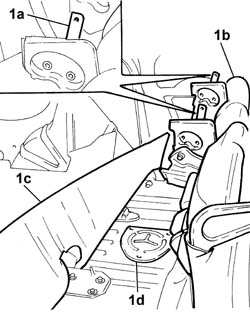
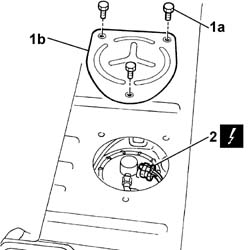
1. Undo th fixing bolts (1a) and remove the protective cover (1b).
2. Disconnect the electrical connection from the level gauge.
| Name | Connector | |
|---|---|---|
| 2 | Fuel pump and sender unit | See N040 FUEL PUMP AND LEVEL GAUGE |
Raise the vehicle.
Op. 7055B43 REAR WHEEL ARCH LINER (ONE) LEFT OR RIGHT - R.R.
1. Undo the bolts fixing the fuel filler to the bodyshell.
2. Undo the bolts fixing the filler pipe to the bodyshell.
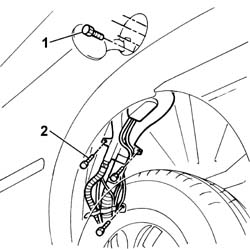
1. Undo the retaining bolts.
2. Remove the pipe protection bracket
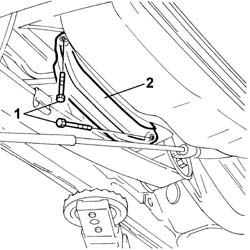
1. Disconnect the anti-evaporation pipe (1b) from the vapour separator to the active charcoal filter from the rapid connector (1a).
2. Disconnect the rapid connector for the rear supply pipe from the length of intermediate pipe.
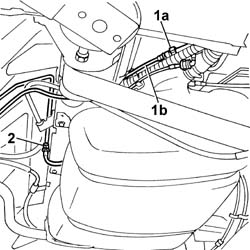
1. Position a stand beneath the tank to support it during removal.
2. Undo the tank bracket retaining bolts.
Lower the hydraulic jack.
3. Remove the fuel tank, complete with fuel filler pipe.
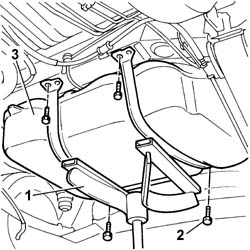
Refitting
Position the fuel tank on the stand.
Raise the tank and tighten the bolts fixing the tank to the bodyshell to torque.
| Fastening | Component | Ø | Value (daNm) | |
|---|---|---|---|---|
| Bolt | FUEL TANK | M8 | 2.4 |
Remove the tank stand.
Connect the anti-evaporation pipe connected to the vapour separator from the rapid attachment.
Connect the single fuel supply pipe.
Fit the pipe protection bracket and tighten the fixing bolts.
Position the filler pipe in the special housing and tighten the bolts fixing the fuel filler to the bodyshell.
Op. 7055B43 REAR WHEEL ARCH LINER (ONE) LEFT OR RIGHT - R.R.
Lower the vehicle.
Connect the fuel level guage electrical connection.
| Name | Connector | |
|---|---|---|
| Fuel pump and sender unit | See N040 FUEL PUMP AND LEVEL GAUGE |
Working from inside the vehicle, fit the protective cover and tighten the fixing bolts.
Refit the floor covering.
Lower the rear seat fastening it to the securing hooks.
Remove the vehicle from the ramp.
Use the correct equipment and appropriate protection as required by current safety legislation to fill the vehicle with the recommended fuel.
Connect the battery negative terminal.
Removing
Disconnect the battery negative terminal.
Place the car on a ramp.
Drain the fuel from the tank using suitable equipment. Adopt protective measures to meet current safety requirements.
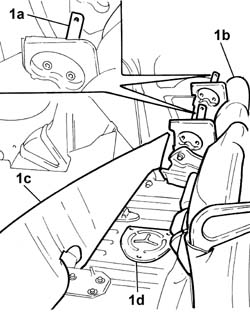
1. Acting on the levers (1a), lift up the rear seat cushion (1b) and move the floor covering (1c) aside to gain access to the fuel pump flap (1d).
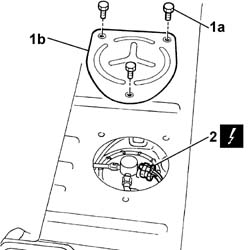
1. Undo the fixing bolts (1a) and remove the protective cover (1b).
2. Disconnect the electrical connection for the electric pump.
| Name | Connector | |
|---|---|---|
| 2 | EPIC injection pump | See N41 EPIC INJECTION PUMP |
Raise the vehicle.
Op. 7055B43 REAR WHEEL ARCH LINER (ONE) LEFT OR RIGHT - R.R.
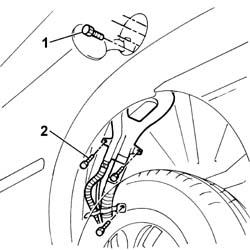
1. Undo the bolts fixing the fuel filler pipe fitting to the bodyshell.
2. Undo the bolts fixing the filler pipe to the bodyshell.
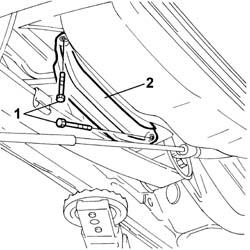
1. Unscrew the retaining bolts
2. Remove the protection bracket.
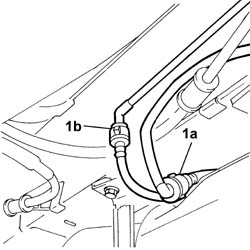
1. Disconnect the quick-release fittings of fuel outlet hose (1a) and inlet hose (1b).
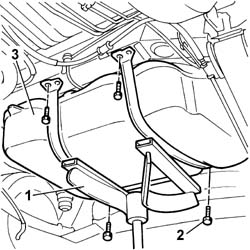
1. Position an appropriate stand beneath the tank in order to support it during removal.
2. Undo the tank bracket retaining bolts.
Lower the hydraulic jack.
3. Remove the fuel tank, complete with fuel filler pipe.
Refitting
Position the fuel tank on the stand.
Raise the tank and tighten the bolts fixing the tank to the bodyshell to torque.
| Fastening | Component | Ø | Value (daNm) | |
|---|---|---|---|---|
| Bolt | FUEL TANK | M8 | 2.4 |
Remove the tank stand.
Connect the fuel outlet and inlet hoses.
Fit the pipe protection bracket and tighten the fixing bolts.
Position the filler pipe in the special housing and tighten the bolts fixing the fuel filler to the bodyshell.
Op. 7055B43 REAR WHEEL ARCH LINER (ONE) LEFT OR RIGHT - R.R.
Lower the vehicle.
Connect the electrical connection to the electric pump.
| Name | Connector | |
|---|---|---|
| EPIC injection pump | See N41 EPIC INJECTION PUMP |
Working from inside the vehicle, fit the protective cover and tighten the fixing bolts.
Refit the floor covering.
Lower the rear seat fastening it to the securing hooks.
Remove the vehicle from the ramp.
Refill the car with the recommended fuel. During this operation, use appropriate equipment and adopt protective measures to comply with current safety legislation.
Connect the battery negative terminal.
Remove the vehicle from the ramp.
Removing
Position the vehicle on the ramp.
Ensure that the ignition key is in the stop position, then disconnect the battery negative terminal.
| Name | Connector | |
|---|---|---|
| Battery | See A1B BATTERY ( BATTERY POSITIVE ) |
Drain the fuel from the tank using suitable equipment. Adopt protective measures to meet current safety requirements.
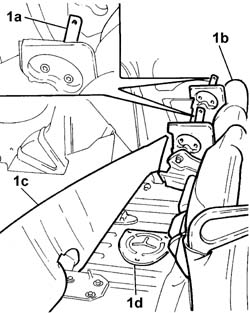
1. Acting on the levers (1a), lift up the rear seat cushion (1b) and move the floor covering (1c) aside to gain access to the fuel pump protective cover (1d).
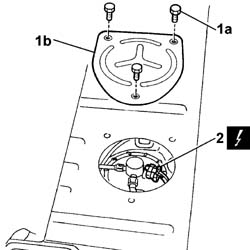
1. Undo the fixing bolts (1a) and remove the protective cover (1b).
2. Disconnect the electrical connection for the electric pump.
| Name | Connector | |
|---|---|---|
| 2 | EPIC injection pump | See N41 EPIC INJECTION PUMP |
Proceed with the removal
Op. 7055B43 REAR WHEEL ARCH LINER (ONE) LEFT OR RIGHT - R.R.
(Right side).
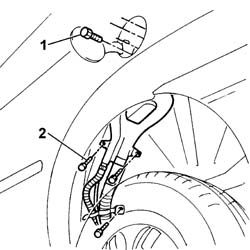
1. Undo the bolts fixing the fuel filler pipe to the bodyshell.
2. Undo the bolts fixing the fuel filler pipe to the bodyshell.
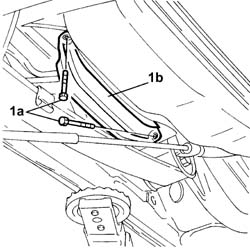
1. Undo the bolts (1a) and remove the protective bracket (1b).
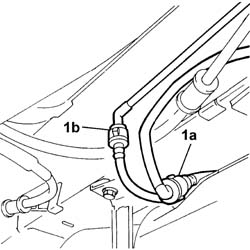
1. Disconnect the rapid attachments on the fuel supply pipe (1a) and return pipe (1b).
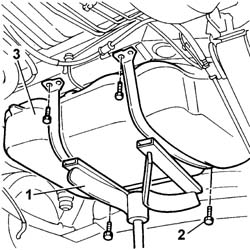
1. Position a suitable stand under the fuel tank to support it during removal.
2. Undo the bolts securing the fuel tank mounting brackets.
3. Remove the fuel tank complete with fuel filler pipe.
Refitting
Refit in its seating the fuel filler tank complete with fuel filler pipe.
Tighten the bolts securing the fuel mounting brackets to the specified torque.
| Fastening | Component | Ø | Value (daNm) | |
|---|---|---|---|---|
| Bolt | FUEL TANK | M8 | 2.4 |
Remove the fuel tank supporting stand.
Connect the rapid attachments for the fuel supply and return pipes.
Refit the protective bracket in its seating and secure it with its bolts.
Place the fuel filler pipe in its seating and secure it.
Proceed with the refitting
Op. 7055B43 REAR WHEEL ARCH LINER (ONE) LEFT OR RIGHT - R.R.
(Right side).
Connect the electrical connection to the electric pump.
Place the protective cover back in its housing and fix it using the bolts.
Put the floor trim back in its place.
Lower the rear seat cushion, securing it to the anchoring hooks.
Fill the car with the specified fuel using appropriate equipment and suitable protection in accordance with current safety regulations.
Connect the battery terminal (-).
Remove the car from the ramp.
Removing
Disconnect the battery negative terminal.
Place the car on a ramp.
Drain the fuel from the tank using suitable equipment and appropriate protection to meet current safety requirements.
Op. 1040A08 RIGHT CANISTER FOR CNG CANISTER ASSEMBLY - R.R.
1. Disconnec the quick connectors of the anti-evaporation system pipes connecting to the float valves located on the tank.
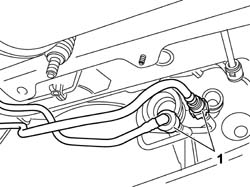
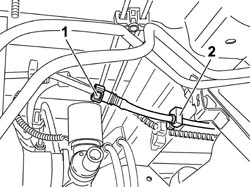
1. Disconnect the rapid connector of the single fuel supply pipe.
2. Release the pipe from the retaining bands.
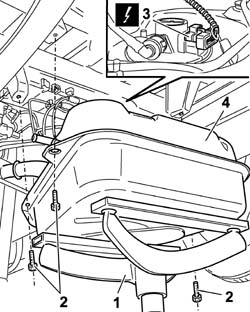
1. Position a stand beneath the tank to support it during removal.
2. Undo the tank fixing bolt.
Gradually lower the hydraulic jack.
3. Disconnect the electrical connection for the electric fuel pump.
| Name | Connector | |
|---|---|---|
| 3 | Fuel pump and sender unit | See N040 FUEL PUMP AND LEVEL GAUGE |
4. Remove the fuel tank complete with anti-evaporation system pipes.
Refitting
Position the fuel tank on the stand.
Partially raise the tank and connect the electrical connection for the fuel pump.
| Name | Connector | |
|---|---|---|
| Fuel pump and sender unit | See N040 FUEL PUMP AND LEVEL GAUGE |
Raise the tank and tighten the bolts fixing the tank to the bodyshell to torque.
| Fastening | Component | Ø | Value (daNm) | |
|---|---|---|---|---|
| Bolt | FUEL TANK | M8 | 2.8 |
Remove the tank stand.
Connect the quick connector of the single fuel supply pipe and secure it to the retaining bands.
Connect the quick connectors on the anti-evaporation system pipes connecting to the float valves on the tank.
Op. 1040A08 RIGHT CANISTER FOR CNG CANISTER ASSEMBLY - R.R..
Remove the vehicle from the lift.
Use the correct equipment and appropriate protection as required by current safety legislation to fill the vehicle with the recommended fuel.
Connect the battery negative terminal.
Parts & tools for this job Staging For 2000 Fiat Doblò
- PARTEngine gasket setSearch: Fiat Doblò 2000 engine gasket set
- TOOLTorque wrenchSearch: 3/8 inch torque wrench
- TOOLFeeler gauge setSearch: feeler gauge set
Links open Amazon search results in a new tab. As an Amazon Associate I earn from qualifying purchases.