
Body link bracket - r r
- Make
- Alfa Romeo
- Model
- GT Factory Service Manual
- Year
- 2003–2010
- Section
- Power unit supports › Body link bracket - r r
BODY LINK BRACKET - R R
Removing
Proceed with removal
Op. 1016A40 IGNITION COIL COVER ON CYLINDER HEAD- R+R.
Proceed with removal
Op. 1008C10 POWER UNIT UPPER REACTION LINK R R.
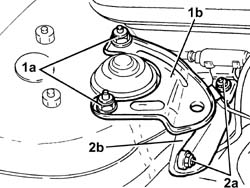
1. Undo the nuts (1a) and remove the upper bracket on the bodyshell for the reaction rod (1b).
2. Undo the nuts (2a) and remove the lower bracket on the bodyshell for the reaction rod (2b).
Refitting
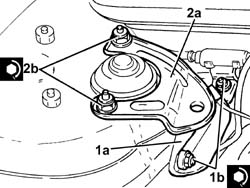
1. Fit the lower bracket on the bodyshell for the reaction rod (1a) and fix it tightening the nuts (1b) to the recommended torque.
| Fastening | Component | Ø | Value (daNm) | |
|---|---|---|---|---|
| 1b | Nut | REACTION LINK ATTACHMENT BRACKET | M8 | (Bodyshell side) 2.2 ÷ 2.6 |
2. Place the upper bracket on the bodyshell for the reaction rod (2a) back in its housing and secure it by tightening the nuts (2b) to the recommended torque.
| Fastening | Component | Ø | Value (daNm) | |
|---|---|---|---|---|
| 2b | Nut | REACTION LINK ATTACHMENT BRACKET | M8 | (Bodyshell side) 2.2 ÷ 2.6 |
Proceed with refitting
Op. 1008C10 POWER UNIT UPPER REACTION LINK R R.
Proceed with refitting
Op. 1016A40 IGNITION COIL COVER ON CYLINDER HEAD- R+R.
Removing
Proceed with removal
Op. 1008C10 POWER UNIT UPPER REACTION LINK R R.
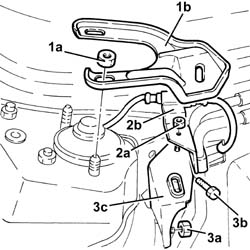
1. Undo the nuts (1a) and remove the upper bracket on the bodyshell for the reaction rod (1b).
The above mentioned nuts also fix the right front shock absorber to the bodyshell.
2. Undo the nut (2a) and remove the mounting bracket for the wheel rpm sensor connection and fuel pipes (2b).
3. Undo the nut (3a) and the bolt (3b) and remove the lower bracket on the bodyhsell for the reaction rod (3c).
Refitting
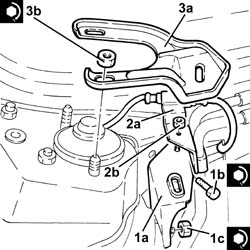
1. Place the lower bracket on the bodyshell for the reaction rod (1a) back in its housing and secure it by tightening the bolt (1b) and the nut (1c) to the recommended torque.
| Fastening | Component | Ø | Value (daNm) | |
|---|---|---|---|---|
| 1b | Bolt | REACTION ROD LOWER MOUNTING BRACKET | M8 | (Bodyshell side) 2.2 ÷ 2.6 |
| Fastening | Component | Ø | Value (daNm) | |
|---|---|---|---|---|
| 1c | Nut | REACTION ROD LOWER MOUNTING BRACKET | M8 | (Bodyshell side) 2.2 ÷ 2.6 |
2. Place the mounting bracket (2a) for the wheel rpm sensor connection and fuel pipe back in its housing, then secure it using the nut (2b).
3. Place the upper bracket on the bodyshell for the reaction rod (3a) back in its housing and secure it by tightening the nuts (3b) to the recommended torque.
| Fastening | Component | Ø | Value (daNm) | |
|---|---|---|---|---|
| 3b | Nut | REACTION ROD UPPER MOUNTING BRACKET | M8 | (Bodyshell side) 2.2 ÷ 2.6 |
The above mentioned nuts also fix the right front shock absorber to the bodyshell.
Proceed with refitting
Op. 1008C10 POWER UNIT UPPER REACTION LINK R R.
Removing
Proceed with removal
Op. 1008C10 POWER UNIT UPPER REACTION LINK R R.
1. Undo the nuts (1a) and remove the upper bracket on the bodyshell for the reaction rod (1b).
The above mentioned nuts also fix the right front shock absorber to the bodyshell.
2. Undo the nut (2a) and remove the mounting bracket for the wheel rpm sensor connection and fuel pipes (2b).
3. Undo the nut (3a) and the bolt (3b) and remove the lower bracket on the bodyhsell for the reaction rod (3c).
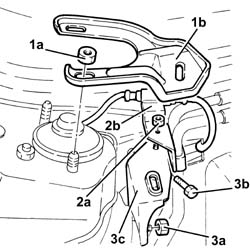
Refitting
1. Place the lower bracket on the bodyshell for the reaction rod (1a) back in its housing and secure it by tightening the bolt (1b) and the nut (1c) to the recommended torque.
| Fastening | Component | Ø | Value (daNm) | |
|---|---|---|---|---|
| 1b | Bolt | REACTION ROD LOWER MOUNTING BRACKET | M8 | (Bodyshell side) 2.2 ÷ 2.6 |
| Fastening | Component | Ø | Value (daNm) | |
|---|---|---|---|---|
| 1c | Nut | REACTION ROD LOWER MOUNTING BRACKET | M8 | (Bodyshell side) 2.2 ÷ 2.6 |
2. Place the mounting bracket (2a) for the wheel rpm sensor connection and fuel pipe back in its housing, then secure it using the nut (2b).
3. Place the upper bracket on the bodyshell for the reaction rod (3a) back in its housing and secure it by tightening the nuts (3b) to the recommended torque.
| Fastening | Component | Ø | Value (daNm) | |
|---|---|---|---|---|
| 3b | Nut | REACTION ROD UPPER MOUNTING BRACKET | M8 | (Bodyshell side) 2.2 ÷ 2.6 |
The above mentioned nuts also fix the right front shock absorber to the bodyshell.
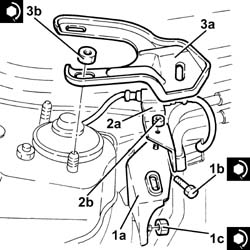
Proceed with refitting
Op. 1008C10 POWER UNIT UPPER REACTION LINK R R.
Removing
Proceed with the removal
Op. 1008C10 POWER UNIT UPPER REACTION LINK R R.
1. Undo the nuts (1a) and remove the upper bracket on the bodyshell for the reaction rod (1b).
The above mentioned nuts also secure the right front shock absorber to the bodyshell.
2. Undo the nut (2a) fixing the mounting bracket (2b) for the wheel rpm sensor connection and the fuel pipe.
3. Undo the nut (3a) and the bolt (3b) and remove the lower bracket on the bodyshell for the reaction rod (3c).
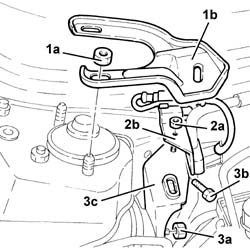
Refitting
1. Place the lower bracket on the bodyshell for the reaction rod (1a) back in its housing and secure it by tightening the bolt (1b) and the nut (1c) to the recommended torque.
| Fastening | Component | Ø | Value (daNm) | |
|---|---|---|---|---|
| 1b | Bolt | REACTION ROD LOWER MOUNTING BRACKET | M8 | (Bodyshell side) 2.2 ÷ 2.6 |
| Fastening | Component | Ø | Value (daNm) | |
|---|---|---|---|---|
| 1c | Nut | REACTION ROD LOWER MOUNTING BRACKET | M8 | (Bodyshell side) 2.2 ÷ 2.6 |
2. Place the mounting bracket (2a) for the wheel rpm sensor connection and the fuel pipe back in its housing, then secure it using the nut (2b).
3. Place the upper bracket on the bodyshell for the reaction rod (3a) back in its housing and secure it by tightening the nuts (3b) to the recommended torque.
| Fastening | Component | Ø | Value (daNm) | |
|---|---|---|---|---|
| 3b | Nut | REACTION ROD UPPER MOUNTING BRACKET | M8 | (Bodyshell side) 2.2 ÷ 2.6 |
The above mentioned nuts also secure the right front shock absorber to the bodyshell.
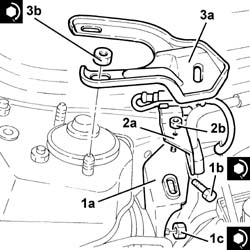
Proceed with the refitting
Parts & tools for this job Staging For 2003 Alfa Romeo GT
- TOOLTrim removal tool kitSearch: trim removal tool kit
- PARTTouch-up paintSearch: Alfa Romeo touch up paint
- PARTPanel clip assortmentSearch: Alfa Romeo panel clips assortment
Links open Amazon search results in a new tab. As an Amazon Associate I earn from qualifying purchases.