
Tank fuel vapour separator - r + r
- Make
- Alfa Romeo
- Model
- GT Factory Service Manual
- Year
- 2003–2010
- Section
- Exhaust emission control system › Tank fuel vapour separator - r + r
TANK FUEL VAPOUR SEPARATOR - R + R
Removing
Position the vehicle on a lift.
Proceed with the removal
Op. 4450B08 RIGHT REAR WHEEL R R.
Proceed with the removal
Op. 7055B45 RIGHT HAND REAR SUPPLEMENTARY WHEEL ARCH - R+R.
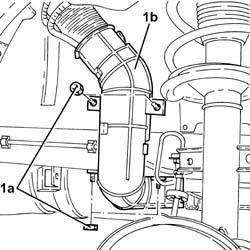
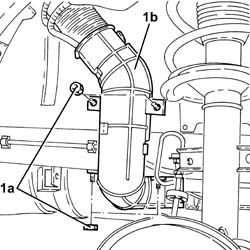
1. Undo the nuts (1a) and remove the plastic protection (1b) for the fuel filler pipe after having released it from the fastening bands.
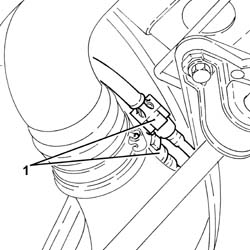
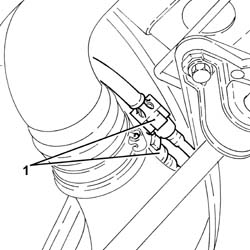
1. Disconnect the rapid connectors for the fuel vapour recovery pipes from the float valves to the fuel vapour separator.
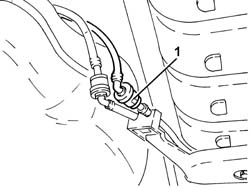
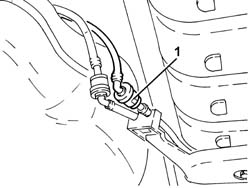
1. Disconnect the rapid connector for the fuel vapour supply pipe from the separator to the canister.
Lower the fuel tank as necessary to release the supply pipe from the fuel vapour separator to the intermediate connector (pipe incorporated in the fuel vapour separator) and remove it.
Op. 1040A10 FUEL TANK - R + R AND DECANT FUEL.
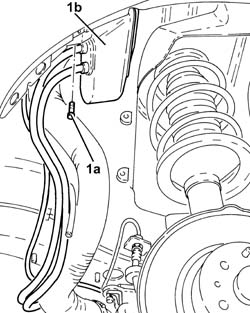
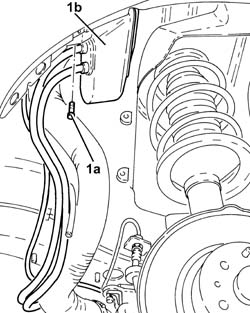
1. Undo the bolts (1a) and remove the fuel tank vapour separator (1b) complete with integrated pipes.
Refitting
Place the fuel tank vapour separator in its housing and secure it using the bolts.
Position the supply pipe from the fuel vapour separator to the intermediate connector on the tank then place the fuel tank in its housing.
Op. 1040A10 FUEL TANK - R + R AND DECANT FUEL.
Connect the rapid connector for the fuel vapour supply pipe from the separator to the canister.
Connect the rapid connectors for the fuel vapour recovery pipes to the float valves to the fuel vapour separator.
Place the plastic protection for the fuel filler pipe in position and secure it using the bands and the nuts.
Proceed with the refitting
Op. 7055B45 RIGHT HAND REAR SUPPLEMENTARY WHEEL ARCH - R+R.
Proceed with the refitting
Op. 4450B08 RIGHT REAR WHEEL R R.
Remove the vehicle from the lift.
Removing
Proceed with the removal
Op. 4450B08 RIGHT REAR WHEEL R R.
Proceed with the removal
Op. 7055B45 RIGHT HAND REAR SUPPLEMENTARY WHEEL ARCH - R+R.
Proceed with the removal
Op. 1040A70 SUBMERGED PUMP ASSEMBLY COMPLETE WITH LEVEL GUAGE CONTROL - R + R.
Proceed with the removal
Op. 1040A30 OIL SEAL COVER, FLY WHEEL SIDE - R + R AND REPLACE SEALS.
Refitting
Proceed with the refitting
Op. 1040A30 OIL SEAL COVER, FLY WHEEL SIDE - R + R AND REPLACE SEALS.
Proceed with the refitting
Op. 1040A70 SUBMERGED PUMP ASSEMBLY COMPLETE WITH LEVEL GUAGE CONTROL - R + R.
Proceed with the refitting
Op. 7055B45 RIGHT HAND REAR SUPPLEMENTARY WHEEL ARCH - R+R.
Proceed with the refitting
Op. 4450B08 RIGHT REAR WHEEL R R.
Removing
- Position the vehicle on a lift.
- Op. 4450B08 RIGHT REAR WHEEL R R
- Op. 7055B45 RIGHT HAND REAR SUPPLEMENTARY WHEEL ARCH - R+R
- Undo the nuts (1a) and remove the plastic protection (1b) for the fuel filler pipe after having released it from the fastening bands.
- Disconnect the rapid connectors for the fuel vapour recovery pipes from the float valves to the fuel vapour separator.
- Disconnect the rapid connector for the fuel vapour supply pipe from the separator to the canister.
Lower the fuel tank as necessary to release the supply pipe from the fuel vapour separator to the intermediate connector (pipe incorporated in the fuel vapour separator) and remove it.
- Undo the bolts (1a) and remove the fuel tank vapour separator (1b) complete with integrated pipes.
Refitting
- Place the fuel tank vapour separator in its housing and secure it using the bolts.
Position the supply pipe from the fuel vapour separator to the intermediate connector on the tank then place the fuel tank in its housing.
- Connect the rapid connector for the fuel vapour supply pipe from the separator to the canister.
- Connect the rapid connectors for the fuel vapour recovery pipes to the float valves to the fuel vapour separator.
- Place the plastic protection for the fuel filler pipe in position and secure it using the bands and the nuts.
- Op. 7055B45 RIGHT HAND REAR SUPPLEMENTARY WHEEL ARCH - R+R
- Op. 4450B08 RIGHT REAR WHEEL R R
- Remove the vehicle from the lift.
Parts & tools for this job Staging For 2003 Alfa Romeo GT
- PARTExhaust gasketSearch: Alfa Romeo GT 2003 exhaust gasket
- TOOLPenetrating oilSearch: penetrating oil
- TOOLOBD2 scannerSearch: OBD2 scanner
Links open Amazon search results in a new tab. As an Amazon Associate I earn from qualifying purchases.