
Engine oil pump, removed - check at bench
- Make
- Alfa Romeo
- Model
- GT Factory Service Manual
- Year
- 2003–2010
- Section
- Engine lubrication system › Engine oil pump, removed - check at bench
ENGINE OIL PUMP, REMOVED - CHECK AT BENCH
Removing
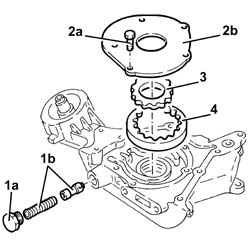
1. Undo the cap (1a) and remove the engine oil pressure relief valve (1b).
2. Undo the bolts (2a) and remove the engine oil pump cover (2b).
3. Remove the drive gear.
4. Remove the driven gear.
Refitting
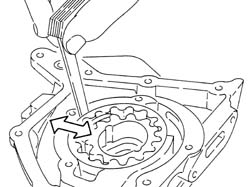
Check that the radial clearance between the driven gear and the pump casing is within the recommended limits; if this is not the case, replace the oil pump assembly.
| Measurement | Value | ||
|---|---|---|---|
| Radial clearance between driven gear and engine oil pump casing (mm) | 0.080 ÷ 0.186 |
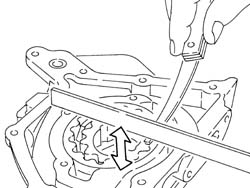
Check that the clearance between the pump cover support plane and the top of the gears is within the reocmmended values; if this is not the case, replace the oil pump assembly.
| Measurement | Value | ||
|---|---|---|---|
| Endfloat between top of gears and engine oil pump casing support plane (mm) | 0.025 ÷ 0.070 |
Check that the height of the engine oil pressure relief valve spring is within the recommended values; if not, replace the spring.
| Measurement | Value | ||
|---|---|---|---|
| Height of engine oil pressure relief valve spring (mm) | 36.0 | ||
| Test load (daN) | 6.4 ÷ 7.2 | ||
Place the driven gear in position.
Place the drive gear in position.
Place the engine oil pump cover back in its housing and secure it using the bolts centering it.
Manually rotate the gears to check that they do not stick.
Place the engine oil pressure relief valve in position and tighten the cap.
Removing
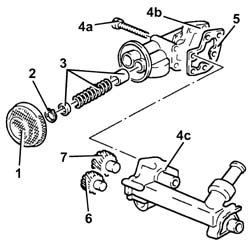
1. Remove the intake gauze.
2. Remove the circlip.
3. Remove the engine oil pressure relief valve.
4. Undo the bolts (4a) and separate the pump cover (4b) from the pump casing (4c).
5. Remove the seal.
6. Remove the drive gear.
7. Remove the driven gear.
Refitting
Check that the gears show no signs of wear or seizing; if this is not the case, replace the oil pump assembly.
Check that the radial clearance between the driven gear and the pump casing is within the recommended limits; if this is not the case, replace the oil pump assembly.
| Measurement | Value | ||
|---|---|---|---|
| Radial clearance between driven gear and engine oil pump casing (mm) | 0.025 ÷ 0.075 |
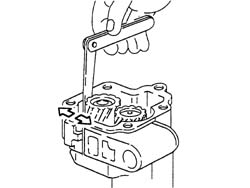
Check that the height of the engine oil pressure relief valve spring is within the recommended values; if not, replace the spring.
| Measurement | Value | ||
|---|---|---|---|
| Height of engine oil pressure relief valve spring (mm) | 33.3 | ||
| test load (daN) | 15.9 - 16.9 | ||
Place the driven gear in position.
Place the drive gear in position.
Place the gasket back in its housing.
Place the pump cover in position and secure it tightening the bolts to the recommended torque.
| Fastening | Component | Ø | Value (daNm) |
|---|
Place the engine oil pressure relief valve in position.
Place the circlip in position.
Place the intake gauze back in its housing.
Removing
1. Undo bolts (1a) and remove the oil pump cover (1b).
2. Remove the drive gear.
3. Remove the driven gear.
4. Undo the cap (4a) and remove the oil pressure relief valve (4b).
5. Remove the crankshaft front oil seal.
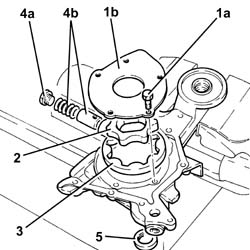
Refitting
Check that the radial clearance between the driven gear and the pump casing is within the recommended limits; if this is not the case, replace the oil pump assembly.
| Measurement | Value | ||
|---|---|---|---|
| Radial clearance between driven gear and pump casing (mm) | 0.080 - 0.186 |
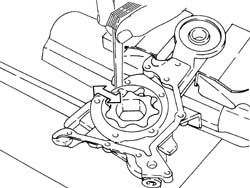
Check that the axial clearance between the pump cover support plane and the top of the gears is within the recommended values; if this is not the case, replace the oil pump assembly.
| Measurement | Value | ||
|---|---|---|---|
| Endfloat between the pump casing support plane and the top of the gears (mm) | 0.025 - 0.070 |
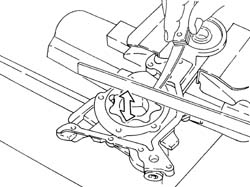
Check that the height of the oil pressure relief valve spring is within the recommended values; if not, replace the spring.
| Measurement | Value | ||
|---|---|---|---|
| Height of engine oil pressure relief valve spring (mm) | 35 | ||
| under test load (daN) | 11.73 - 12.51 | ||
Place the oil pressure relief valve in position and tighten the cap.
Place the driven gear in position.
Place the drive gear in position.
Fit the oil pump cover in its housing and tighten the bolts.
Manually rotate the gears to check that they turn without sticking.
Removing
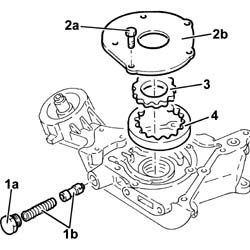
1. Undo the cap (1a) and remove the engine oil pressure relief valve (1b).
2. Undo the bolts (2a) and remove the oil pump cover (2b).
3. Remove the drive gear.
4. Remove the driven gear.
Remove the crankshaft front oil seal.
Refitting
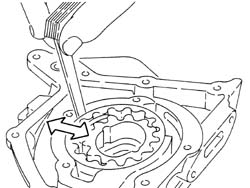
Check that the radial clearance between the driven gear and the pump casing is within the recommended limits; if this is not the case, replace the oil pump assembly.
| Measurement | Value | ||
|---|---|---|---|
| Radial clearance between driven gear and engine oil pump casing (mm) | 0.080 ÷ 0.186 |
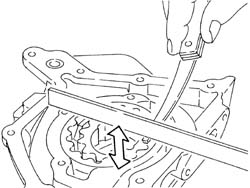
Check that the clearance between the pump cover support plane and the top of the gears is within the reocmmended values; if this is not the case, replace the oil pump assembly.
| Measurement | Value | ||
|---|---|---|---|
| Endfloat between top of gears and engine oil pump casing support plane (mm) | 0.025 ÷ 0.070 |
Check that the height of the engine oil pressure relief valve spring is within the recommended values; if not, replace the spring.
| Measurement | Value | ||
|---|---|---|---|
| Height of engine oil pressure relief valve spring (mm) | 36.0 | ||
| Test load (daN) | 6.4 ÷ 7.2 | ||
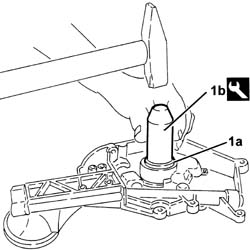
1. Fit a new crankshaft front oil seal (1a) using the tool (1b).
| Description | Code | |
|---|---|---|
| 1b | Fitting tool | 1.821.247.000 |
Fit the driven gear.
Fit the drive gear.
Fit the oil pump cover and secure it by tightening the bolts.
Manually rotate the gears to check that they do not stick.
Fit the oil pressure relief valve and tighten the cap.
Parts & tools for this job Staging For 2003 Alfa Romeo GT
- PARTEngine gasket setSearch: Alfa Romeo GT 2003 engine gasket set
- TOOLTorque wrenchSearch: 3/8 inch torque wrench
- TOOLFeeler gauge setSearch: feeler gauge set
Links open Amazon search results in a new tab. As an Amazon Associate I earn from qualifying purchases.