
Description of components
- Make
- Lancia
- Model
- Thesis Factory Service Manual
- Year
- 2002–2009
- Section
- Diesel fuel injection system › Description of components
DESCRIPTION OF COMPONENTS
PRESSURE PUMP
Specifications
Type
The pump is radialjet type with three radial pistons (total cylinder capacity 0.567 cm³) and is driven by a toothed belt without the need to adjust timing.
Structure
Each pumping unit consists of:
- a piston (5) operated by a cam (2) integral with the pump shaft (6);
- a plate-type intake valve (3)
- a ball delivery valve (4).
Because the pressure pump must be fed at a pressure of at least 0.5 bars, the fuel system is equipped with an auxiliary fuel pump submerged in the tank.
The maximum delivery pressure reaches 1400 bars. The pressure pump is lubricated and cooled by the fuel via special channels.
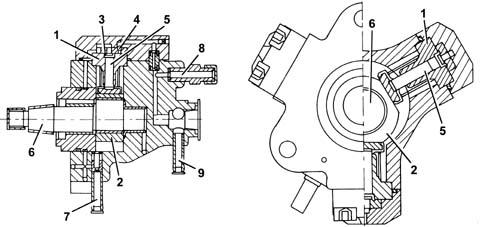
- 1 Cylinder
- 2 Cam
- 3 Plate-type intake valve
- 4 Ball delivery valve
- 5 Piston
- 6 Pump shaft
- 7 Inlet - low pressure (from the fuel filter)
- 8 Delivery - high pressure (to single fuel manifold)
- 9 Delivery - low pressure (to fuel return manifold)
PRESSURE REGULATOR
SPECIFICATIONS
Structure
This is fitted on the pressure pump and controlled by the Engine Control Node. It adjusts fuel feed pressure to the injectors.
The pressure regulator consists mainly of the following components:
- spherical plunger (1)
- pin (2) controlling valve (3)
- preload spring (4)
- coil (5).
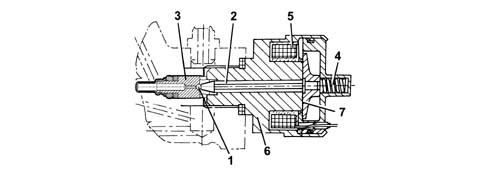
- 1 Spherical plunger
- 2 Pin
- 3 Valve
- 4 Preload spring
- 5 Coil
- 6 Case
- 7 Anchor
INJECTORS
Specifications
Structure
The injectors are fitted on the cylinder head and controlled by the Engine Control Node.
The injector may be divided into two sections:
- actuator/nebuliser consisting of pressure rod (1), pin (2) and nozzle (3)
- control solenoid consisting of coil (4) and pilot valve (5).
Operation
General remarks
Injector operation is divided into three stages:
- rest position. The coil (4) is deactivated and the plunger (6) is in the closed position to prevent fuel from being introduced into the cylinder Fc %gt; Fa (Fc: due to line pressure acting on control area 7 of rod 1; Fa: due to line pressure acting on feed volume 8).
- injection start. Coil (4) is excited and causes plunger (6) to rise. Control volume fuel (9) flows out towards return manifold (10) to bring about a pressure drop on control area (7). Simultaneously, line pressure flowing through intake duct (12) exercises a force Fa %gt; Fc in supply volume (8) to cause pin (2) to lift and allow fuel into the cylinders.
- injection end. Coil (4) is deactivated and causes plunger (6) to return to closed position. This rebalances the forces so that pin (2) returns to closed position and thus ends the injection.
IMA Classification
During the test stage the injectors are checked with the specifications verified in different pressure/flow rate conditions.
All the injectors that do not meet a certain standard are rejected; the remaining ones are classified using a 9 character alphanumerical code, known as an IMA code, imprinted by laser on the top part of the magnet.
During fitting on the vehicle the control unit should memorize the individual code and, if one or more injectors is replaced in a service situation the alteration to the code should be made during the diagnosis using the appropriate equipment.
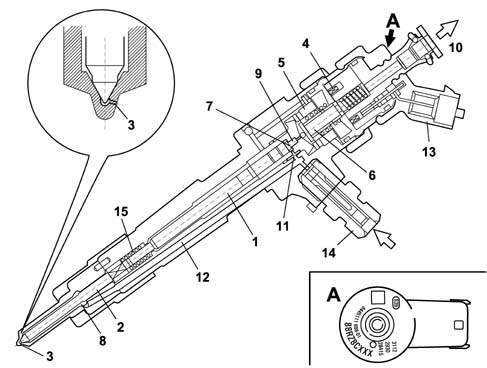
- 1 Pressure rod
- 2 Pin
- 3 Nozzle (n°6)
- 4 Coil
- 5 Pilot valve
- 6 Ball plunger
- 7 Control area
- 8 Feed volume
- 9 Control volume
- 10 Fuel return - low pressure
- 11 Control duct
- 12 Feed duct
- 13 Electrical connection
- 14 Fuel return connector - high pressure
- 15 Spring
SINGLE FUEL MANIFOLD PIPE
Specifications
Structure
The single fuel manifold (rail) is fited to the intake side of the cylinder head.
With a volume of 33 cm³, this damps fuel pressure fluctuations due to:
- pressure pump operation
- injector opening.
Fuel pressure sensor [DF_1060G] is fitted in the centre of the delivery manifold.
The hydraulic connections (high pressure) between manifold-pump and manifold-injecors are via steel pipes with a bore of 2 mm and external diameter of 6 mm.
ENGINE MANAGEMENT NODE (COMMON RAIL EDC-16C8)
Specifications
This is fitted on the left front side beneath the wheelarch. The Engine Control Node is 'flash e.p.r.o.m.' type, i.e. it can be reprogrammed externally without altering the hardware.
The Engine Control Node contains a built-in absolute pressure sensor.
Pin out
CONNECTOR A
- 1, Cylinder 3 injector positive
- 2, Cylinder 2 injector positive
- 3, Not connected
- 4, Fuel pressure regulator positive
- 5, Not connected
- 6, Not connected
- 7, Not connected
- 8, Fuel pressure sensor negative
- 9, Not connected
- 10, Not connected
- 11, Timing sensor positive
- 12, Engine rpm sensor negative
- 13, Supercharging sensor positive
- 14, Not connected
- 15, Turbo pressure electro-pneumatic management valve positive
- 16, Cylinder 1 injector positive
- 17, Cylinder 4 injector positive
- 18, Cylinder 5 injector positive
- 19, Not connected
- 20, Timing sensor negative
- 21, Not connected
- 22, Not connected
- 23, Supercharging pressure and intake air temperature sensor negative
- 24, Not connected
- 25, Not connected
- 26, Not connected
- 27, Engine rpm sensor positive
- 28, Fuel pressure sensor positive
- 29, Flow meter positive
- 30, Not connected
- 31, Cylinder 2 injector negative
- 32, Not connected
- 33, Cylinder 4 injector negative
- 34, Fuel pressure regulator negative
- 35, Insufficient engine oil pressure sensor signal
- 36, Not connected
- 37, Air temperature sensor signal on flow meter
- 38, Not connected
- 39, Not connected
- 40, Supercharging sensor signal
- 41, Engine coolant temperature sensor negative
- 42 - Flow meter air flow rate signal
- 43, Fuel pressure sensor signal
- 44, Flow meter negative
- 45, Not connected
- 46, Cylinder 3 injector negative
- 47, Cylinder 1 injector negative
- 48, Cylinder 5 injector negative
- 49, Not connected
- 50, Timing sensor signal
- 51, Not connected
- 52, Not connected
- 53, Intake air temperature sensor signal
- 54, Not connected
- 55, Not connected
- 56, Not connected
- 57, Not connected
- 58, Engine coolant temperature sensor signal
- 59, Switching off throttle solenoid valve control actuator negative
- 60, EGR solenoid valve negative
CONNECTOR K
- 1, Supply from main relay
- 2, Control unit earth
- 3, Not connected
- 4, Control unit earth
- 5, Main relay supply
- 6, Control unit earth
- 7, Not connected
- 8, Accelerator pedal potentiometer track 2 negative
- 9, Accelerator pedal potentiometer track 1 signal
- 10, Fuel temperature signal negative
- 11, Fuel temperature sensor signal
- 12, Air conditioning linear pressure sensor negative
- 13, Air conditioning linear pressure sensor signal
- 14, Not connected
- 15, Not connected
- 16, Not connected
- 17, Brake pedal normally open switch signal
- 18, Not connected
- 19, Not connected
- 20, Not connected
- 21, Not connected
- 22, Air conditioning linear pressure sensor positive
- 23, Not connected
- 24, Not connected
- 25, Body computer K line
- 26, Not connected
- 27, Not connected
- 28, Key ON signal
- 29, Air conditioning compressor relay
- 30, Accelerator pedal potentiometer track 1 negative
- 31, Accelerator pedal potentiometer track 2 signal
- 32, Not connected
- 33, Not connected
- 34, Not connected
- 35, Not connected
- 36, Not connected
- 37, Not connected
- 38, Resume Cruise Control
- 39, Not connected
- 40, Not connected
- 41, Not connected
- 42, Not connected
- 43, Not connected
- 44, Not connected
- 45, Accelerator pedal potentiometer track 1 positive
- 46, Accelerator pedal potentiometer track 2 positive
- 47, Body computer W line
- 48, Engine rpm output signal to robotized gearbox
- 49, Not connected
- 50, Not connected
- 51, Not connected
- 52, Feedback signal from heater plugs control unit
- 53, Not connected
- 54, Climate control engagement request from control button
- 55, Not connected
- 56, Cruise Control positive
- 57, Not connected
- 58, Not connected
- 59, Not connected
- 60, Not connected
- 61, C-CAN low from ABS control unit
- 62, C-CAN high from ABS control unit
- 63, Not connected
- 64, Not connected
- 65, Not connected
- 66, Not connected
- 67, Not connected
- 68, Fuel filter heater relay feed
- 69, Engine cooling fan 2nd speed engagement relay feed
- 70, Not connected
- 71, MIL warning light
- 72, Main relay activation
- 73, Not connected
- 74, Water in fuel filter signal
- 75, Not connected
- 76, Not connected
- 77, On/Off cruise control
- 78, Cruise Control speed decrease signal
- 79, Clutch switch signal
- 80, Brake pedal switch 2nd signal (for versions with Cruise Control only)
- 81, Not connected
- 82, Not connected
- 83, C CAN low to Body Computer
- 84, C CAN high to Body Computer
- 85, Not connected
- 86, Not connected
- 87, Not connected
- 88, Not connected
- 89, Not connected
- 90, Engine cooling fan 1st speed engagement relay feed
- 91, Fuel pump relay feed
- 92, Not connected
- 93, Heater plugs engagement control
RPM SENSOR
Specifications
Type
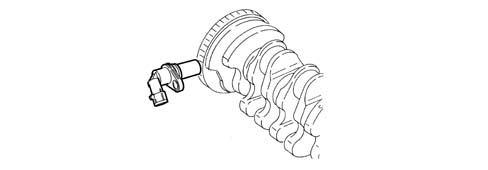
This is fitted on the crankcase and faces the phonic wheel postioned on the crankshaft.
It is inductive type, i.e. its operation is determined by magnetic field changes generated by the teeth passing in front of the phonic wheel (60-2 teeth).
The Engine Control Node uses the rpm sensor signal to:
- determine speed of rotation
- determine angular crankshaft position.
Operation
General remarks
The changeover from full to empty determined by the presence or absence of a gap brings about a magnetic flux change sufficient to generate an induced alternating voltage proportional to the number of teeth on the ring (or phonic wheel).
The frequency and amplitude of the voltage directed to the Engine Control Node supplies the node with an engine angular speed measurement.
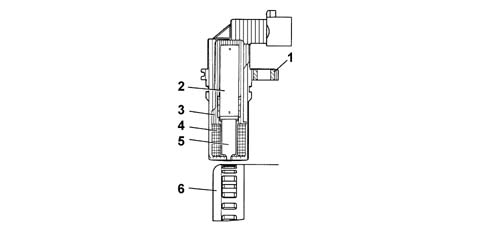
- 1 Brass bush
- 2 Permanent magnet
- 3 Plastic sensor casing
- 4 Coil reel
- 5 Polar core
- 6 Ring gear or flywheel
- 7 Coaxial paired cable or electrical connection.
The recommended distance (gap) between the end of the sensor and the flywheel for obtaining correct signals should be 0.8 - 1.5 mm
This distance is not adjustable. If the gap is found to be outside the tolerance limits, check the condition of the sensor and phonic wheel.
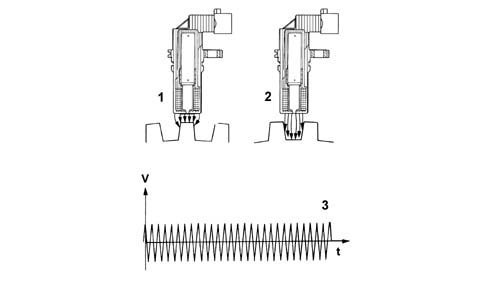
- 1 Maximum magnetic flow
- 2 Minimum magnetic flow
- 3 Induced alternating voltage plot
CAM ANGLE SENSOR
Specifications
Type
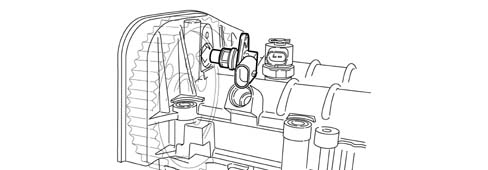
This Hall effect sensor is fitted to the cylinder head and faces the camshaft drive pulley.
A tooth on the pulley allows the timing sensor to indicate engine timing position.
The Engine Control Node uses the timing sensor signal to identify T.D.C. at the end of compression.
Operation
General remarks
If current intensity remains constant, the generated voltage depends on magnetic field intensity alone. Periodic changes in magnetic field intensity are sufficient to generate a modulated electrical signal with frequency proportional to the speed of magnetic field change.
This change is achieved by making a magnetic ring (internal part of pulley) with an opening pass the sensor.
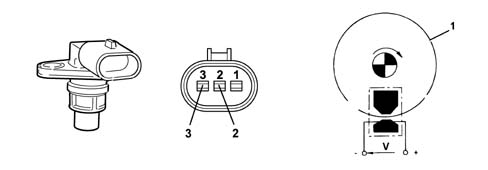
- 1 Pulley ring
- 2 Signal
- 3 Power supply
EXCESS PRESSURE SENSOR
Specifications
The excess pressure and intake air temperature sensor is an integral component which is designed to measure the pressure and the temperature of the air inside the intake manifold.
It is fitted on the intake manifold and has the task of informing the injection control unit in order to:
- regulate the pressure of the variable geometry turbine in order to ensure optimum engine performance in all operating conditions.
- regulate fuel injection duration.
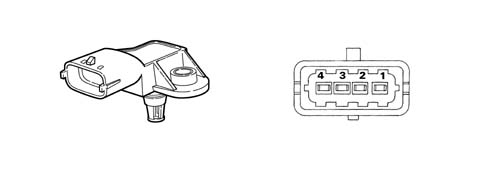
- 1 Earth
- 2 Air temperature signal
- 3 5 Volt (from the engine management node)
- 4 Supercharging pressure output signal
ENGINE COOLANT TEMPERATURE SENSOR
Specifications
Type
This is fitted to the thermostat cup and detects coolant temperature by means of a dual NTC thermistor with negative resistance coefficient.
the NTC thermistor sends a signal to the Engine Control Node, which sends a signal to the injector and instrument panel warning light.
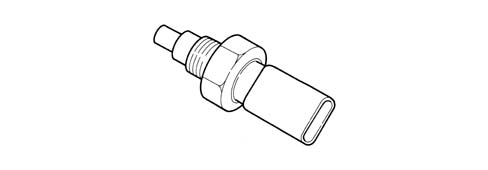
The sensor is designed using semiconductor technology. In other words, the resistance level drops if sensor element temperature increases with increasing coolant temperature.
Because the resistance does not change in linear fashion as temperature increases, it is relatively higher at low temperatures than at high temperatures.
AIR FLOW METER WITH BUILT IN AIR TEMPERATURE SENSOR
Specifications
Type
The debimeter is located on the air intake sleeve and is hot film type.
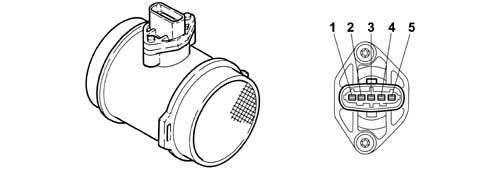
The intake air temperature sensor is built into the debimeter.
The air flow meter cannot be disassembled.
- 1 Covers
- 2 Electronic card
- 3 Sensor
- 4 Support plate
- 5 Support
- 6 O - Ring seal
- 7 Temperature sensor
Operation
The principle of operation is based on a heated membrane positioned within a measurement channel that carries air into the engine.
The hot film membrane is maintained at constant temperature (about 120°C higher than the incoming air temperature) by the heating coil.
The air mass that flows through the measurement channel tends to remove heat from the membrane. Current must therefore flow through the coil to maintain the membrane at a constant temperature.
This current is measured by a special Wheatstone bridge.
The current is therefore proportional to the flowing air mass.
The flow meter measures the air mass directly (not the volume) to eliminate problems of temperature, altitude, pressure etc.
FUEL TEMPERATURE SENSOR
Specifications
It is incorporated in the fuel heater assembly and measures the temperature of the fuel by means of a dual NTC thermistor with negative resistance coefficient.
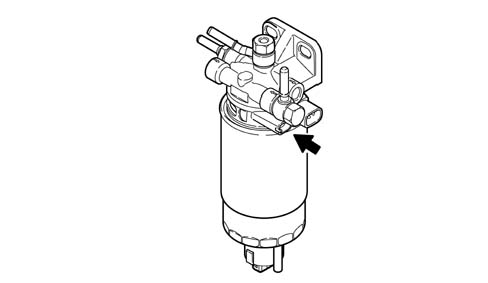
The sensor is designed using semiconductor technology. In other words, the resistance level drops if sensor element temperature increases with increasing fuel emperature.
Because the resistance does not change in linear fashion as temperature increases, it is relatively higher at low temperatures than at high temperatures.
FUEL PRESSURE SENSOR
Specifications
It is fitted at the end of the of the single fuel manifold rail and its function is to provide the injection control unit with a feedback signal to enable it to:
- modulate injection pressure;
- regulate fuel injection duration.
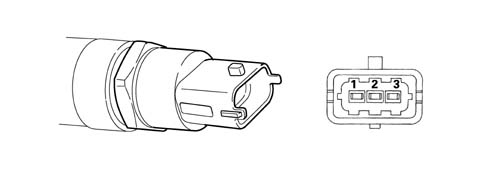
- 1 Earth
- 2 Output signal
- 3 Supply
ACCELERATOR PEDAL POTENTIOMETER
Specifications
Type
The accelerator pedal is equipped with two built-in potentiometers:
- a main potentiometer
- a safety potentiometer.
The Engine Control Node implements the following recovery strategies.
- if one of the two potentiometers fails, this allows the throttle to be opened to a maximum of 40° over a long time period;
- if both potentiometers fail completely, it prevents throttle opening.
Operation
General remarks
The sensor consists of a case secured to the pedal unit by bolts. The case contains an axially-located shaft connected to two potetiometers.
A coil spring on the shaft ensures the correct amount of resistance to pressure while a second spring ensures return following release.
Operating field from 0° to 70°; mechanical stop at 88°.
if one or both potentiometers fail, the whole accelerator pedal must be replaced because it cannot be dismantled.
PRESSURE PUMP
Specifications
Type
The pump is radialjet type with three radial pistons (total cylinder capacity 0.657 cm³) and is driven by a toothed belt without the need to adjust timing.
Structure
Each pumping unit consists of:
- a piston (5) operated by a cam (2) integral with the pump shaft (6);
- a plate-type intake valve (3)
- a ball delivery valve (4).
Because the pressure pump must be fed at a pressure of at least 0.5 bars, the fuel system is equipped with an auxiliary fuel pump submerged in the tank.
The maximum delivery pressure reaches 1350 bars. The pressure pump is lubricated and cooled by the fuel via special channels.
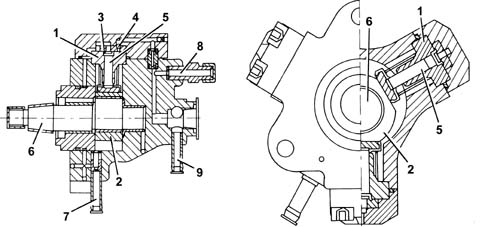
- 1 Cylinder
- 2 Cam
- 3 Plate-type intake valve
- 4 Ball delivery valve
- 5 Piston
- 6 Pump shaft
- 7 Inlet - low pressure (from the fuel filter)
- 8 Delivery - high pressure (to single fuel manifold)
- 9 Delivery - low pressure (to fuel return manifold)
PRESSURE REGULATOR
SPECIFICATIONS
Structure
This is fitted on the pressure pump and controlled by the Engine Control Node. It adjusts fuel feed pressure to the injectors.
The pressure regulator consists mainly of the following components:
- spherical plunger (1)
- pin (2) controlling valve (3)
- preload spring (4)
- coil (5).
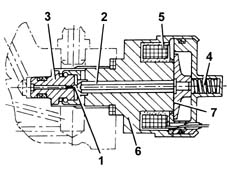
- 1 Spherical plunger
- 2 Pin
- 3 Valve
- 4 Preload spring
- 5 Coil
- 6 Case
- 7 Anchor
INJECTORS
Specifications
Structure
The injectors are fitted on the cylinder head and controlled by the Engine Control Node.
The injector may be divided into two sections:
- actuator/nebuliser consisting of pressure rod (1), pin (2) and nozzle (3)
- control solenoid consisting of coil (4) and pilot valve (5).
Operation
General remarks
Injector operation is divided into three stages:
- rest position. coil (4) is deactivated and plunger (6) is in closed position to prevent fuel from being introduced into the cylinder Fc %gt Fa (Fc: due to line pressure acting on control area 7 of rod 1; Fa: due to line pressure acting on feed volume 8).
- injection start. Coil (4) is excited and causes plunger (6) to rise. Control volume fuel (9) flows out towards return manifold (10) to bring about a pressure drop on control area (7). Simultaneously, line pressure flowing through intake duct (12) exercises a force Fa %gt Fc in supply volume (8) to cause pin (2) to lift and allow fuel into the cylinders.
- injection end. Coil (4) is deactivated and causes plunger (6) to return to closed position. This rebalances the forces so that pin (2) returns to closed position and thus ends the injection.
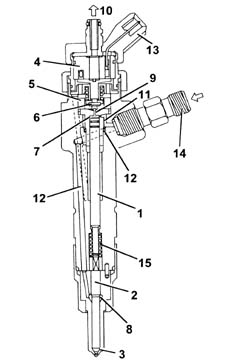
- 1 Pressure rod
- 2 Pin
- 3 Nozzle
- 4 Coil
- 5 Pilot valve
- 6 Ball plunger
- 7 Control area
- 8 Feed volume
- 9 Control volume
- 10 Fuel return - low pressure
- 11 Control duct
- 12 Feed duct
- 13 Electrical connection
- 14 Fuel return connector - high pressure
- 15 Spring
SINGLE FUEL MANIFOLD PIPE
Specifications
Structure
The single fuel manifold (rail) is fited to the intake side of the cylinder head.
With a volume of 33 cm³, this damps fuel pressure fluctuations due to:
- pressure pump operation
- injector opening.
Fuel pressure sensor [DF_1060G] is fitted in the centre of the delivery manifold.
The hydraulic connections (high pressure) between manifold-pump and manifold-injecors are via steel pipes with a bore of 2 mm and external diameter of 6 mm.
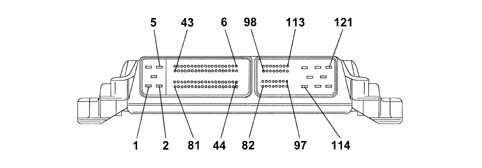
ENGINE MANAGEMENT NODE (COMMON RAIL EDC-15C7 - 2.2)
Specifications
This is fitted on the left front side beneath the wheelarch. The Engine Control Node is 'flash e.p.r.o.m.' type, i.e. it can be reprogrammed externally without altering the hardware.
The Engine Control Node contains a built-in absolute pressure sensor.
Pin out
- 1. Earth
- 2. Earth
- 3. Earth
- 4. Actuator power supply
- 5. Injector/ECU power supply
- 6. Not connected
- 7. Not connected
- 8. +30 Power supply
- 9. CAN L
- 10. CAN H
- 11. Not connected
- 12. Not connected
- 13. Pin 85 injection relay
- 14. EGR cooler relay
- 15. Borg-Warner valve actuator
- 16. EGR actuator
- 17. Wastegate actuator
- 18. Pin 85 air conditioner relay
- 19. Pin 85 2nd fan speed activation
- 20. Pin 85 1st fan speed activation
- 21. Pin 85 supplementary heater relay
- 22. Spark plug activation
- 23. Not connected
- 24. Pin 85 fuel pump relay
- 25. Not connected
- 26. Not connected
- 27. Not connected
- 28. CAN L
- 29. CAN H
- 30. Not connected
- 31. Not connected
- 32. Not connected
- 33. Not connected
- 34. Not connected
- 35. Not connected
- 36. Not connected
- 37. Not connected
- 38. Not connected
- 39. Not connected
- 40. Not connected
- 41. Not connected
- 42. Not connected
- 43. Not connected
- 44. Digital input 1
- 45. Not connected
- 46. Not connected
- 47. Engine rpm output signal
- 48. K line
- 49. Vehicle speed input
- 50. Digital input 2
- 51. Quadrinary on
- 52. Trinary on
- 53. Not connected
- 54. Not connected
- 55. Not connected
- 56. Not connected
- 57. Not connected
- 58. Key sense
- 59. Brake pedal switch
- 60. Air conditioner activation request
- 61. Clutch pedal switch
- 62. Spark plug diagnostics
- 63. Not connected
- 64. Not connected
- 65. Not connected
- 66. Not connected
- 67. Not connected
- 68. Analogue sensor 5
- 69. Analogue sensor 5
- 70. Analogue sensor 3
- 71. Analogue sensor 3
- 72. Not connected
- 73. Not connected
- 74. Analogue sensor 1
- 75. Analogue sensor 1
- 76. Accelerator pedal earth 1
- 77. Accelerator pedal signal 1
- 78. Accelerator pedal power supply 1
- 79. Accelerator pedal earth 2
- 80. Accelerator pedal signal 2
- 81. Accelerator pedal power supply 2
- 82. Fuel temperature sensor - pin 1
- 83. Fuel temperature sensor - pin 2
- 84. Coolant temperature sensor - pin 1
- 85. Coolant temperature sensor - pin 2
- 86. Air flow meter - pin 1
- 87. Not connected
- 88. Air flow meter - pin 3
- 89. Air flow meter - pin 5
- 90. Fuel pressure sensor - pin 3
- 91. Fuel pressure sensor - pin 2
- 92. Fuel pressure sensor - pin 1
- 93. Turbocharging pressure sensor - pin 1
- 94. Turbocharging pressure sensor - pin 3
- 95. Turbocharging pressure sensor - pin 2
- 96. Not connected
- 97. Air flow meter - pin 4
- 98. Engine oil pressure switch
- 99. RPM sensor - pin 1
- 100. RPM sensor - pin 2
- 101. RPM sensor - pin 3
- 102. Timing sensor - pin 1
- 103. Timing sensor - pin 2
- 104. Timing sensor - pin 3
- 105. Feedback position swirl
- 106. Sensor power supply output
- 107. Variable swirl position
- 108. Diesel pressure regulator
- 109. Diesel pressure regulator
- 110. Variable swirl position
- 111. Element shut off valve
- 112. Not connected
- 113. Not connected
- 114. Cylinder 4 injector control
- 116. Not connected
- 117. Cylinder 1-2 injector shared
- 118. Cylinder 3-4 injector shared
- 119. Cylinder 1 injector control
- 120. Cylinder 2 injector control
- 121. Cylinder 3 injector control
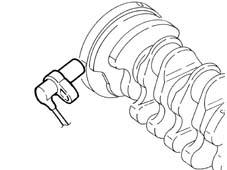
RPM SENSOR
Specifications
Type
This is fitted on the crankcase and faces the phonic wheel postioned on the crankshaft.
It is inductive type, i.e. its operation is determined by magnetic field changes generated by the teeth passing in front of the phonic wheel (60-2 teeth).
The Engine Control Node uses the rpm sensor signal to:
- determine speed of rotation
- determine angular crankshaft position.
Operation
General remarks
The changeover from full to empty determined by the presence or absence of a gap brings about a magnetic flux change sufficient to generate an induced alternating voltage proportional to the number of teeth on the ring (or phonic wheel).
The frequency and amplitude of the voltage directed to the Engine Control Node supplies the node with an engine angular speed measurement.
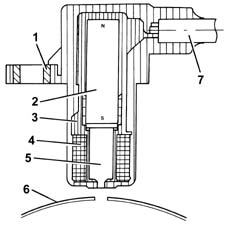
- 1 Brass bush
- 2 Permanent magnet
- 3 Plastic sensor casing
- 4 Coil reel
- 5 Polar core
- 6 Ring gear or flywheel
- 7 Coaxial paired cable or electrical connection.
The recommended distance (gap) between the end of the sensor and the flywheel for obtaining correct signals should be 0.8 - 1.5 mm
This distance is not adjustable. If the gap is found to be outside the tolerance limits, check the condition of the sensor and phonic wheel.
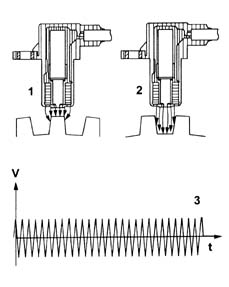
- 1 Maximum magnetic flow
- 2 Minimum magnetic flow
- 3 Induced alternating voltage plot
CAM ANGLE SENSOR
Specifications
Type
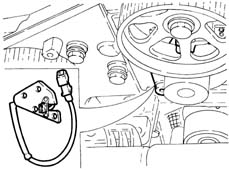
This Hall effect sensor is fitted to the cylinder head and faces the camshaft drive pulley.
A slot on the pulley allows the timing sensor to indicate engine timing position.
The Engine Control Node uses the timing sensor signal to identify T.D.C. at the end of compression.
Operation
General remarks
A current-carrying semiconductor layer immersed in a normal magnetic field (force lines at right angles to current direction) generates a potential difference known as a Hall voltage at its terminals.
If current intensity remains constant, the generated voltage depends on magnetic field intensity alone. Periodic changes in magnetic field intensity are sufficient to generate a modulated electrical signal with frequency proportional to the speed of magnetic field change.
This change is achieved by making a magnetic ring (internal part of pulley) with an opening pass the sensor.
As it moves, the metal part of the ring covers the sensor to block the magnetic field and thus generate a low ouput signal. Conversely, the sensor generates a high signal when the opening is over the sensor and a magnetic field is present.
Together with the rpm and TDC signal, this signal allows the Engine Control Node to identify the cylinders and determine injection point.
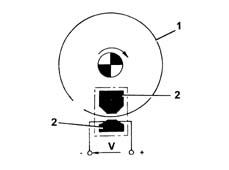
- 1 Pulley ring
- 2 Magnetic material
EXCESS PRESSURE SENSOR
Specifications
This is fitted in the centre of the intake chamber and sends the Engine Control Node information to enable it to:
- modulate injection pressure
- regulate fuel injection duration.
Pin out
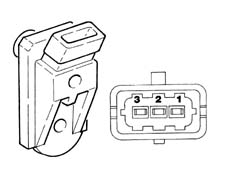
- 1 5V(from ECU)
- 2 Earth
- 3 Output signal
ENGINE COOLANT TEMPERATURE SENSOR
Specifications
Type
This is fitted to the thermostat cup and detects coolant temperature by means of a dual NTC thermistor with negative resistance coefficient.
the NTC thermistor sends a signal to the Engine Control Node, which sends a signal to the injector and instrument panel warning light.
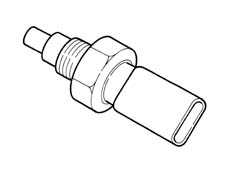
The sensor is designed using semiconductor technology. In other words, the resistance level drops if sensor element temperature increases with increasing coolant temperature.
Because the resistance does not change in linear fashion as temperature increases, it is relatively higher at low temperatures than at high temperatures.
AIR FLOW METER WITH BUILT IN AIR TEMPERATURE SENSOR
Specifications
Type
The debimeter is located on the air intake sleeve and is hot film type.
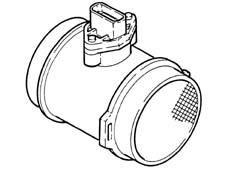
The intake air temperature sensor is built into the debimeter.
The air flow meter cannot be disassembled.
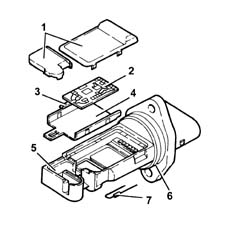
- 1 Covers
- 2 Electronic card
- 3 Sensor
- 4 Support plate
- 5 Support
- 6 O - Ring seal
- 7 Temperature sensor
Operation
The principle of operation is based on a heated membrane positioned within a measurement channel that carries air into the engine.
The hot film membrane is maintained at constant temperature (about 120°C higher than the incoming air temperature) by the heating coil.
The air mass that flows through the measurement channel tends to remove heat from the membrane. Current must therefore flow through the coil to maintain the membrane at a constant temperature.
This current is measured by a special Wheatstone bridge.
The current is therefore proportional to the flowing air mass.
The flowmeter measures the air mass directly (not the volume) to eliminate problems of temperature, altitude, pressure etc.
FUEL TEMPERATURE SENSOR
Specifications
Type
This is fitted to the return manifold and detects fuel temperature by means of a dual NTC thermistor with negative resistance coefficient.
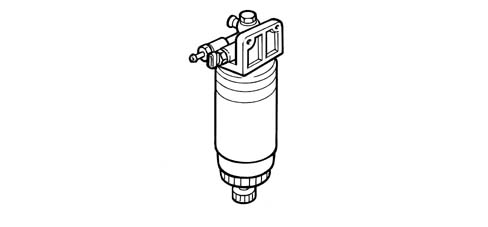
The sensor is designed using semiconductor technology. In other words, the resistance level drops if sensor element temperature increases with increasing fuel emperature.
Because the resistance does not change in linear fashion as temperature increases, it is relatively higher at low temperatures than at high temperatures.
FUEL PRESSURE SENSOR
Specifications
Type
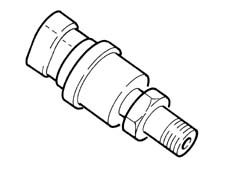
This is fitted in the centre of the single fuel manifold rail and its function is to provide the Engine Control Node with a feed back signal to enable it to:
- modulate injection pressure
- regulate fuel injection duration.
ACCELERATOR PEDAL POTENTIOMETER
Specifications
Type
The accelerator pedal is equipped with two built-in potentiometers:
- a main potentiometer
- a safety potentiometer.
The Engine Control Node implements the following recovery strategies.
- if one of the two potentiometers fails, this allows the throttle to be opened to a maximum of 40° over a long time period;
- if both potentiometers fail completely, it prevents throttle opening.
Operation
General remarks
The sensor consists of a case secured to the pedal unit by bolts. The case contains an axially-located shaft connected to two potetiometers.
A coil spring on the shaft ensures the correct amount of resistance to pressure while a second spring ensures return following release.
Operating field from 0° to 70°; mechanical stop at 88°.
if one or both potentiometers fail, the whole accelerator pedal must be replaced because it cannot be dismantled.
Parts & tools for this job Staging For 2002 Lancia Thesis
- PARTGlow plugsSearch: Lancia Thesis 2002 glow plugs
- TOOLGlow plug socketSearch: glow plug socket
- TOOLDiesel compression testerSearch: diesel compression tester
Links open Amazon search results in a new tab. As an Amazon Associate I earn from qualifying purchases.