
Vacuum pipe for brake servo - r+r
- Make
- Lancia
- Model
- Thesis Factory Service Manual
- Year
- 2002–2009
- Section
- Hydraulic braking system › Vacuum pipe for brake servo - r+r
Vacuum pipe for brake servo - r+r
Removing
1. Undo the fixing bolt (1a) and move the wiring holder bracket (1b) to the side.
2. Remove the one-way valve from the brake servo which is a press-fit.
3. Disconnect the vacuum pipe from the housing on the modular intake manifold, then remove the pipe.
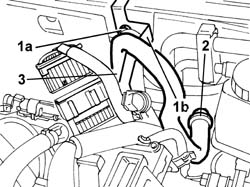
Refitting
- Fit the vacuum pipe in the housing on the modular intake manifold and secure it using the band.
- Connect the one-way valve (which is a press-fit) to the brake servo.
- Position the wiring holder bracket and tighten the fixing bolt.
Removing
See in Op. 1016A10 SOUND-PROOFING COVER - R.R.
See in Op. 3330D20 one-way valve for brake servo - r+r
1. Disconnect the vacuum intake pipe from the pipe connected to the vacuum reservoir.
2. Disconnect the vacuum intake pipe from the vacuum unit.
3. Remove the pipe from the engine compartment.
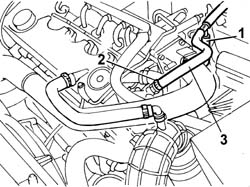
Refitting
- Fit the vacuum pipe connected to the vacuum unit.
- Connect the vacuum intake pipe to the pipe connected to the vacuum reservoir.
See in Op. 3330D20 one-way valve for brake servo - r+r
See in Op. 1016A10 SOUND-PROOFING COVER - R.R.
Removing
- Open the bonnet
1. Open the band (1a) fastening the pipe (1c) to the intake chamber (1b) and disconnect the pipe.
2. Release the brake servo vacuum pipe from the vaccum increase valve and remove it.
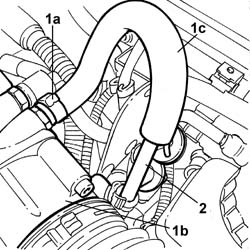
Refitting
- Fit the pipe on the vacuum increase valve making sure that it is correctly fitted.
- Fit the pipe on the intake chamber and close the retaining band.
- Close the bonnet
Removing
See in Op. 7040D50 ENGINE COMPARTMENT UPPER SOUND INSULATION SHIELD - R.R.
See in Op. 1016A10 SOUND-PROOFING COVER - R.R.
See in Op. 1048B44 RIGID air supply PIPE from heat exchanger to intake manifold - R.R.
See in Op. 3330D20 one-way valve for brake servo - r+r
1. Disconnect the vacuum intake pipe from the vacuum unit (1a) and the vacuum intake pipe from the pipe (1b) connected to the vacuum reservoir.
2. Remove the pipe from the engine compartment.
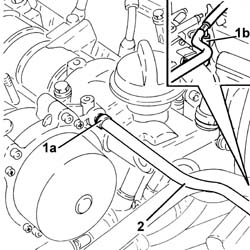
Refitting
- Fit the vacuum pipe connected to the vacuum unit.
- Connect the vacuum intake pipe to the pipe connected to the vacuum reservoir.
See in Op. 3330D20 one-way valve for brake servo - r+r
See in Op. 1048B44 RIGID air supply PIPE from heat exchanger to intake manifold - R.R.
See in Op. 1016A10 SOUND-PROOFING COVER - R.R.
See in Op. 7040D50 ENGINE COMPARTMENT UPPER SOUND INSULATION SHIELD - R.R.
Parts & tools for this job Staging For 2002 Lancia Thesis
- PARTBrake padsSearch: Lancia Thesis 2002 brake pads
- TOOLBrake bleeder kitSearch: one man brake bleeder kit
- FLUIDBrake fluidSearch: brake fluid
Links open Amazon search results in a new tab. As an Amazon Associate I earn from qualifying purchases.